Summary Of The RHELv9 Book Ref:124 (Theoritical Based)
LAB Creation: RHCSA & RHCE
Generally the reference book of Redhat, There is mention of a few lab machines for practicing LAB. But if you have no Linux Cloud LAB machines, this task is only for you. For ready Virtual Machines on your local Computer Just follow the below requirements-
Install the VMWare Workstation, Virtual Box, etc
Download the ISO file of Redhat
Create the Virtual Machines as your required
Configuring the Minimum Features and Services in every machine
Take a Snapshot of Machines for restoring as per your variety of tasks.
Procedures:
Step 01: Primarily Install the OS of Linux and Set the IP address in your Network.
Step 02: Create 3 Machines as Hostname (as your requirement) workstation.lab.example.com, servera.lab.example.com & serverb.lab.example.com respectively.
Step 03: Create a Local/Server repository Manually. Note that If your machine has no subscription, it will not get updated packages and will not create a repository automatically.
Step 04: Install the SSH configuration.
Step 05: Configure and Include all of the hostnames into the Hosts file of both of the local machines. (working as DNS A record)
Step 06: Take a snapshot of every machine to restore it as required.
N:B: If necessary I will show how to add features.
Chapter 2. Access the Command Line
Chapter 03: Manage files from the command line
Files Hierarchy -


Absolute Paths
An absolute path is a fully qualified name that specifies the exact location of the file in the file-system hierarchy. The absolute path begins at the root (/) directory and includes each subdirectory that must be traversed to reach the specific file.
For Example, var/log/messages.
The Current Working Directory and Relative Paths
When the user is working in a specific directory of systems is called the current working directory and somehow needs to jump to the other file location directories this reversive process from the current working directories is called the relative paths.
Relative paths use two special symbols: a dot (.) and a double dot (..), which represent the current directory and the parent directory, respectively.
For example, if you are in the directory /home/user/documents and want to access a file in the directory /home/user/pictures, you can use the relative path ../pictures/file.jpg
Navigate Paths in the File System
The command is “pwd” for finding the present working directory. “ls” is the command for listing the contents (directories and files). “cd” is changing the directory. The prompt displays the tilde character (~) when your current working directory is your home directory.
“touch” command only for creating files, not input the contents into the file.

The most common options for “ls” command are -l (long listing format), -a (all files, including hidden files), and -R (recursive, to include the contents of all subdirectories).
At the top of the listing are two special directories. One dot (.) refers to the current directory, and two dots (..) refer to the parent directory.


The cd .. command uses the (..) hidden directory to move up one level to the parent directory, without needing to know the exact parent name. The other hidden directory (.) specifies the current directory on commands where the current location is either the source or destination argument, and avoids the need to type the directory's absolute path name.
Example: Which command changes the working directory to /tmp if the current working directory is /home/student?
Ans: cd../../tmp
Copy File One Working Directory to Current Directory -
Creation the .mp3, .jpg and .avi files using student user in the /home directory. Create another 3 directories in the same directory. Move the 3 types of files to the 3 separate directories.
Create another 3 files in /home directory and to enter the newly created directories and Copy the files from previous created directory to Current Directories accordingly. Be careful of the dot(.) last of the command.
cp ~/Music/song{1..3}.mp3 ~/Pictures/snap{1..3}.jpg ~/Videos/film{1..3}.avi .

Make Links Between Files -
You can create two types of links: a hard link, or a symbolic link (sometimes called a soft link).
The Hard link acts exactly like the original file name. After the link is created, you cannot tell the difference between the new hard link and the original name of the file.
Command is - ln, for creating hard link of specific files.

For checking the Hard link, ls -il ( i = inode number )

Even If, the Delete the original file of Hard link, link remain will be OK.

Limitations of Hard link - you can use hard links only if both files are on the same file systems. For Example, you can create a hard link between the /var/tmp/link1 and /home/user/file files, because they are both subdirectories of the / directory but not of any other directory on the list. However, you cannot create a hard link between the /boot/test/badlink and /home/user/file files.
The Soft Link (symbolic Link), The ln command -s option creates a symbolic link, which is also called a "soft link".
Symbolic links have some advantages over hard links: Symbolic links can link two files on different file systems & Symbolic links can point to a directory or special file, not just to a regular file. For example -

Match File Names with Shell Expansions

Brace Expansion
Brace expansions might be nested, one inside another. You can also use double-dot syntax (..), which expands to a sequence. For example, the {m..p} double-dot syntax inside braces expands to m n o p.

Tilde Expansion
The tilde character (~), matches the current user's home directory.

Variable Expansion
A variable acts like a named container that stores a value in memory. Backspace or extra space not allowed among of the Variable name, equal symbols and value.

Command Substitution
Command substitution enables the output of a command to replace the command itself on the command line. The $(command) form can nest multiple command expansions inside each other. An earlier form of command substitution uses backticks: `command`. For example, following below picture -

Protecting Arguments from Expansion
The backslash (\) is an escape character in the Bash shell. It protects the following character from expansion.

To protect longer character strings, you can use single quotation marks (') or double quotation marks (") to enclose strings. Double quotation marks suppress special characters other than the dollar sign ($), backslash (\), backtick (`), and exclamation point (!) from operating inside the quoted text.

Chapter 4. Get Help in Red Hat Enterprise Linux
Guided Exercise: Read Manual Pages
View the gedit man page. Command - man gedit
Read the su(1) man page. Command - man 1 su
Find the file location: whereis passwd, here passwd is file and whereis is command
The man page with detailed information about a ZIP archive: man -k zip
Use the command as a viewer in preview mode: evince -w /home/student/filename
A few Command are - lp, firefox,
Chapter 5. Create, View, and Edit Text Files


Redirect Output to a File


Examples of Command -
[user@host ~]$ date > /tmp/saved-timestamp
[user@host ~]$ tail -n 100 /var/log/secure > /tmp/last-100-log-secure
[user@host ~]$ cat step1.sh step2.log step3 step4 > /tmp/all-four-steps-in-one
[user@host ~]$ ls -a > my-file-names
[user@host ~]$ echo "new line of information" >> /tmp/many-lines-of-information
[user@host ~]$ find /etc -name passwd 2> /tmp/errors
[user@host ~]$ find /etc -name passwd > /tmp/output 2> /tmp/errors
[user@host ~]$ find /etc -name passwd > /tmp/output 2> /dev/null
[user@host ~]$ find /etc -name passwd &> /tmp/all-message-output
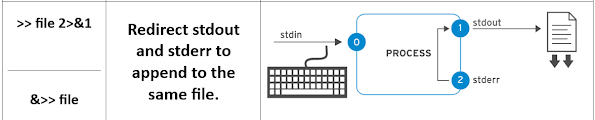
[user@host ~]$ find /etc -name passwd >> /tmp/all-message-output 2>&1
Construct Pipelines
A pipeline is a sequence of one or more commands that are separated by the vertical bar character (|). A pipeline connects the standard output of the first command to the standard input of the next command.
Example:
[user@host ~]$ ls -l /usr/bin | less
[user@host ~]$ ls | wc -l (First execute the ls command and secondly “wc -l” for calculation of the counting number of lines.)
Example of the Tee command of pipelines:
ls -l | tee /tmp/saved-output | less
ls -t | head -n 10 | tee /tmp/ten-last-changed-files
ls -l | tee -a /tmp/append-files
find / -name passwd 2>&1 | less
Vim Editor:
The Vim editor offers various modes of operation such as command mode, extended command mode, edit mode, and visual mode. Pressing the required keystroke accesses specific editing functions.
An “i” keystroke enters insert mode. Pressing Esc returns to command mode.
A “v” keystroke enters visual mode, where multiple characters might be selected for text manipulation. Use “Shift+V” for multiline and “Ctrl+V” for block selection.
:q! :wq :w (info: cat ~/.vimrc)

A few Commands, env (for environment), set | less , history, echo $PATH, echo, export PATH=${PATH}:/home/user/sbin,


Chapter 6. Manage Local Users and Groups
Some command- usermod, echo $PATH, echo $HOME, id, gid, pwd, useradd, userdel, passwd, groupadd, groupdel, groupmod
Modify Existing Users from the Command Line

Manage Local Group Accounts
Some relevant commands,
groupadd -g 30000 operators
groupadd admin
tail /etc/group
usermod -aG operators operator1
echo "%admin ALL=(ALL) ALL" >> /etc/sudoers.d/admin
Manage User Passwords
[root@host ~]# chage -m 0 -M 90 -W 7 -I 14 sysadmin05

Chage -l username (list the current configuration of this user)
Chage -E YYYY-MM-DD (will expire an account on a specific date)
Date -d “+45 days” (find the full date and time)
Some files in the linux,
/etc/login.defs
/etc/shadow
/etc/gshadow
/etc/passwd
/etc/group
Chapter 7. Control Access to Files
Some important command, chmod, chmod go-rw files.txt, chown, chgrp


Manage Default Permissions and File Acces
Some important command, umask,


Some files,
/etc/profile.d/local-umask.sh, ~/.bashrc, /etc/profile, /etc/bashrc,
Chapter 8. Monitor and Manage Linux Processes
How to generate the Process ID of Linux:
A process fork, to create a child process structure. Every new process is assigned a unique process ID (PID) for tracking and security purposes. The PID and the parent's process ID (PPID) are elements of the new process environment. Any process can create a child process

Normally, a parent process sleeps when the child process runs, and sets a wait request to be signaled when the child completes. After the child process exits, it closes or discards its resources and environment, and leaves a zombie resource.
Some of the command-
top, ps, ps aux, ps -aux, ps lax, ps -ef, jobs, fg %ID_Number, bg %id_number, ps j, bg, fg, ps jT, w, killall, kill, pkill, pgrep, pstree, ps -ef | grep tail
The following diagram and table describe Linux process states in detail.

Run Jobs in the Background
Example for some command,
sleep 10000 &
jobs
kill -l
ps aux | grep job
kill <processID>
kill -SIGTERM <processID>
pgrep -l -u bob (show the running process tasks in this user)
pkill -SIGKILL -u bob
w -u bob (here, bob is user)
pkill -t tty3
pkill -SIGKILL -t tty3
pstree -p bob
pkill -P <processID>
pkill -SIGKILL -P <processID>
killall control
kill -SIGSTOP %PID
w -f (administratively logout user)
Monitor and Manage Linux Processes
Some command:
uptime, top, w
lscpu
monitor &
chmod +x /home/student/bin/process101
grep "model name" /proc/cpuinfo | wc -l
Top => (shift+m) + press m + press t + (shift+p) (terminal will be showing the cpu process rate)
Shift+b => shift + w =>
Finally press jobs command
pkill -SIGSTOP process101 & 102
ps jT
pkill process101 & 102


Chapter 9. Control Services and Daemons
systemd unit is an abstract concept to define objects that the system knows how to manage.

Command Examples-
systemctl -t
systemctl list-units --type=service --all
systemctl list-units --type=socket --all
systemctl
systemctl list-unit-files --type=service
systemctl status <sshd.service> (start, stop, restart, reload, enable, disable)
systemctl is-active <sshd.service>
systemctl is-enabled <sshd.service>
systemctl is-failed <sshd.service>
systemctl status <chronyd> (service for NTP server)
systemctl status <cups.service> (printer service)
systemctl status <psacct)
systemctl status rsyslog
Some necessary Command are, systemd(1), systemd.unit(5), systemd.service(5), systemd.socket(5), and systemctl (stop, start, restart, reload, enable, and disable)
N:B: psacct is service using view the monitors user activity and resource consumption on a system.
Summary of systemctl Commands: -

For SSH Known_hosts Key Management - /etc/ssh/ssh_known_hosts, ~/.ssh/known_hosts, ~/.ssh/config, /etc/ssh/ssh_config
Some commands are: w –from (remote access from where to where), ssh-keygen, ssh-agent (managed locally), ssh-copy-id(1), and ssh-add(1)
The relevant command for Configuring the server SSH host key:
ssh-keygen -lf /etc/ssh/ssh_host_ecdsa_key.pub
cat ~/.ssh/known_hosts
ssh-keygen -R <remoteSystemName> -f ~/.ssh/known_hosts
rm <user_directory_path>.ssh/known_hosts
cat <user_directory_path>.ssh/known_hosts
Configure SSH Key-based Authentication:
Step01: SSH Keys Generation, ssh-keygen
Step02: A passphrase-protected private key is created with the public key, ssh-keygen -f .ssh/key-with-pass
[Example, the ssh-keygen command saved the key pair in the /home/user/.ssh/key-with-pass & /home/user/.ssh/key-with-pass.pub files.]
Step03: Share the Public Key, ssh-copy-id -i .ssh/key-with-pass.pub user@remotehost
[You can specify a specific public key with the ssh-copy-id command, or use the default ~/.ssh/id_rsa.pub file.]
N:B: After you place the public key, test the remote access, with the corresponding private key. If the configuration is correct, you access your account on the remote system without being asked for your account password. If you do not specify a private key file, then the ssh command uses the default ~/.ssh/id_rsa file if it exists.
Non-interactive Authentication with the Key Manager
eval $(ssh-agent)
ssh-add
ssh-add .ssh/key-with-pass
ssh user@remotehost
ssh -i .ssh/key-with-pass user@remotehost
Basic SSH Connection Troubleshooting
The ssh command provides three verbosity levels with the -v, -vv, and -vvv options.

OpenSSH and OpenSSL versions.
OpenSSH configuration files.
Connection to the remote host.
Trying to authenticate the user on the remote host.
Authentication methods that the remote host allows.
Trying to authenticate the user by using the SSH key.
Using the /home/user/.ssh/id_rsa key file to authenticate.
The remote hosts accepts the SSH key.

SSH Client Configuration

N:B: from the file, /etc/ssh/sshd_config. If we change the PermitRootLogin yes. It would be a risk for a system. We may change any settings in the above configuration file as required
Chapter 11. Manage Networking
TCP/IP Network Model:

Network interface names start with the type of interface:
Ethernet interfaces begin with en
WLAN interfaces begin with wl
WWAN interfaces begin with ww
Some Examples of IPv4 Addressing

Fig: IP Address Subnetting for Small Network

Fig: IP Address Subnetting for Medium Network

Fig: IPv4 Routing in a Network
IPv6 Addressing with Examples
The following list shows tips for writing consistently readable addresses:
Suppress leading zeros in a group.
Use a two-colon :: block to shorten the address as much as possible.
If an address contains two consecutive groups of zeros, which are equal in length, then shorten the leftmost groups of zeros to :: and the rightmost groups to :0: for each group.
Although it is allowed, do not use :: to shorten a single group of zeros. Use :0: instead, and save :: for consecutive groups of zeros.
Always use lowercase letters for a through f hexadecimal characters.

Some examples for command, package for ipv6 is - radvd
ip addr show dev eth0
ip -br addr show dev eth0
ping6 ipv6%eth0
ip link show
ip -s link show ens3
ping -c3 192.0.2.254
ip route
ip -6 route
tracepath access.redhat.com (traceroute)
Troubleshoot Port and Service Issues, ss -ta, ss -lt
(ss command replace netstat tool, packages is net-tools)
ifconfig (ifcfg)
Important configuration files are - /etc/hosts, /etc/resolv.conf(DNS resolver file), /etc/services

Configure Networking from the Command Line
Directories are, the old dir path is /etc/sysconfig/network-scripts/ and new dir path is /etc/NetworkManager/system-connections/
View Network Information
nmcli device status
nmcli device disconnect
nmcli connection modify
nmcli con show
nmcli con show --active
nmcli connection down/up
nmcli connection add <eth0> type <>
nmcli con add con-name eno3 type ethernet ifname eno3 \ ipv4.method manual ipv4.addresses 192.168.0.5/24 ipv4.gateway 192.168.0.254
nmcli con add con-name eno4 type ethernet ifname eno4 \
ipv6.addresses 2001:db8:0:1::c000:207/64 ipv6.gateway 2001:db8:0:1::1 \
ipv6.method manual ipv4.addresses 192.0.2.7/24 ipv4.gateway 192.0.2.1 \
ipv4.method manual
nmcli con mod static-ens3 ipv4.addresses 192.0.2.2/24 \
ipv4.gateway 192.0.2.254 connection.autoconnect yes
nmcli con mod static-ens3 +ipv4.dns 2.2.2.2
nmcli con reload
nmcli con reload eno2
nmcli con del static-ens3


Configure Hostnames and Name Resolution
Hostname
hostnamectl hostname host.example.com
hostnamectl status
cat /etc/hostname
DNS Configuration
cat /etc/hosts
cat /etc/resolv.conf (DNS Resolver/Recursive file; Nameserver: resolver IP address)
nmcli con mod ID ipv4.dns IP
nmcli con down ID
nmcli con up ID
cat /etc/NetworkManager/system-connections/ID
nmcli con mod ID +ipv4.dns IP
host servera.lab.example.com (Test DNS resolution)
dig servera.lab.example.com (Use the "dig HOSTNAME" command to test DNS server connectivity)
getent hosts servera.lab.example.com
Chapter 12. Install and Update Software Packages
Subscribe a System by Using the rhc Command:
rhc connect -a host_key -o 117018 (example)
rhc connect -u <_username_> -p <_password_>
rhc disconnect
Subscribe a System by Using the subscription-manager Command:
subscription-manager register --username <yourusername>
subscription-manager list --available
subscription-manager attach --auto
subscription-manager attach --pool=poolID
subscription-manager list --consumed
subscription-manager unregister
Entitlement Certificates:
The registered system stores the entitlement certificates under the /etc/pki directory.
/etc/pki/product certificates indicate installed Red Hat products.
/etc/pki/consumer certificates identify the Red Hat account for registration.
/etc/pki/entitlement certificates indicate which subscriptions are attached.
Software Packages and RPM
RPM package file names consist of four elements (plus the .rpm suffix): name-version-release.architecture:

Examine RPM Packages
rpm -qa : List all installed packages.
rpm -qf FILENAME : [rpm -qf /etc/yum.repos.d]
rpm -q : List the currently installed package version. [rpm -q dnf]
rpm -qi : Get detailed package information
rpm -ql : List the files that the package installs. [rpm -ql dnf]
rpm -qc : List only the configuration files that the package installs.[rpm -qc openssh-clients]
rpm -qd : List only the documentation files that the package installs[rpm -qd openssh-clients]
rpm -q --scripts : List the shell scripts that run before or after you install or remove the package.[rpm -q --scripts openssh-server]
rpm -q --changelog : List the change log information for the package.[rpm -q --changelog audit]
rpm -qlp : List the files that the local package installs[rpm -qlp podman-4.0.0-6.el9.x86_64.rpm]
Install RPM Packages
rpm -ivh podman-4.0.0-6.el9.x86_64.rpm
Extracting RPM packages
rpm2cpio httpd-2.4.51-7.el9_0.x86_64.rpm | cpio -idv [The rpm2cpio command converts an RPM package to a cpio archive and the cpio command can extract a list of files. -i options for standard input, -d options for subdirectory and -v for verbose output]
ls -l
rpm2cpio httpd-2.4.51-7.el9_0.x86_64.rpm | cpio -id "*/etc/httpd/conf/httpd.conf"
rpm2cpio httpd-2.4.51-7.el9_0.x86_64.rpm | cpio -tv [ -t options for list the files of rpm packages]
Manage Software Packages with DNF
DNF commands are functionally the same as YUM commands
ls -l /bin/ | grep yum | awk '{print $9 " " $10 " " $11}'
dnf list 'http*' [find the packages]
dnf search all 'web server'[nmap]
dnf info httpd
dnf provides /var/www/html [PATHNAME]
Install and Remove Software with DNF
dnf install httpd
dnf update
dnf list kernel
dnf remove httpd [yum grouplist]
dnf group list [yum group list]
dnf group info "RPM Development Tools" [yum group mark install GROUPNAME]
dnf group install "RPM Development Tools" [yum group install]
tail -5 /var/log/dnf.rpm.log
dnf history
dnf history undo 6
N:B: You can define default module streams with configuration files in the /etc/dnf/modules.defaults.d/ directory.


Enable DNF Software Repositories
dnf repolist all
dnf config-manager --enable rhel-9-server-debug-rpms
dnf config-manager \
--add-repo="https://dl.fedoraproject.org/pub/epel/9/Everything/x86_64/"
cd /etc/yum.repos.d
cat \
dl.fedoraproject.org_pub_epel_9_Everything_x86_64_.repo
RPM Configuration Packages for Local Repositories
rpm --import \
https://dl.fedoraproject.org/pub/epel/RPM-GPG-KEY-EPEL-9
dnf install \
https://dl.fedoraproject.org/pub/epel/epel-release-latest-9.noarch.rpm
cat /etc/yum.repos.d/epel.repo
Example:
dnf config-manager \
--add-repo "http://content.example.com/rhel9.3/x86_64/rhcsa-practice/rht"
ls /etc/yum.repos.d
cat /etc/yum.repos.d/content.example.com_rhel9.3_x86_64_rhcsa-practice_rht.repo
vim /etc/yum.repos.d/errata.repo
dnf repolist all
dnf config-manager --disable rht-updates
dnf list rht-system
dnf config-manager --enable rht-updates
dnf update
dnf list rht-system
Chapter 13. Access Linux File Systems
File Systems, Storage, and Block Devices
The /dev directory stores block device files, which RHEL creates automatically for all devices. In RHEL 9, the first detected SATA, SAS, SCSI, or USB hard drive is called the /dev/sda device; the second is the /dev/sdb device; and so on. Another Paravirtualized storage devices are the first partition /dev/vda1 disk. The second partition is the /dev/vdb2 disk, and so on. Follow the below table.

LVM stands for Logical Volume Management
LVM is a disk management system that allows you to create, resize, and manage disk partitions in a more flexible way compared to traditional partitioning methods. It abstracts the physical storage into logical volumes, providing a more dynamic environment for managing disk space.
Important commands are- df, df -h, df -H, du /usr/share, du -h /home, lsblk, lsblk -fp, lsof, mount, umount
Key Components of LVM:
Physical Volumes (PVs):
Physical storage devices or partitions that are initialized for use with LVM.
Created using the pvcreate command.
Example: /dev/sda1, /dev/sdb1.
Volume Groups (VGs):
A collection of physical volumes pooled together.
Acts as a single storage resource for creating logical volumes.
Created using the vgcreate command.
Example: A VG named my_vg could contain /dev/sda1 and /dev/sdb1.
Logical Volumes (LVs):
Units of storage created from a volume group.
Logical volumes can be resized dynamically.
Created using the lvcreate command.
Example: /dev/my_vg/my_lv.
LVM Operations:
Create an LVM:
Initialize physical volumes: pvcreate /dev/sda1
Create a volume group: vgcreate my_vg /dev/sda1
Create a logical volume: lvcreate -L 10G -n my_lv my_vg
Extend an LV:
Add space to an LV: lvextend -L +5G /dev/my_vg/my_lv
Resize the filesystem: resize2fs /dev/my_vg/my_lv
Reduce an LV:
Shrink the filesystem first: resize2fs /dev/my_vg/my_lv 5G
Reduce the LV: lvreduce -L 5G /dev/my_vg/my_lv
Remove an LVM:
Remove the logical volume: lvremove /dev/my_vg/my_lv
Remove the volume group: vgremove my_vg
Remove the physical volume: pvremove /dev/sda1
Calculation in LVM
Example Scenario:
Physical volumes: /dev/sda1 (20 GB), /dev/sdb1 (30 GB)
Volume group (VG): my_vg (total size = 50 GB)
Logical volumes:
lv_home (20 GB)
lv_root (25 GB)
Steps to Calculate Free Space:
Total VG Size:
VG Size = Sum of PVs = 20 GB + 30 GB = 50 GB
Allocated Space:
Allocated space = Sum of LVs = 20 GB (lv_home) + 25 GB (lv_root) = 45 GB
Free Space in VG: Free space = VG Size - Allocated Space = 50 GB - 45 GB = 5 GB
Extending LVM: If you need to extend lv_home by 5 GB:
Extend LV: lvextend -L +5G /dev/my_vg/lv_home
Resize filesystem: resize2fs /dev/my_vg/lv_home
This flexibility of resizing, moving, and managing logical volumes dynamically makes LVM a powerful tool for storage management in Linux.
Mount and Unmount File Systems
mkdir /mnt/part1
lsblk -fp /dev/vdb
lsblk -fp /dev/vdb
Locate Files on the System
updatedb
locate passwd
locate image
locate -i messages ( i is a case-insensitive search)
locate -n 5 passwd
find / -name sshd_config (searching in real time in the file-system hierarchy)
find / -name '*.txt'
find /etc -name '*pass*'
find / -iname '*messages*'
find -user developer
find -uid 1000
find -gid 1000
find / -user root -group mail
find /home -perm 764 -ls
find /home -perm -324
find /home -perm -u=wx,g=w,o=r
find -size +10G
find / -mmin +200
find /etc -type d (Search for all directories in the /etc directory:)
find / -type l (Search for all soft links in the / directory:)
find /dev -type b (Search for all block devices in the /dev directory:)
find / -type f -links +1 (Search for all regular files with more than one hard link:)
Lab: Access Linux File Systems
Generate a disk usage report for the /usr/share directory. Save the result in the /mnt/freespace/results.txt file.
du /usr/share > /mnt/freespace/results.txt
Update the locate database.: updatedb
Use the locate command to find all the files that match the rsyslog.conf keyword, and save the result in the /mnt/freespace/search1.txt file.
locate rsyslog.conf > /mnt/freespace/search1.txt
Store in the /mnt/freespace/search2.txt file the search result of all files in the /usr/share directory that are greater than 50 MB and less than 100 MB
find /usr/share -size +50M -size -100M > \
/mnt/freespace/search2.txt
Chapter 14. Analyze Servers and Get Support
Commands are, cockpit(1), cockpit-ws(8), and cockpit.conf(5), sosreport(1) man page
Enable the Web Console
dnf install cockpit
systemctl enable --now cockpit.socket
firewall-cmd --add-service=cockpit --permanent
firewall-cmd --reload
Open https://servername:9090 in your web browse.
Generate an sos Report from the Command Line:
dnf install sos
sos report
ls -l /var/tmp/
Detect and Resolve Issues with Red Hat Insights:
- rhc connect -a host_key -o 117018
- insights-client --register
- insights-client
- redhat-support-tool


