Summary Book of RHEL134v9
Chapter 01: Improve Command-line Productivity
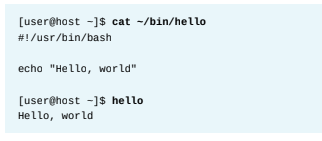
Specify the Command Interpreter:
#!/usr/bin/bash
Here, #! notation is commonly referred to as she-bang or hash-bang, from the names of those two characters, sharp or hash and bang.
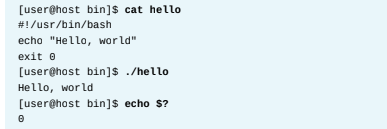
Execute a Bash Shell Script:
For running the shell script shell's need PATH environmental variable,
If a script is not in a PATH directory, then run the script by using its absolute path name, which command for finding the absolute path name
Alternatively, run a script in your current working directory by using the .directory prefix, such as ./scriptname.
For example, which hello, echo $PATH
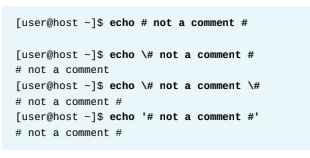
Quote Special Characters
The Special Characters are / backslash, ‘single qoute’ and “double quote”
For Example, shows the backslash character (\) modifying the hash character so it is not
interpreted as a comment:
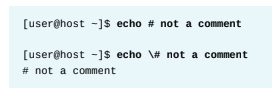
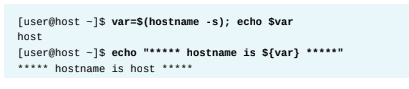
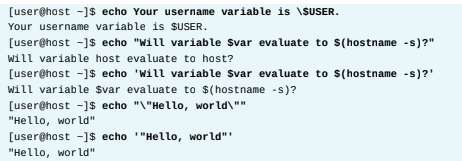
Use double quotation marks to suppress globbing (file name pattern matching) and shell expansion, but still allow command and variable substitution.
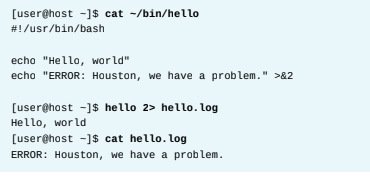
Provide Output from a Shell Script
The echo command displays the "Hello, world" message to STDOUT
When you display error messages, good programming practice is to redirect error messages to STDERR
Write Simple Bash Scripts
[student@servera ~]$ vim firstscript.sh
#!/usr/bin/bash
echo "This is my first bash script" > ~/output.txt
echo "" >> ~/output.txt
echo "#####################################################" >> ~/output.txt
[student@servera ~]$ bash firstscript.sh
[student@servera ~]$ cat output.txt (output)
This is my first bash script
#####################################################
[student@servera ~]$ vim firstscript.sh (add more commands on scripts)
#!/usr/bin/bash
#
echo "This is my first bash script" > ~/output.txt
echo "" >> ~/output.txt
echo "#####################################################" >> ~/output.txt
echo "LIST BLOCK DEVICES" >> ~/output.txt
echo "" >> ~/output.txt
lsblk >> ~/output.txt
echo "" >> ~/output.txt
echo "#####################################################" >> ~/output.txt
echo "FILESYSTEM FREE SPACE STATUS" >> ~/output.txt
echo "" >> ~/output.txt
df -h >> ~/output.txt
echo "#####################################################" >> ~/output.txt
[student@servera ~]$ chmod a+x firstscript.sh
[student@servera ~]$ ./firstscript.sh
[student@servera ~]$ cat output.txt (output)
This is my first bash script
#####################################################
LIST BLOCK DEVICES
NAME MAJ:MIN RM SIZE RO TYPE MOUNTPOINTS
sr0 11:0 1 558K 0 rom
vda 252:0 0 10G 0 disk
├─vda1 252:1 0 1M 0 part
├─vda2 252:2 0 200M 0 part /boot/efi
├─vda3 252:3 0 500M 0 part /boot
[student@servera ~]$ rm firstscript.sh output.txt
Finish
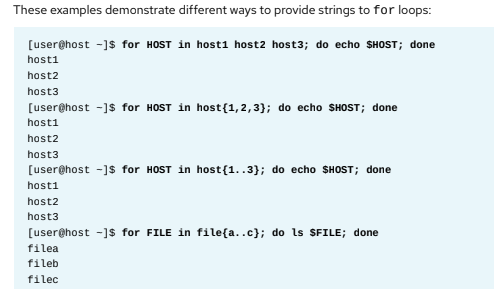
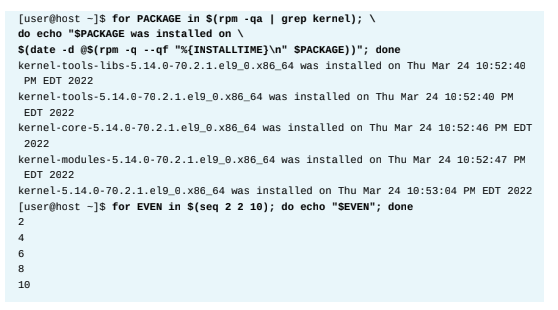
Loops and Conditional Constructs in Scripts
Bash Script Exit Codes
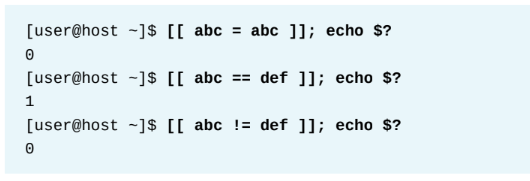
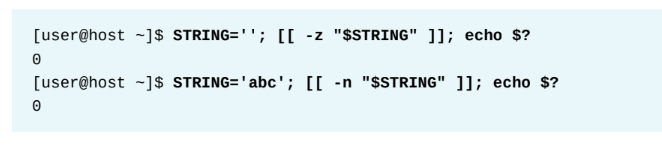
Test Logic for Strings and Directories, and to Compare Values
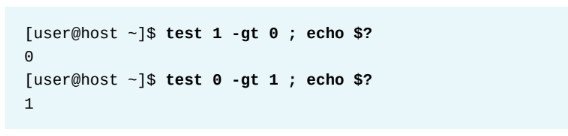
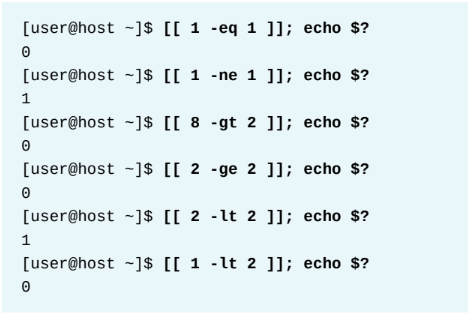
Note here, greater than (gt), greater than or equal to (ge), less than (lt), less than or equal to (le), or equal (eq) to another number.
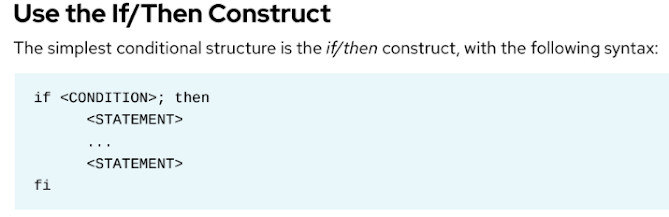
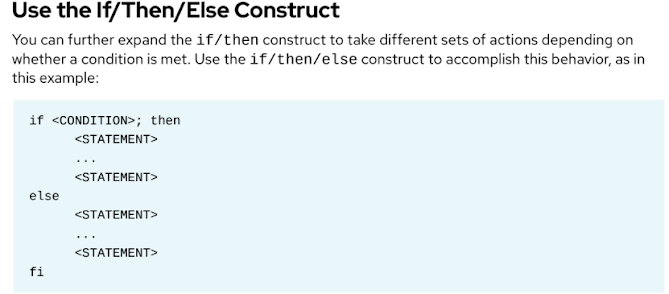
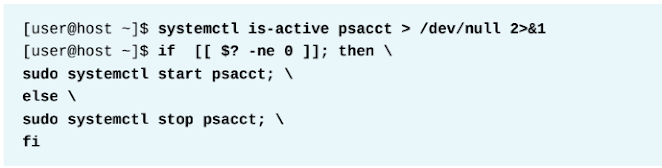
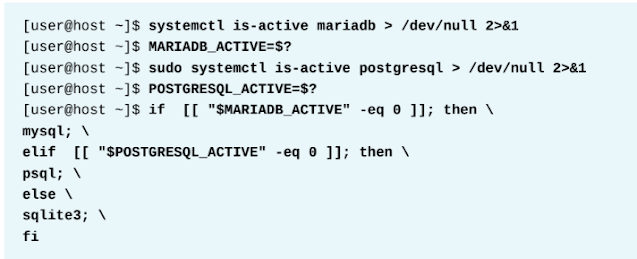
Conditional Structures


Loops and Conditional Constructs in Scripts
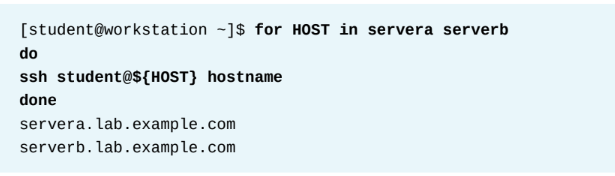
Create a for loop to execute the hostname command on the servera and serverb machines.
Create a shell script in the /home/student/bin directory to execute the same for loop. Ensure that the script is included in the PATH environment variable.
Create the /home/student/bin directory to store the shell script, if the directory does not exist. Ex: [student@workstation ~]$ mkdir ~/bin
Verify that the bin subdirectory of your home directory is in your PATH environment variable. Ex: [student@workstation ~]$ echo $PATH
Create a shell script called printhostname.sh in the /home/student/bin
directory to perform the for loop, and add the following content in the file. [student@workstation ~]$ vim ~/bin/printhostname.sh
#!/usr/bin/bash
#Execute for loop to print server hostname.
for HOST in servera serverb
do
ssh student@${HOST} hostname
done
exit 0
[student@workstation ~]$ chmod +x ~/bin/printhostname.sh
Run the script from your home directory. Ex: [student@workstation ~]$ printhostname.sh
Verify that the exit code of your script is 0: [student@workstation ~]$ echo $?
Match Text in Command Output with Regular Expressions
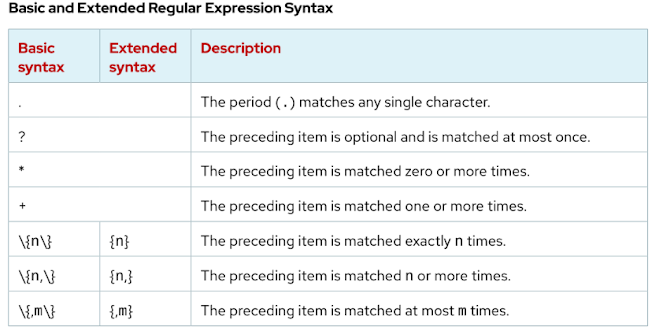
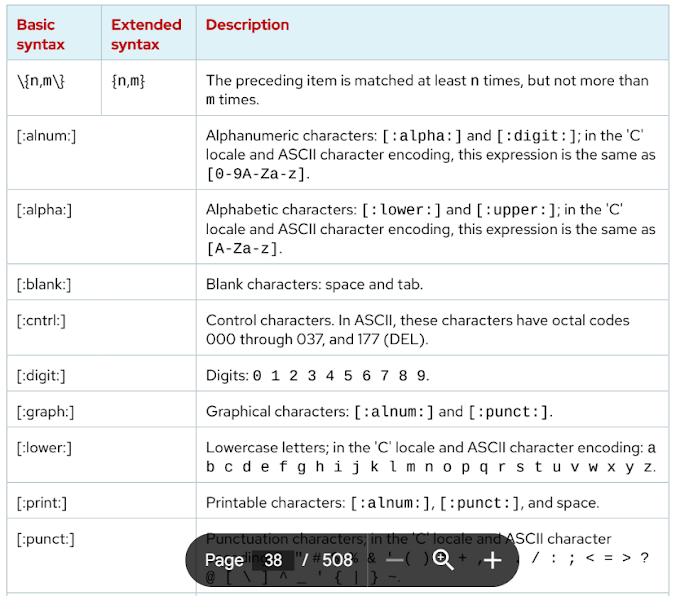
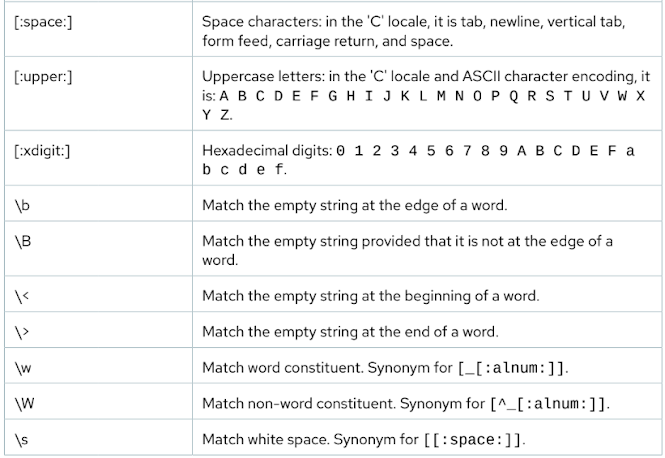
To match only at the beginning of a line, use the caret character (^). To match only at the end of a line, use the dollar sign ($) and use a dot character (.) as a wildcard
The two types of regular expressions are basic regular expressions and extended regular expressions. One difference between basic and extended regular expressions is in the behavior of the |, +, ?, (,), {, and } special characters. Other minor differences apply to how the ^, $, and * characters are handled. In Basic regular Expression prefixed with a backslash \ character and In extend regular expression unless they are prefixed with a backslash \ character.

Demo Command Examples,
[user@host ~]$ grep '^computer' /usr/share/dict/words
[root@host ~]# ps aux | grep chrony
[user@host ~]$ grep -v -i server /etc/hosts
[user@host ~]$ grep -v '^[#;]' \ /etc/systemd/system/multi-user.target.wants/rsyslog.service
[root@servera ~]# rpm -q --scripts postfix | grep -e 'user' -e 'group'
[root@servera ~]# grep 'postfix' /var/log/maillog | head -n 2
[root@servera ~]# grep -i 'queue' /etc/postfix/main.cf
[root@servera ~]# less /var/log/messages
[root@servera ~]# ps aux | grep postfix
[root@servera ~]# grep -e qmgr -e pickup -e cleanup /etc/postfix/master.cf
Script Creation Procedure:
[student@workstation ~]$ mkdir -p /home/student/bin
[student@workstation ~]$ vim ~/bin/bash-lab
#!/usr/bin/bash
[student@workstation ~]$ chmod a+x ~/bin/bash-lab
#!/usr/bin/bash
USR='student'
OUT='/home/student/output'
#
for SRV in servera serverb; do
ssh ${USR}@${SRV} "hostname -f" > ${OUT}-${SRV}
echo "#####" >> ${OUT}-${SRV}
ssh ${USR}@${SRV} "lscpu | grep '^CPU'" >> ${OUT}-${SRV}
echo "#####" >> ${OUT}-${SRV}
ssh ${USR}@${SRV} "grep -v '^$' /etc/selinux/config|grep -v '^#'" >> ${OUT}-
${SRV}
echo "#####" >> ${OUT}-${SRV}
ssh ${USR}@${SRV} "sudo grep 'Failed password' /var/log/secure" >> ${OUT}-${SRV}
echo "#####" >> ${OUT}-${SRV}
done
[student@workstation ~]$ bash-lab
[student@workstation ~]$ cat /home/student/output-servera
[student@workstation ~]$ cat /home/student/output-servera
[student@workstation ~]$ cat /home/student/output-serverb
Chapter 02: Schedule Future Tasks
Schedule a Deferred User Job
[user@host ~]$ date
Wed May 18 21:01:18 CDT 2022
[user@host ~]$ at 21:03 < myscript
job 3 at Wed May 18 21:03:00 2022
[user@host ~]$ at 21:00 < myscript
job 4 at Thu May 19 21:00:00 2022
now +5min
teatime tomorrow (teatime is 16:00)
noon +4 days
5pm august 3 2021
[user@host ~]$ atq or at -l (the pending jobs for the current user)
[student@servera ~]$ echo "date >> /home/student/myjob.txt" | at now +2min
[student@servera ~]$ atq (List the scheduled jobs.)
[student@servera ~]$ watch atq
[student@servera ~]$ cat myjob.txt
[student@servera ~]$ at -q g teatime
warning: commands will be executed using /bin/sh
at> echo "It's teatime" >> /home/student/tea.txt
at> Ctrl+d
job 2 at Fri Feb 17 16:00:00 2023
[student@servera ~]$ at -q b 16:05
warning: commands will be executed using /bin/sh
at> echo "The cookies are good" >> /home/student/cookies.txt
at> Ctrl+d
job 3 at Fri Feb 17 16:05:00 2023
[student@servera ~]$ atq
2 Fri Feb 17 16:00:00 2023 g student
3 Fri Feb 17 16:05:00 2023 b student
[student@servera ~]$ at -c 2 (omitted the 2 no Job)
[student@servera ~]$ atq
2 Fri Feb 17 16:00:00 2023 g student
3 Fri Feb 17 16:05:00 2023 b student
[student@servera ~]$ atrm 2 (of a job that runs at teatime (16:00), and remove it by using the atrm command.)
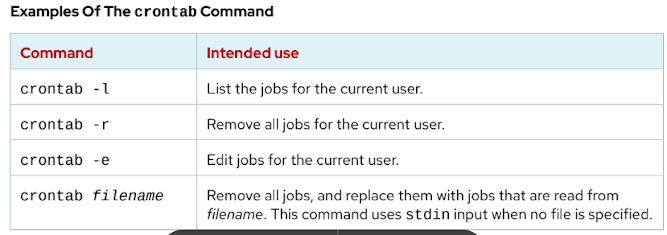
Schedule Recurring User Jobs (crontab)
The fields in the crontab file appear in the following order: crond, crontab, and crontab
• Minutes
• Hours
• Day of month
• Month
• Day of week
• Command

LAB Exercise-
[student@workstation ~]$ date
[student@servera ~]$ date -d "last day" +%a
[student@servera ~]$ date -d "next day" +%a
[student@servera ~]$ crontab -e
[student@servera ~]$ crontab -l
[student@servera ~]$ while ! test -f my_first_cron_job.txt; do sleep 1s; done
[student@servera ~]$ cat my_first_cron_job.txt
[student@servera ~]$ crontab -r
[student@servera ~]$ crontab -l
Schedule Recurring System Jobs
The /etc/crontab file has a syntax diagram shown. On the other /etc/cron.d/ directory. These repositories are placed in the /etc/cron.hourly/,/etc/cron.daily/, /etc/cron.weekly/, and /etc/cron.monthly/ directories.
Run Periodic Commands with Anacron
/etc/anacrontab configuration file ensures scheduled jobs.
The sysstat package provides the systemd timer unit, called the sysstat-collect.timer services. The /usr/lib/systemd/system/sysstat-collect.timer configuration file.
After you change the timer unit configuration file, user reload and enable
[root@host ~]# systemctl daemon-reload
[root@host ~]# systemctl enable --now <unitname>.timer
LAB Exercise:
Create the /etc/cron.daily/usercount script file with the following content:
#!/bin/bash
USERCOUNT=$(w -h | wc -l)
logger "There are currently ${USERCOUNT} active users"
[root@servera ~]# chmod +x /etc/cron.daily/usercount
Install the sysstat package: [root@servera ~]# dnf install sysstat
[root@servera ~]# cp /usr/lib/systemd/system/sysstat-collect.timer \
/etc/systemd/system/sysstat-collect.timer
[root@servera ~]# systemctl daemon-reload
[root@servera ~]# systemctl enable --now sysstat-collect.timer
[root@servera ~]# while [ $(ls /var/log/sa | wc -l) -eq 0 ]; \
do sleep 1s; done
[root@servera ~]# ls -l /var/log/sa
Manage Temporary Files (/tmp directory)
Red Hat Enterprise Linux includes the systemd-tmpfiles command tool, which reads instructions from the /usr/lib/tmpfiles.d/*.conf, /run/tmpfiles.d/*.conf, and /etc/tmpfiles.d/*.conf configuration files. Man Pages: systemd-tmpfiles, tmpfiles.d, stat, stat, and systemd.timer
Clean Temporary Files with a Systemd Timer
a systemd timer unit called systemd-tmpfiles-clean.timer which executes the systemd-tmpfiles --clean command.
[user@host ~]$ systemctl cat systemd-tmpfiles-clean.timer
[root@host ~]# systemctl daemon-reload
Clean Temporary Files Manually
systemd-tmpfiles --clean
systemd-tmpfiles --create
Configuration File Precedence
The systemd-tmpfiles-clean service configuration files can exist in three places:
/etc/tmpfiles.d/*.conf
/run/tmpfiles.d/*.conf
/usr/lib/tmpfiles.d/*.conf
LAB Exercise:
systemd-tmpfiles --clean /tmp
[root@servera ~]# cp /usr/lib/tmpfiles.d/tmp.conf \
/etc/tmpfiles.d/tmp.conf
vim /etc/tmpfiles.d/tmp.conf (In the configuration, the q type is the same as the d type, and instructs the systemd-tmpfiles service to create the /tmp directory if it does not exist. The directory's octal permissions must be set to 1777)
[root@servera ~]# systemd-tmpfiles --clean /etc/tmpfiles.d/tmp.conf
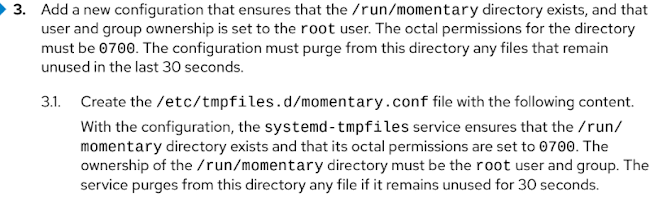
[root@servera ~]# vim /etc/tmpfiles.d/momentary.conf

[root@servera ~]# systemd-tmpfiles --create \
/etc/tmpfiles.d/momentary.conf

[root@servera ~]# ls -ld /run/momentary
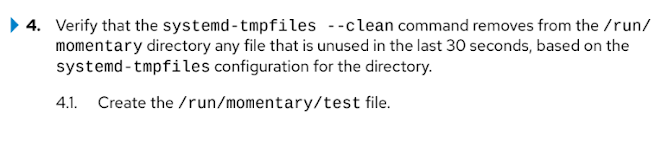
[root@servera ~]# touch /run/momentary/test
[root@servera ~]# sleep 30
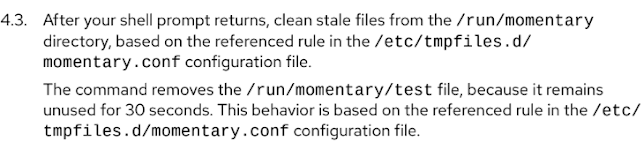
[root@servera ~]# systemd-tmpfiles --clean \
/etc/tmpfiles.d/momentary.conf
[root@servera ~]# ls -l /run/momentary/test
Chapter 03: Analyze and Store Logs
Relevant page and information: systemd-journald.service, rsyslogd, and rsyslog.conf, logger, tail, rsyslog.conf, and logrotate, systemd-journald.conf, systemd-journald.
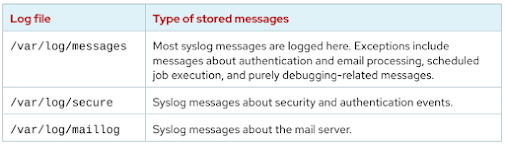
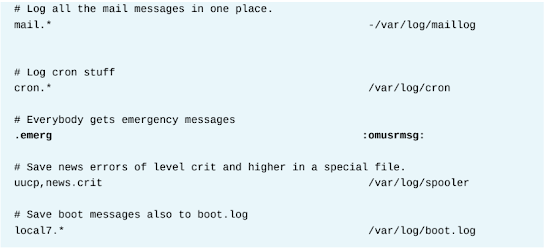
System Log Files

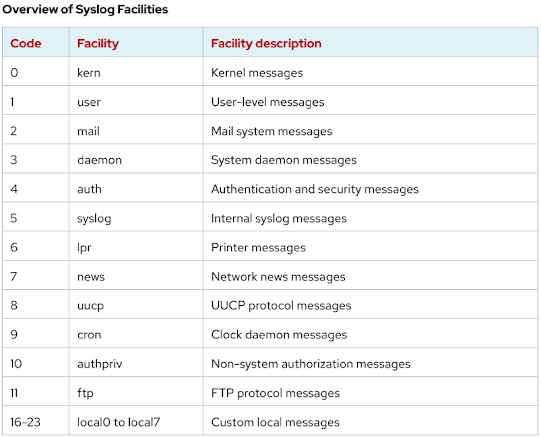
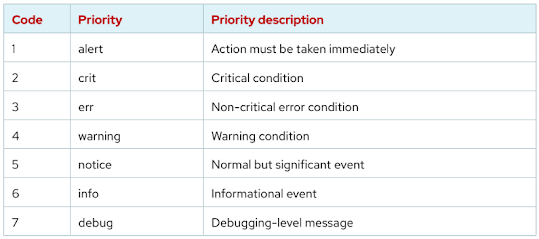
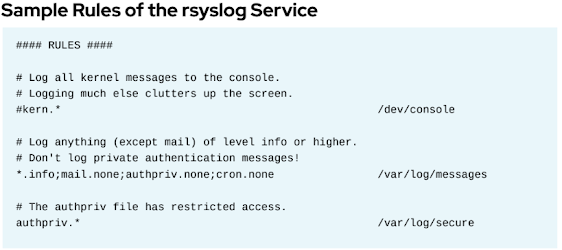
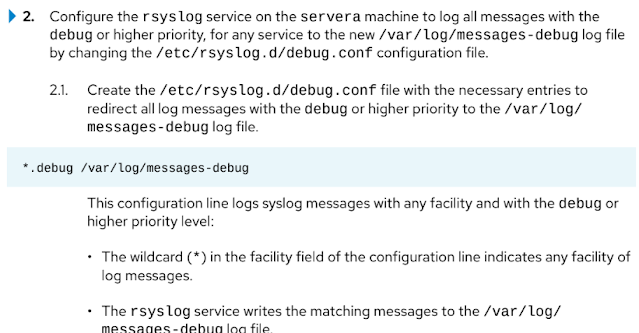
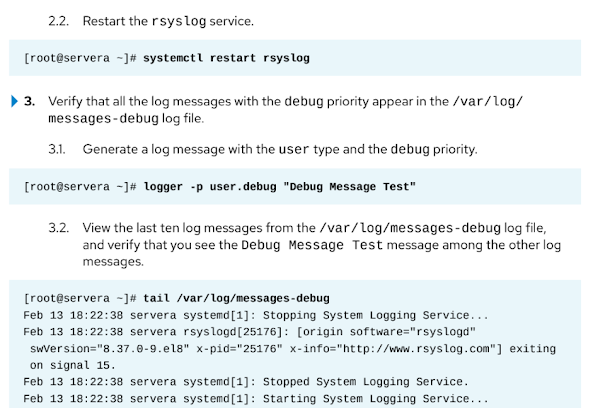
Log Events to the System

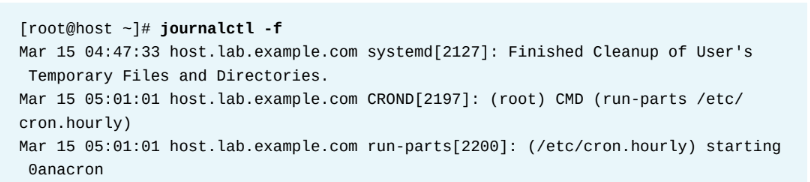
Monitor Log Events

Send Syslog Messages Manually

Review Syslog Files

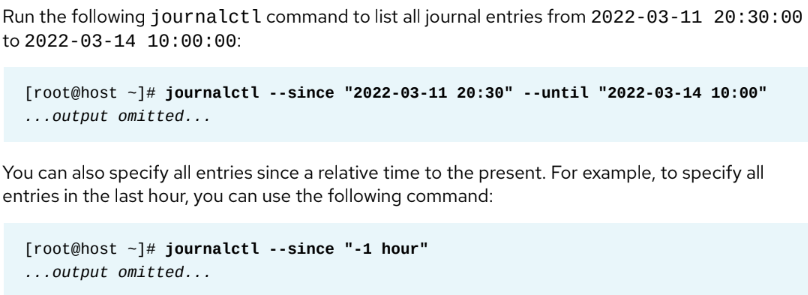
Find Events on the System Journal


Practice System Journal
[student@servera ~]$ journalctl _PID=1
[student@servera ~]$ journalctl _UID=81
[student@servera ~]$ journalctl -p warning
[student@servera ~]$ journalctl --since "-10min"
[student@servera ~]$ journalctl --since 9:00:00 _SYSTEMD_UNIT="sshd.service"
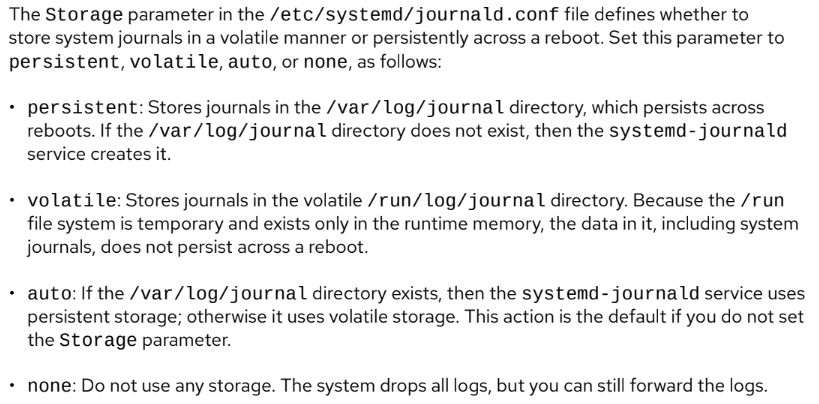
System Journal Storage
[user@host ~]$ journalctl | grep -E 'Runtime Journal|System Journal'
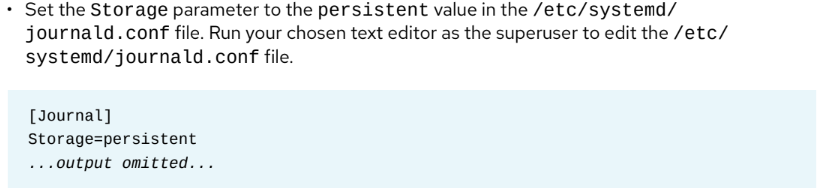
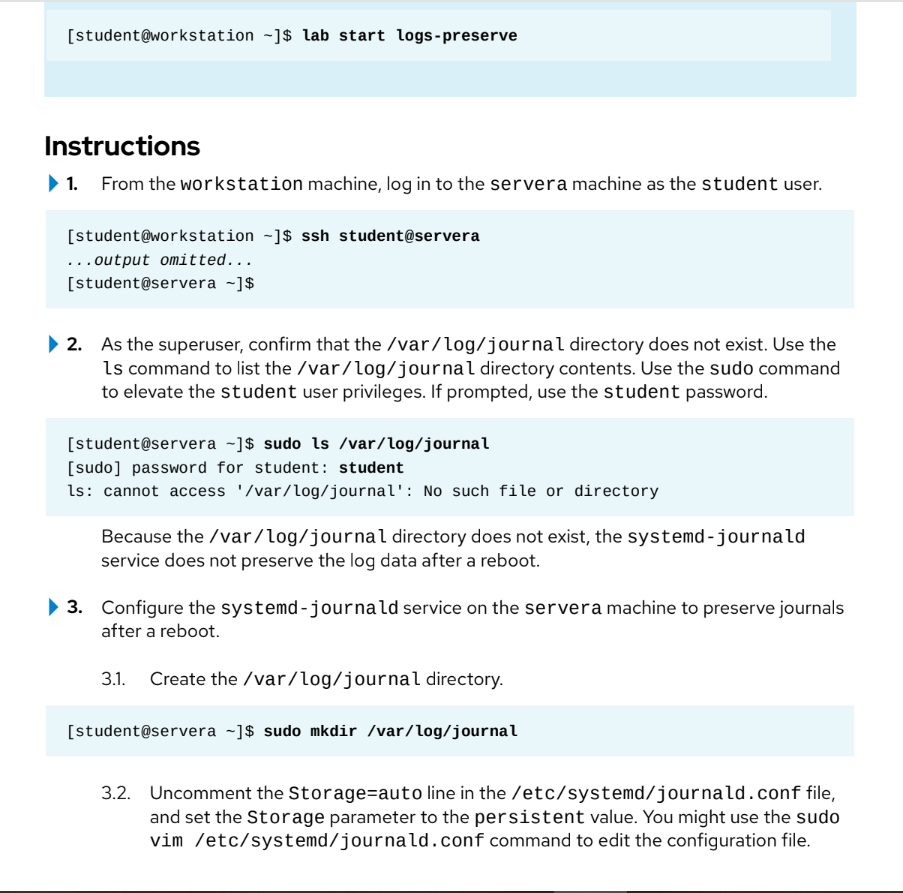
Configure Persistent System Journals
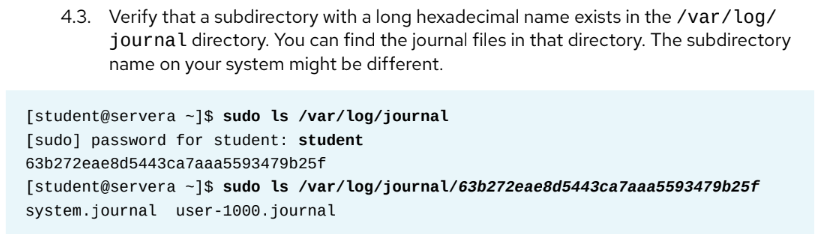
[root@host ~]# mkdir /var/log/journal
[root@host ~]# systemctl restart systemd-journald


Preserve the System Journal
Administer Local Clocks and Time Zones
[user@host ~]$ timedatectl
[user@host ~]$ timedatectl list-timezones
[root@host ~]# timedatectl set-timezone America/Phoenix
[root@host ~]# timedatectl
[root@host ~]# timedatectl set-time 9:00:00
[root@host ~]# timedatectl
[root@host ~]# timedatectl set-ntp false
[student@servera ~]$ tzselect
[student@servera ~]$ sudo timedatectl set-timezone \
America/Port-au-Prince
[student@servera ~]$ sudo timedatectl set-ntp true
Configure and Monitor the chronyd Service
A few Command, timedatectl(1), tzselect(8), chronyd(8), chrony.conf(5), and chronyc(1)
[root@host ~]# systemctl restart chronyd
[root@host ~]# chronyc sources -v
******Do Exercise Analyze and Store Logs (RH134, page 122)******
Chapter 04 : Archive and Transfer Files
tar, gzip, gunzip, bzip2, bunzip2, xz, and unxz man pages
Options of the tar Utility
-c or --create : Create an archive file.
-t or --list : List the contents of an archive.
-x or --extract : Extract an archive.
The following tar command general options are often included:
-v or --verbose : Show the files that are being archived or extracted during the tar
operation.
-f or --file : Follow this option with the archive file name to create or open.
-p or --preserve-permissions : Preserve the original file permissions when extracting.
--xattrs : Enable extended attribute support, and store extended file attributes.
--selinux : Enable SELinux context support, and store SELinux file contexts.
The following tar command compression options are used to select an algorithm:
-a or --auto-compress : Use the archive's suffix to determine the algorithm to use.
-z or --gzip : Use the gzip compression algorithm, which results in a .tar.gz suffix.
-j or --bzip2 : Use the bzip2 compression algorithm, which results in a .tar.bz2 suffix.
-J or --xz : Use the xz compression algorithm, which results in a .tar.xz suffix.
Create an Archive
[user@host ~]$ tar -cf mybackup.tar myapp1.log myapp2.log myapp3.log
[user@host ~]$ ls mybackup.tar
List Archive Contents
[root@host ~]# tar -tf /root/etc.tar
Extract Archive Contents
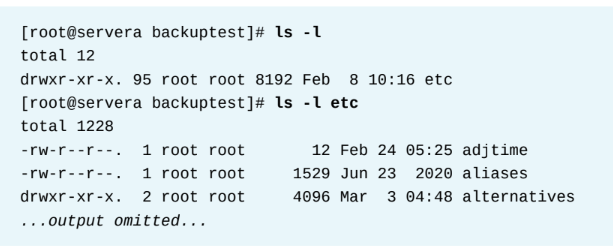
[root@host ~]# mkdir /root/etcbackup
[root@host ~]# cd /root/etcbackup
[root@host etcbackup]# tar -tf /root/etc.tar
[root@host etcbackup]# tar -xf /root/etc.tar
Or,
[user@host scripts]# tar -xpf /home/user/myscripts.tar
Create a Compressed Archive
The tar command supports these compression methods, and others:
gzip compression is the earlier, fastest method, and is widely available across platforms.
bzip2 compression creates smaller archives but is less widely available than gzip.
xz compression is newer, and offers the best compression ratio of the available methods.
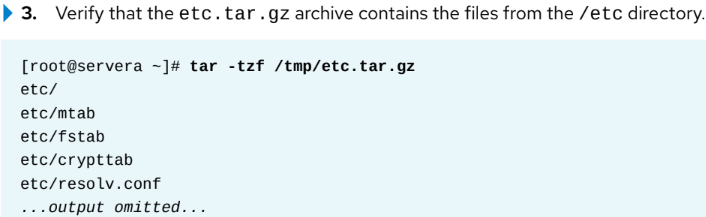
[root@host ~]# tar -czf /root/etcbackup.tar.gz /etc
[root@host ~]$ tar -cjf /root/logbackup.tar.bz2 /var/log
[root@host ~]$ tar -cJf /root/sshconfig.tar.xz /etc/ssh
[root@host ~]# tar -tf /root/etcbackup.tar.gz
Extract Compressed Archive Contents
[root@host ~]# tar -xzf /root/etcbackup.tar.xz [-z option means gzip]
[root@host logbackup]# tar -tf /root/logbackup.tar
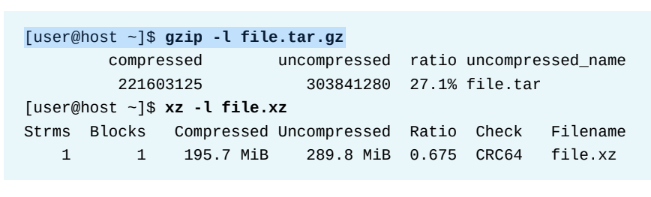
The gzip, bzip2, and xz algorithms are also implemented as stand-alone commands for
compressing individual files without creating an archive but not archive a directory.
Manage Compressed tar Archives


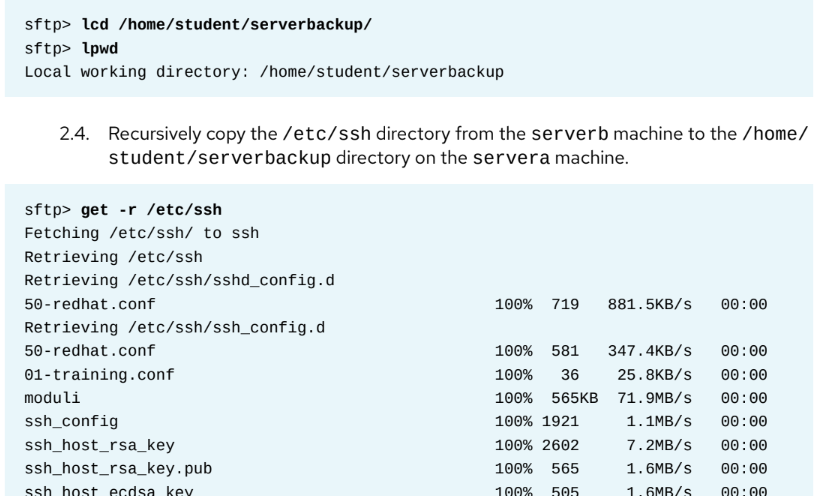
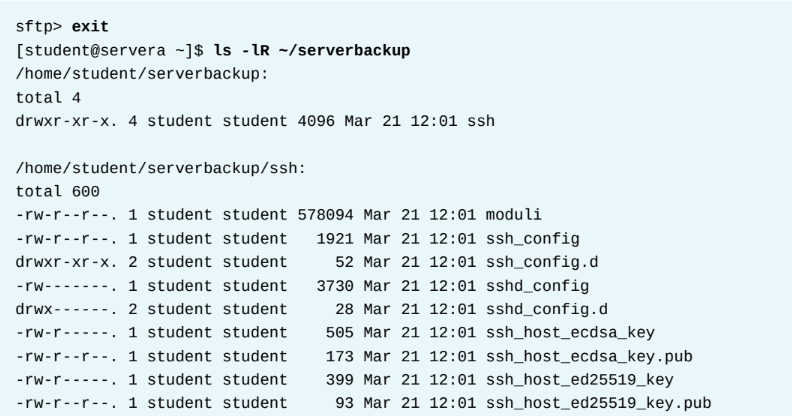
Transfer Files Between Systems Securely
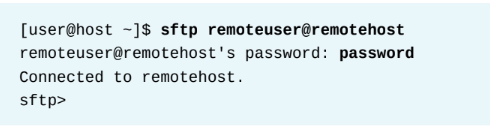
The OpenSSH suite securely runs shell commands on remote systems. Use the Secure File Transfer Program (SFTP) to interactively upload to or download files from an SSH server.
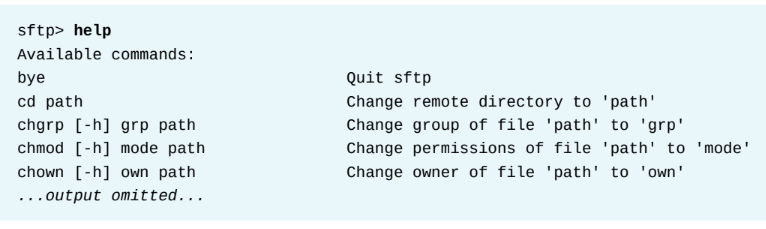
sftp command uses the secure authentication mechanism and encrypted data transfer to and from the SSH server. When you run the sftp command, your terminal provides an sftp> prompt. On sftp>prompt write- ls, cd, mkdir, rmdir,get, exit, and pwd commands.

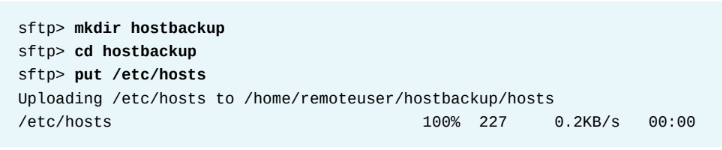
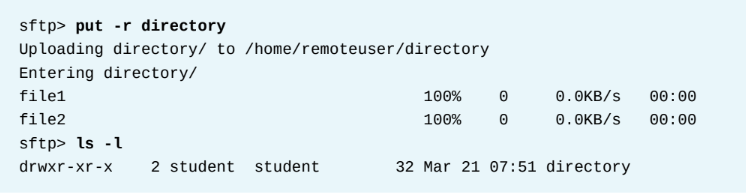
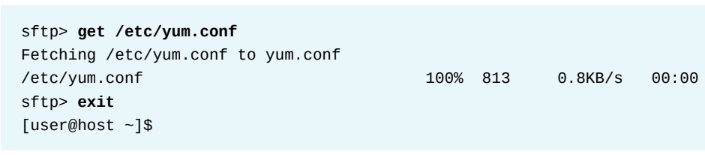
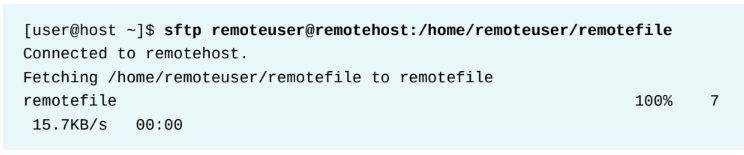
Example,
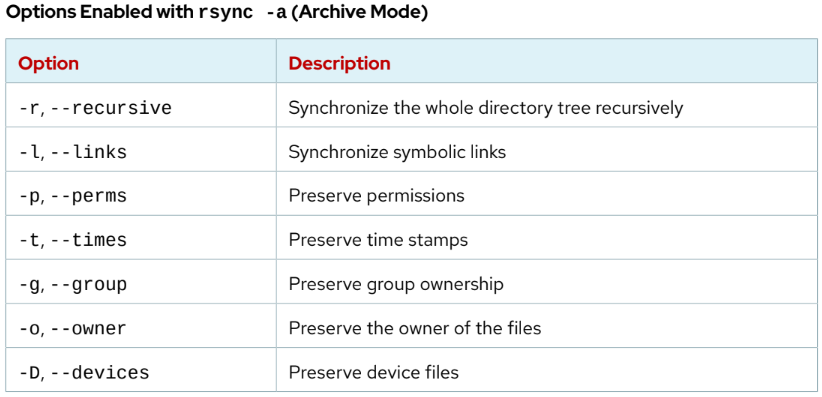
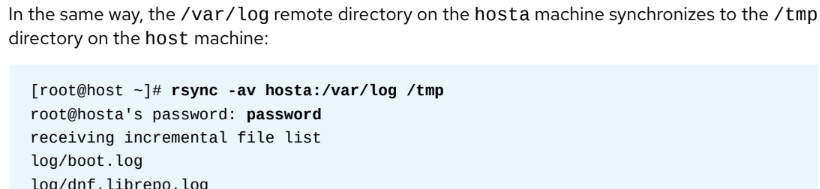
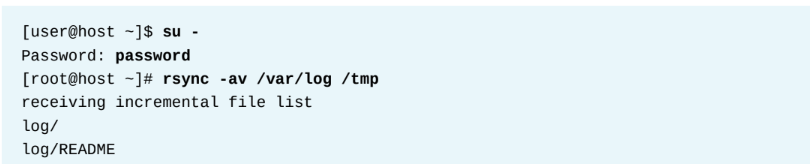
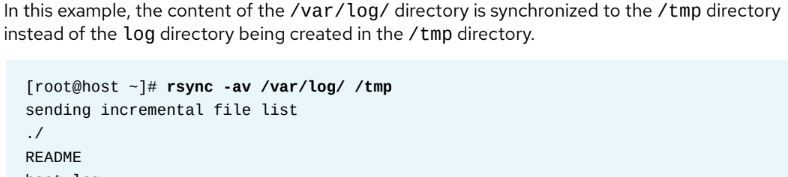
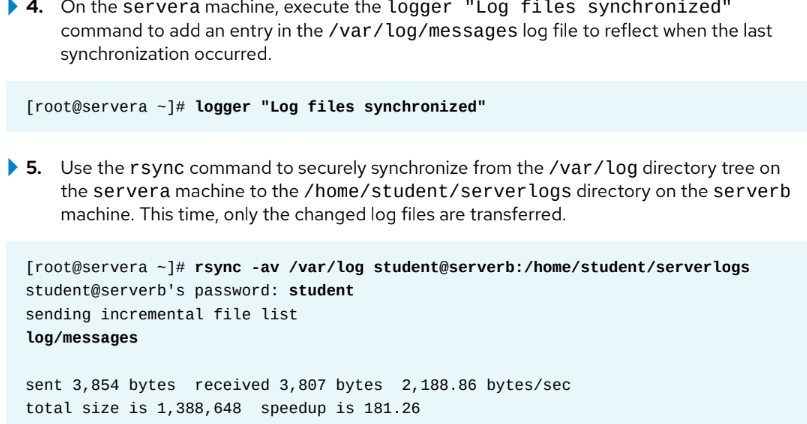
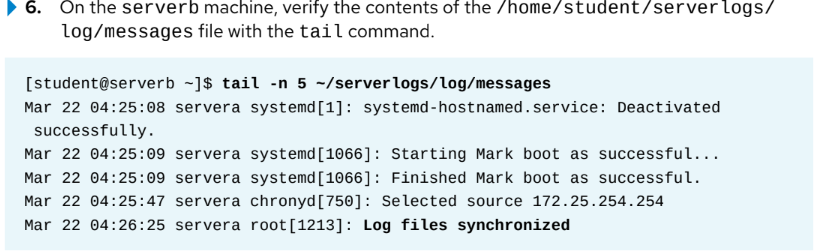
Synchronize Remote Files and Directories

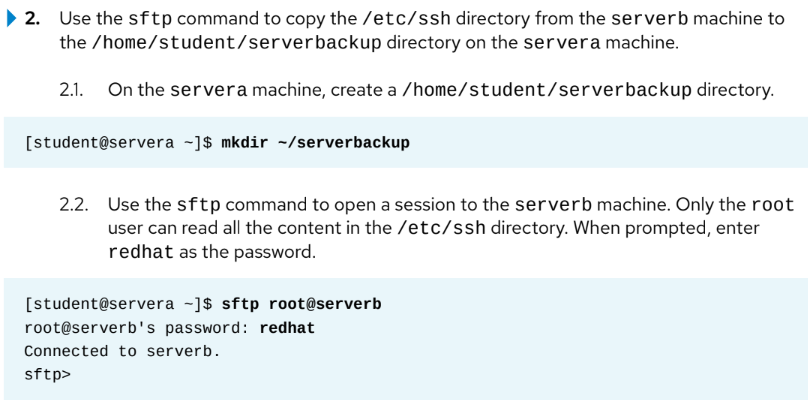
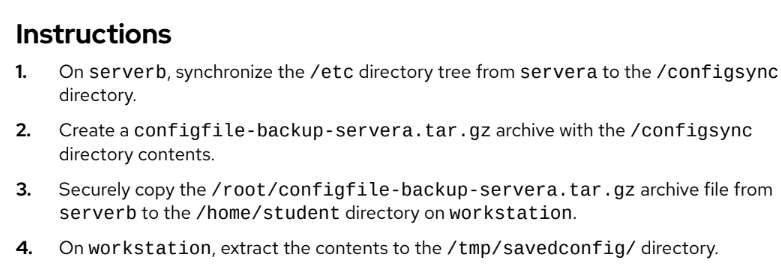
Exercise -

LAB: Archive and Transfer Files
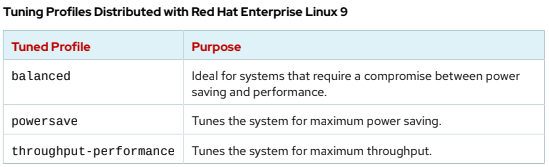
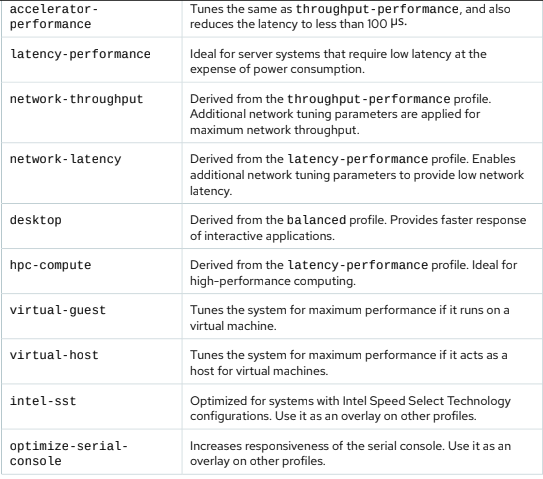
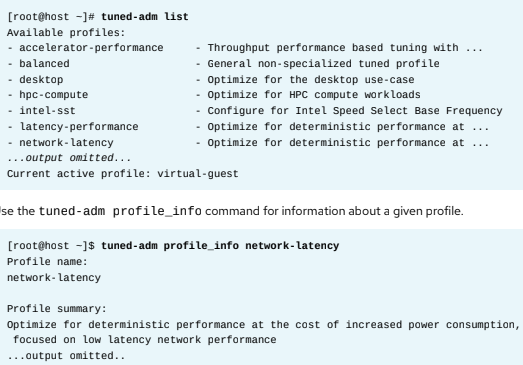
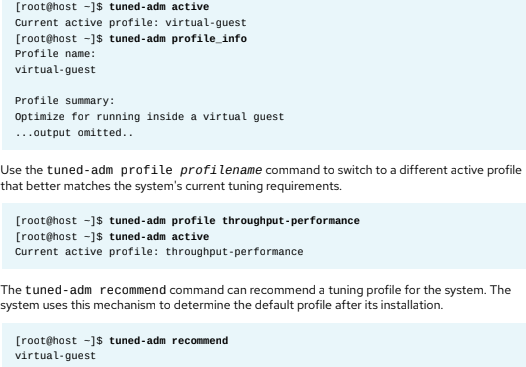
Chapter 5: Tune System Performance
tuned(8), tuned.conf(5), tuned-main.conf(5), and tuned-adm(1)
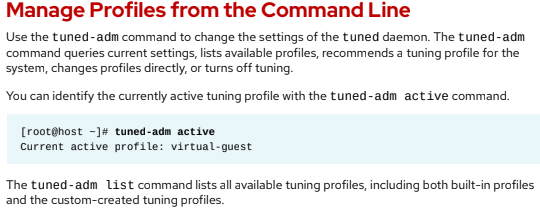
The tuned Utility

[root@host ~]# cd /usr/lib/tuned
[root@host tuned]$ ls virtual-guest
[root@host tuned]# cat virtual-guest/tuned.conf

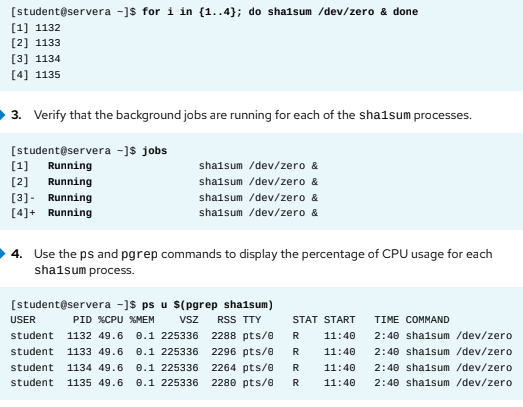
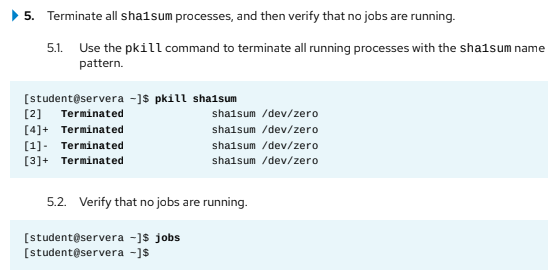
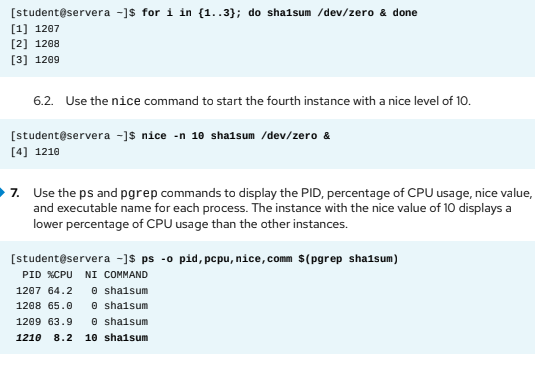
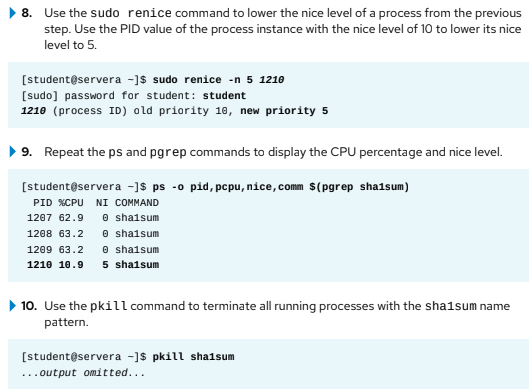
Influence Process Scheduling
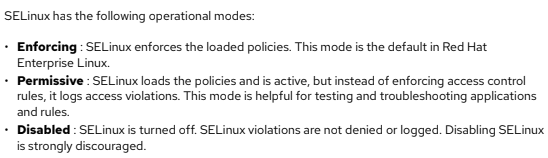
Chapter 6: Manage SELinux Security
getenforce(8), setenforce(8), and selinux_config(5), chcon(1), restorecon(8), semanage(8), and semanage-fcontext(8)
SELinux files location => /etc/selinux/config
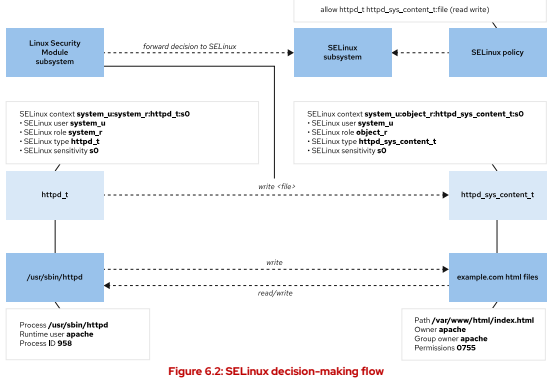
SELinux Architecture

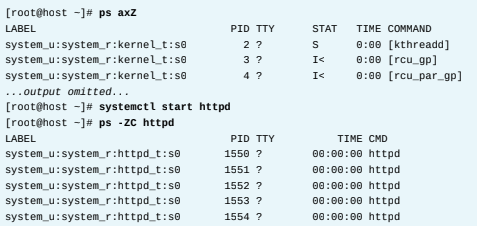


Check the SELinux status
[root@servera ~]# grep '^SELINUX' /etc/selinux/config
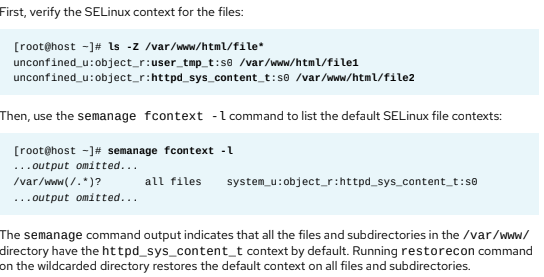
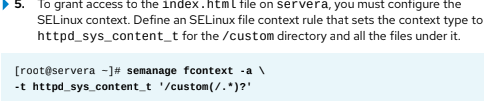
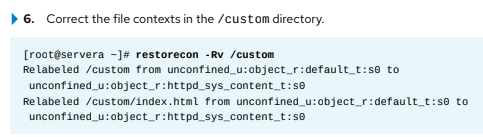
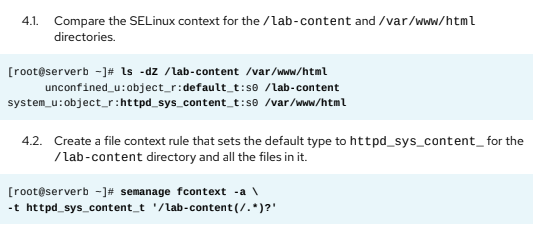
Control SELinux File Contexts
Page 190
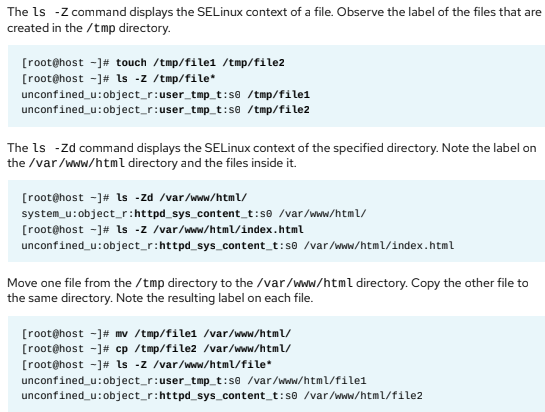
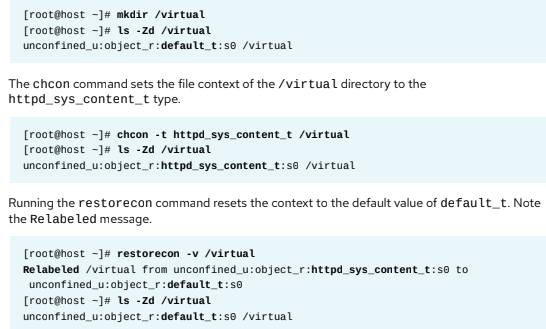
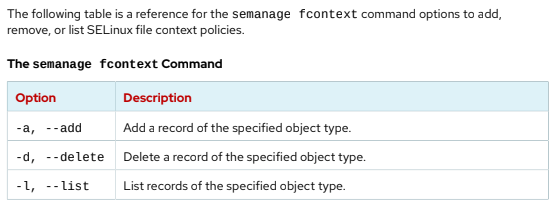
Define SELinux Default File Context Policies
Command, semanage fcontext -l
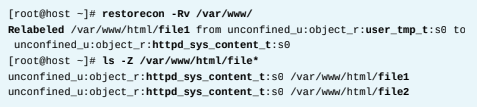
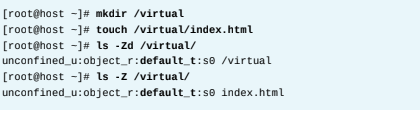
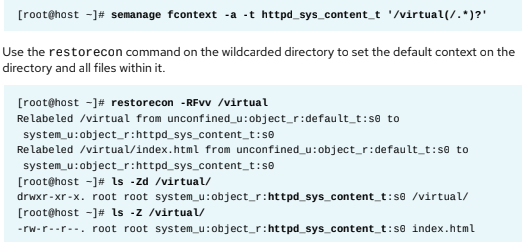

Exercise: Control SELinux File Contexts
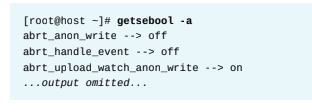
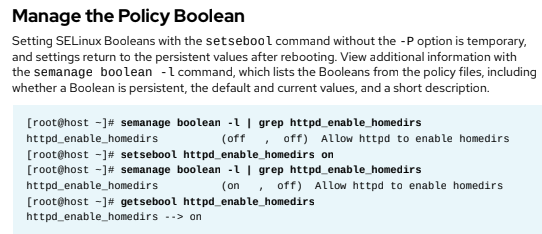
Adjust SELinux Policy with Booleans
booleans(8), getsebool(8), setsebool(8), semanage(8), and semanage-
boolean(8)


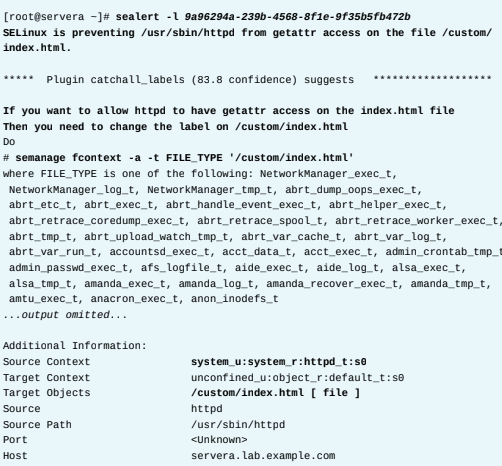
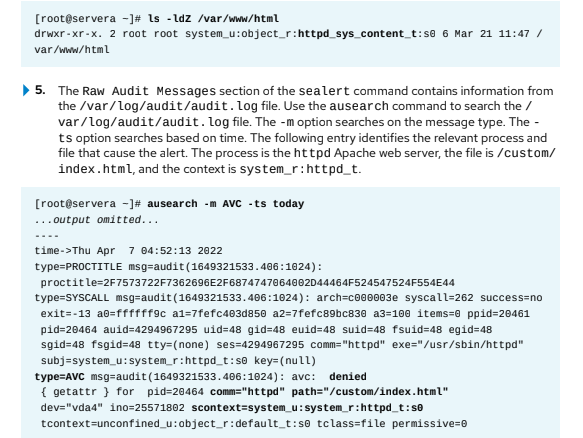
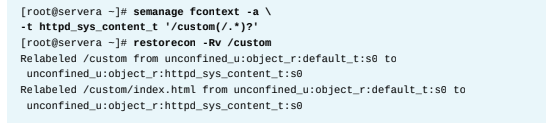
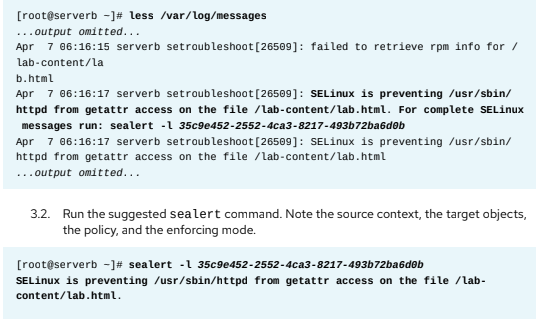
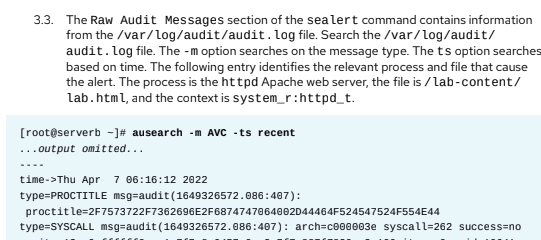
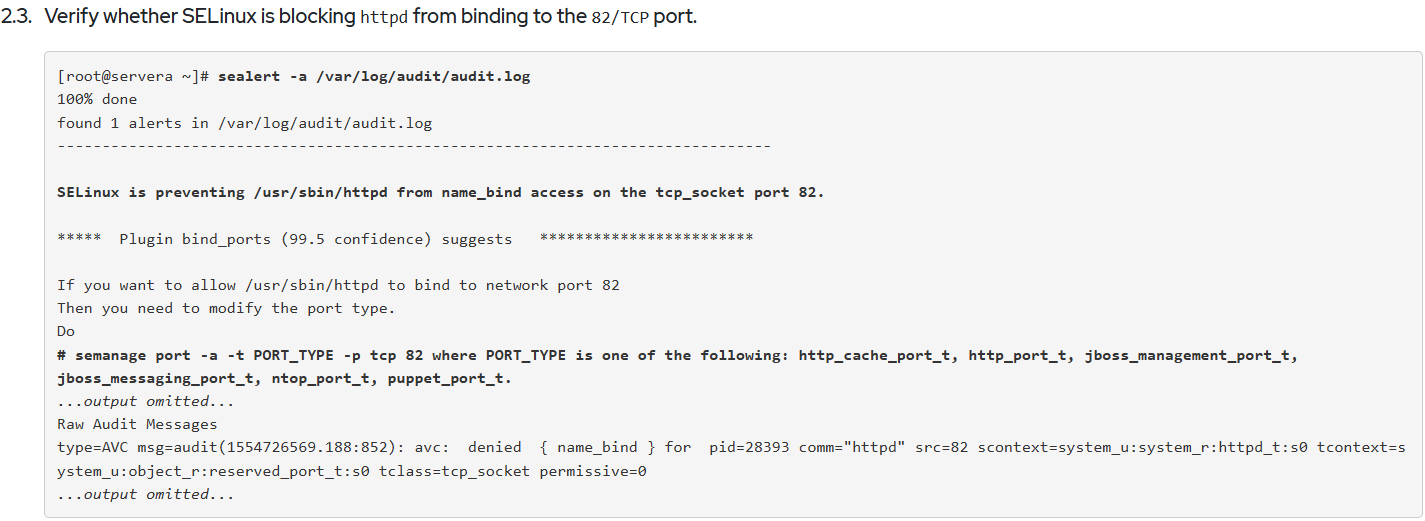
Investigate and Resolve SELinux Issues
Page 207

LAB: Manage SELinux Security
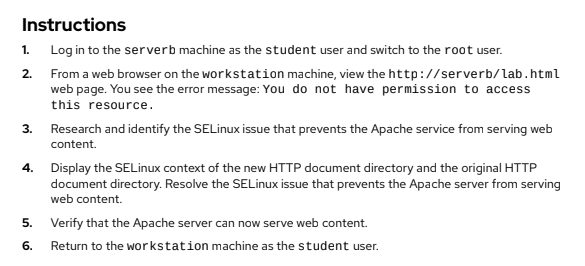
Solution:
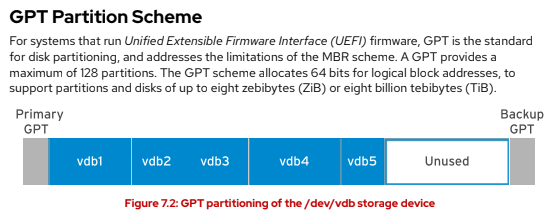
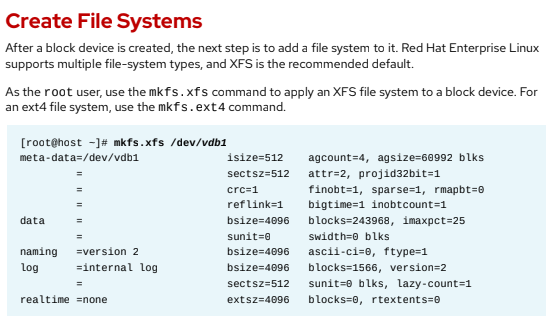
Chapter 7: Manage Basic Storage
parted, mkfs, mount, lsblk, and fstab
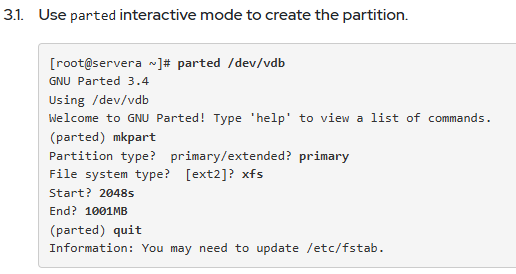
Add Partitions, File Systems, and Persistent Mounts
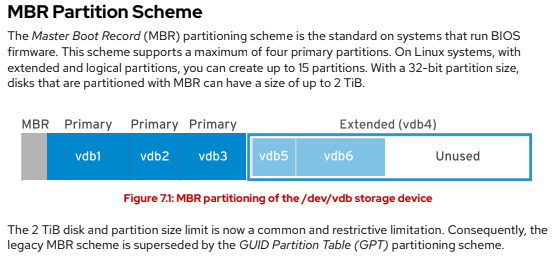
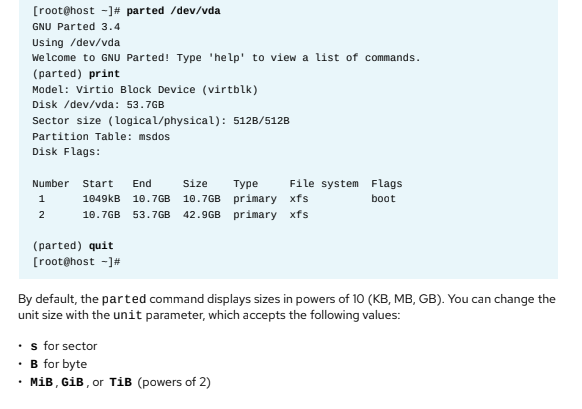
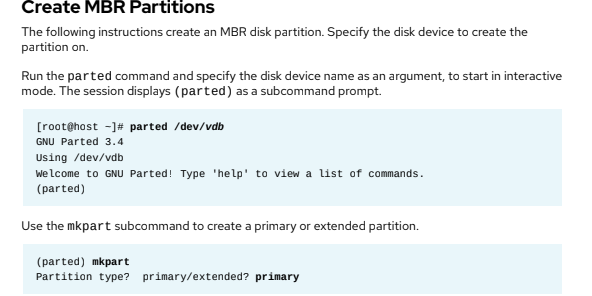
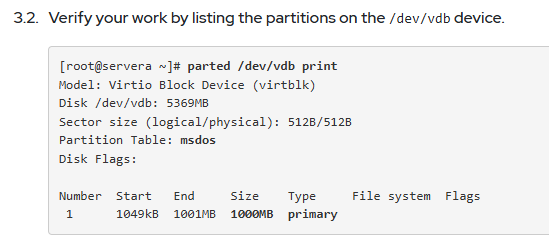
Manage Partitions
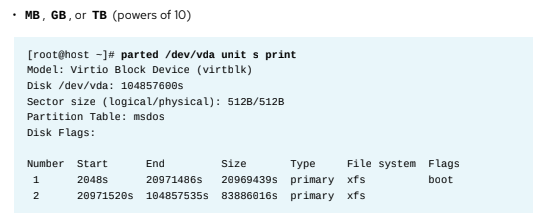
[root@host ~]# parted /dev/vda print
[root@host ~]# parted /dev/vdb mklabel msdos
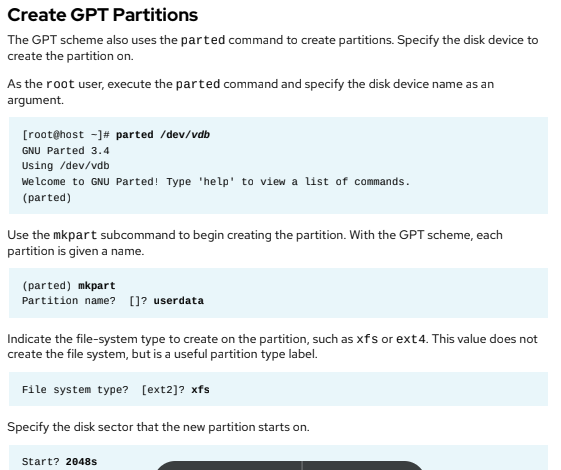
[root@host ~]# parted /dev/vdb mklabel gpt
File system type? [ext2]? xfs
[root@host ~]# parted /dev/vdb help mkpart
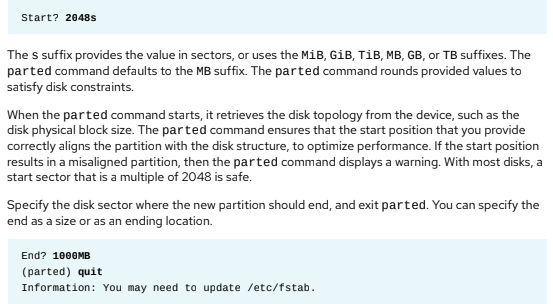
End? 1000MB
(parted) quit
Information: You may need to update /etc/fstab.
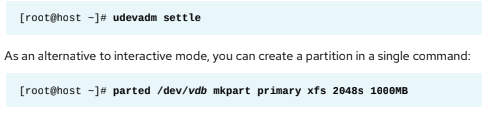
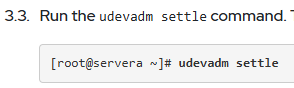
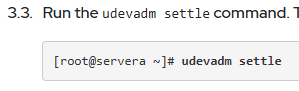
[root@host ~]# udevadm settle
[root@host ~]# parted /dev/vdb mkpart userdata xfs 2048s 1000MB
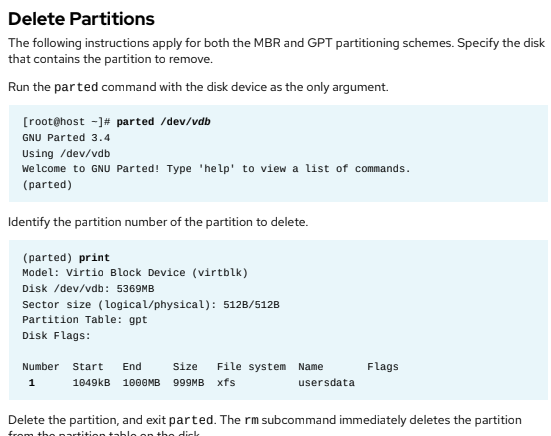
(parted) rm 1
(parted) quit
Information: You may need to update /etc/fstab.
[root@host ~]# parted /dev/vdb rm 1
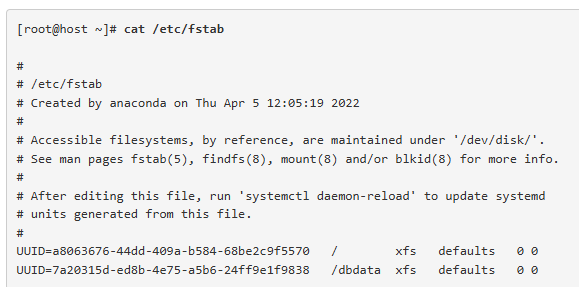
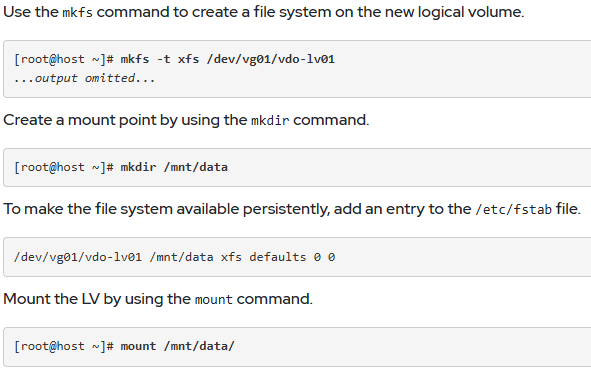
Mount File Systems

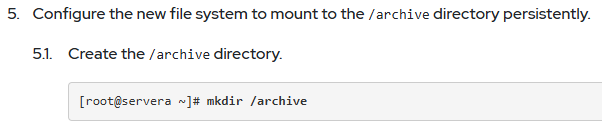
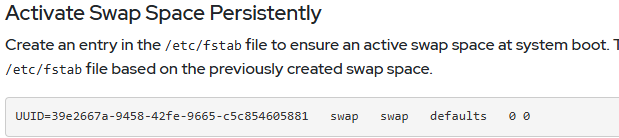
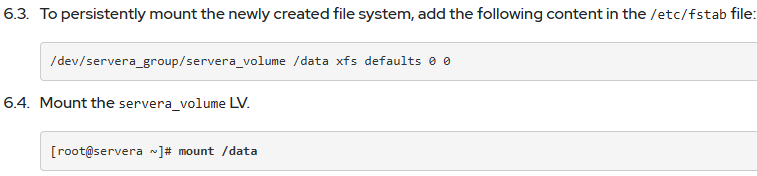
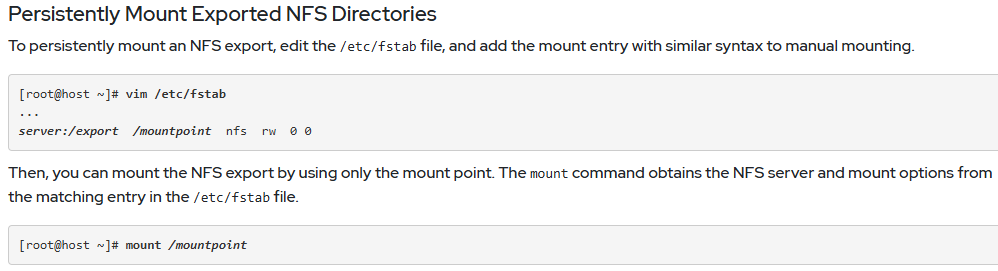
Persistently Mount File Systems
[root@host ~]# systemctl daemon-reload
Guided Exercise: Add Partitions, File Systems, and Persistent Mounts
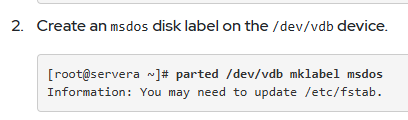
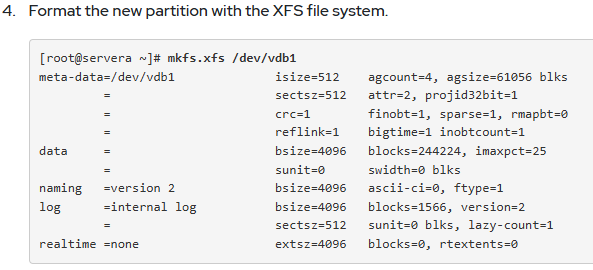
Add a 1 GB primary partition. For correct alignment, start the partition at the 2048 sector. Set the partition file-system type to XFS.


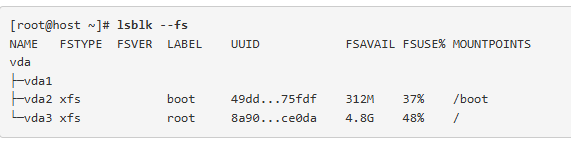
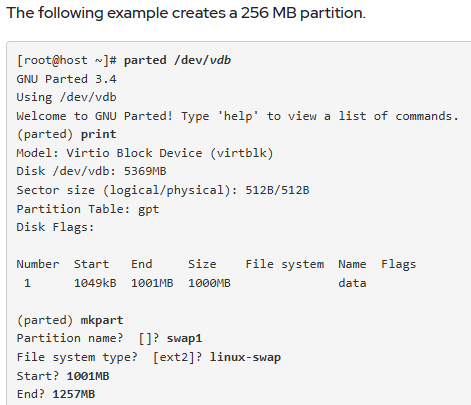
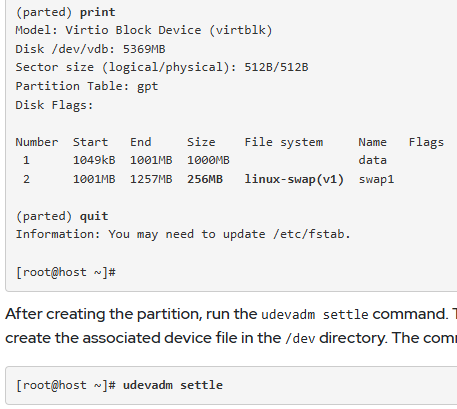
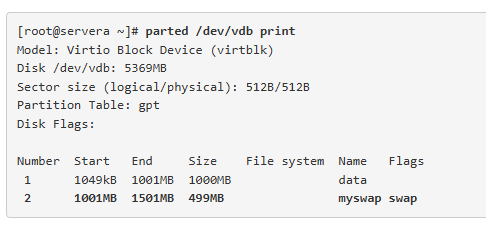
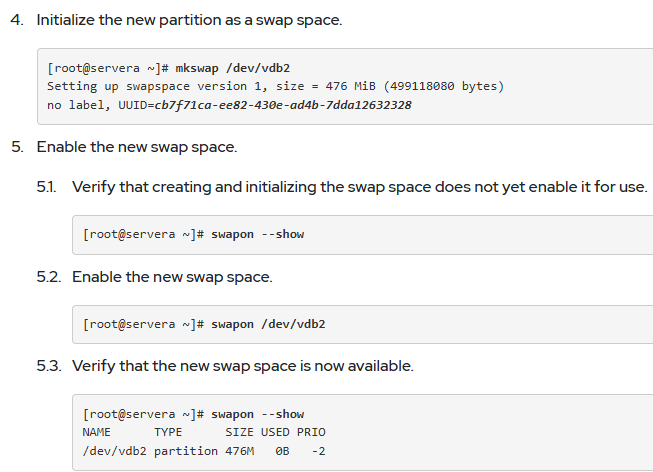
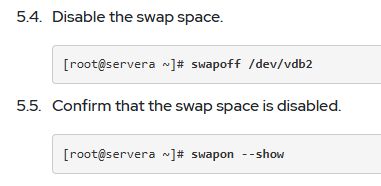
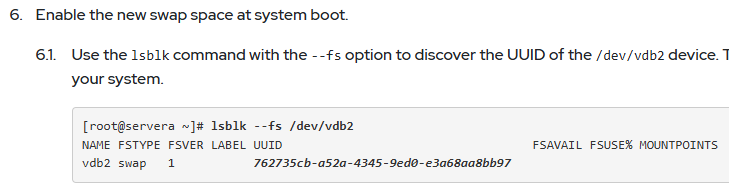
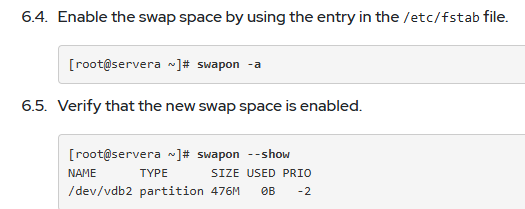
Manage Swap Space
mkswap, swapon, swapoff, mount, and parted
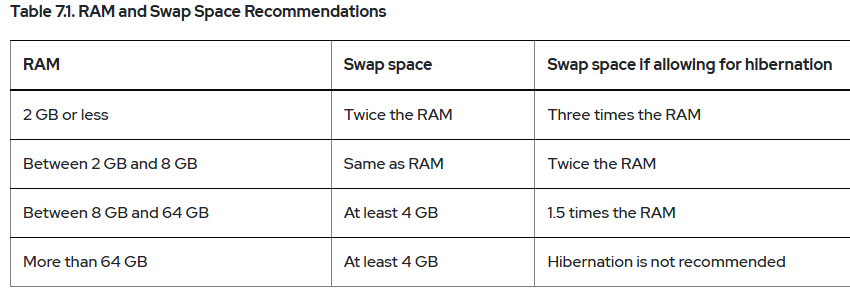
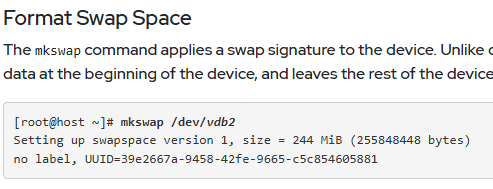
Create Swap Space

[root@host ~]# lsblk --fs
[root@host ~]# systemctl daemon-reload
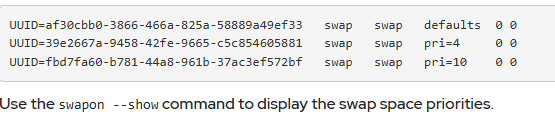
Set Swap Space Priority
Guided Exercise: Manage Swap Space
Add a new partition of 500 MB for use as a swap space. Set the partition type to linux-swap.

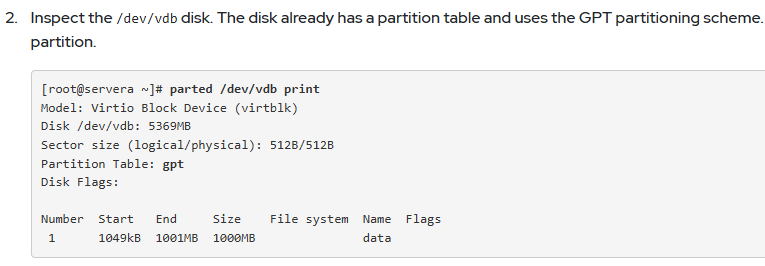
Verify your work by listing the partitions on the /dev/vdb disk. The size of the new partition is not exactly 500 MB.


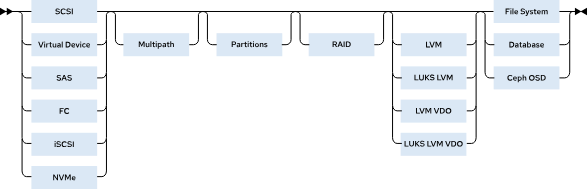
Chapter 8. Manage Storage Stack
Create and Extend Logical Volumes
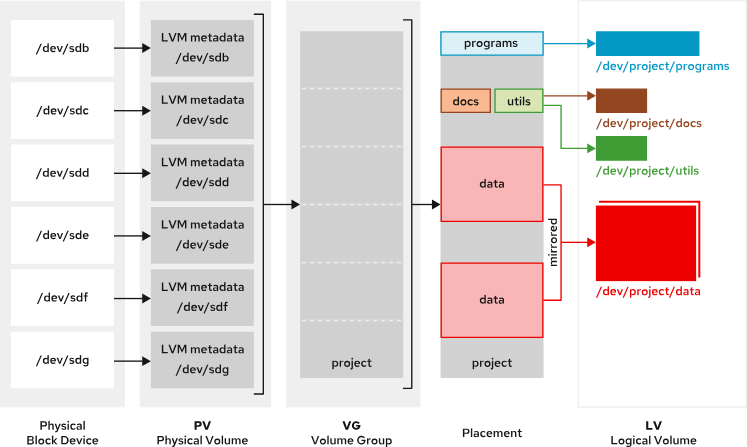
Figure 8.1: Logical Volume Manager workflow
Build LVM Storage


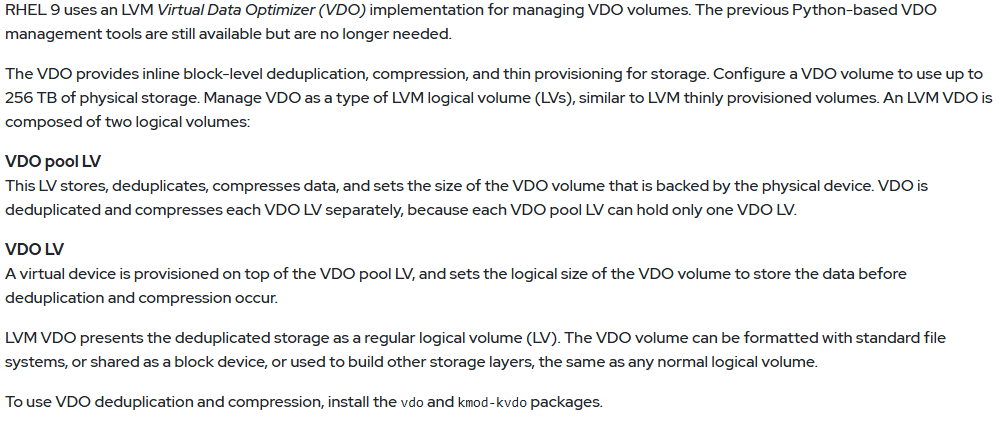
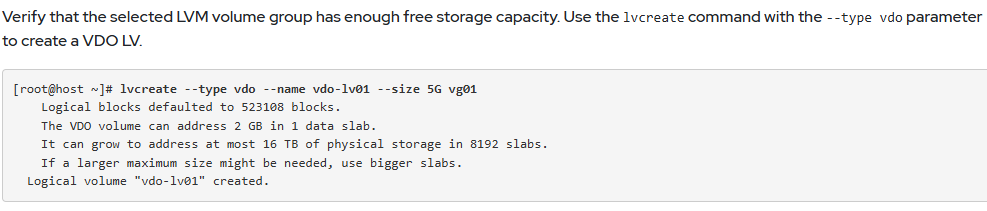
Create a Logical Volume with Deduplication and Compression

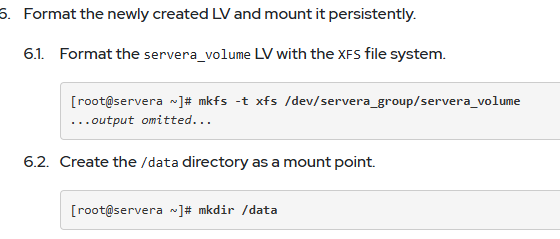
Create a File System on the Logical Volume
Specify the logical volume by using either the /dev/vgname/lvname traditional name, or the /dev/mapper/vgname-lvname kernel device mapper name.
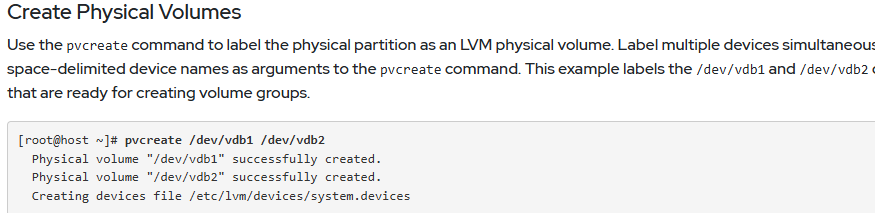
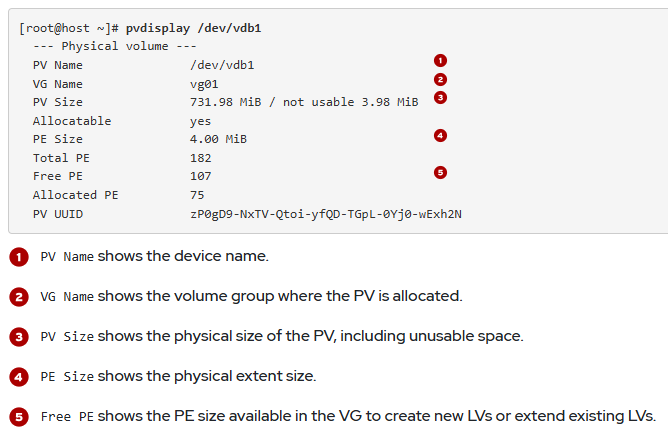
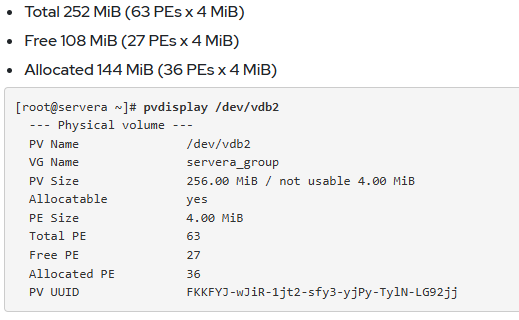
Display Physical Volume Information
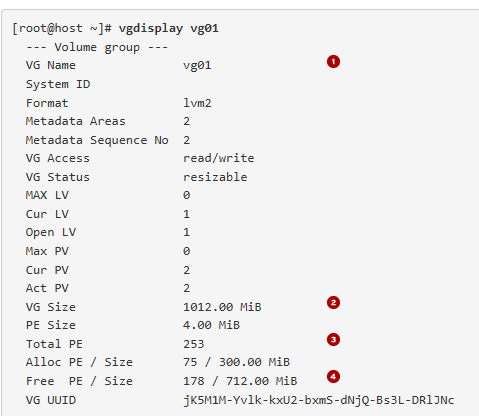
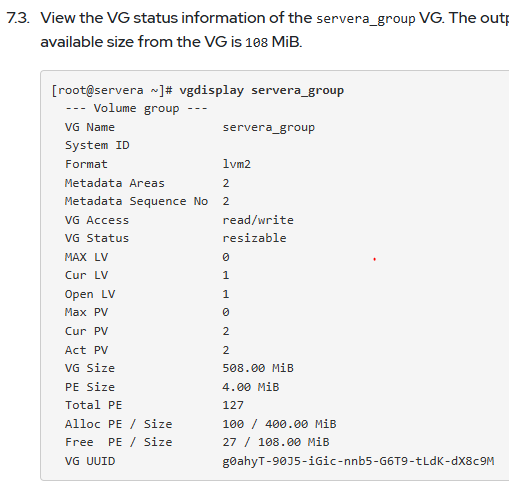
Display Volume Group Information
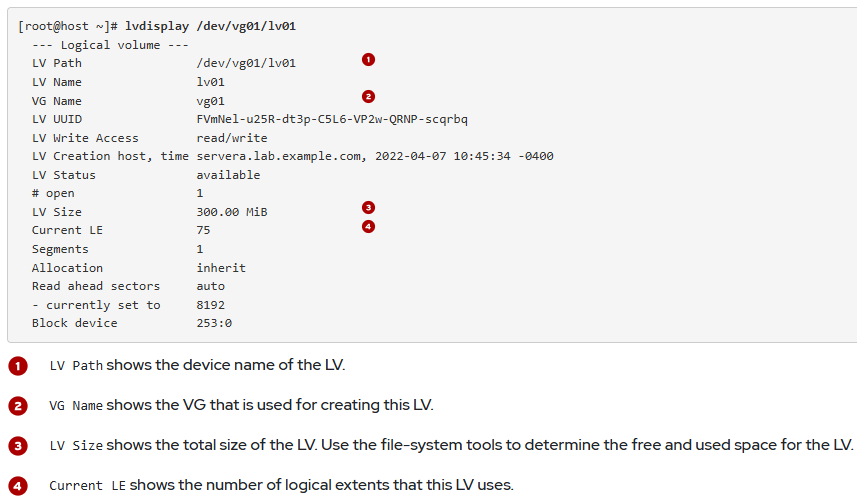
Display Logical Volume Information
Extend and Reduce LVM Storage
Extend a Volume Group Size
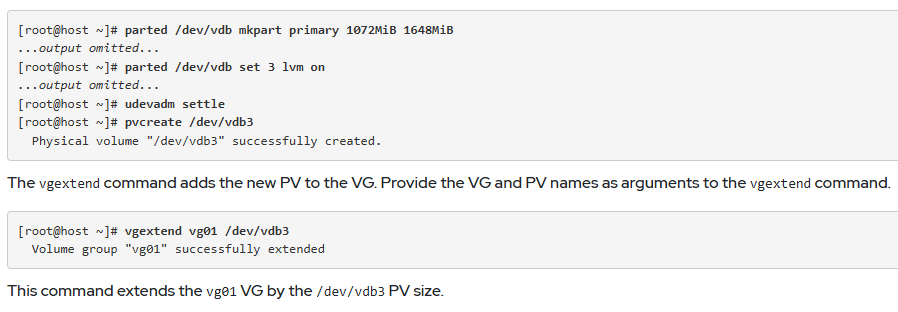
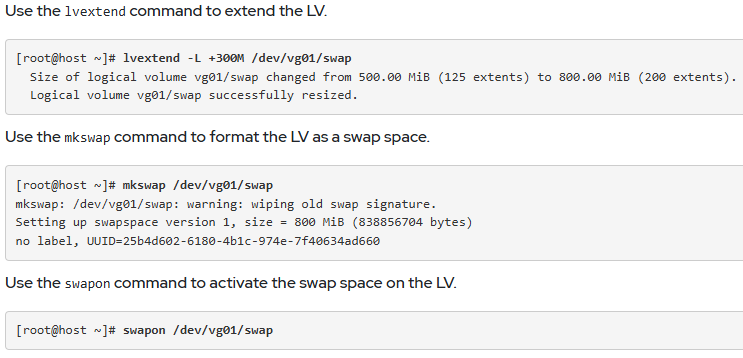
Extend a Logical Volume Size

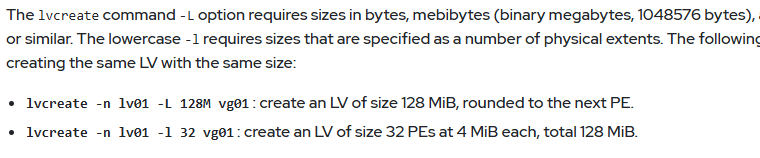
The lvextend command -l option expects the number of PE as the argument. The lvextend command -L option expects sizes in bytes, mebibytes, gibibytes, and similar.
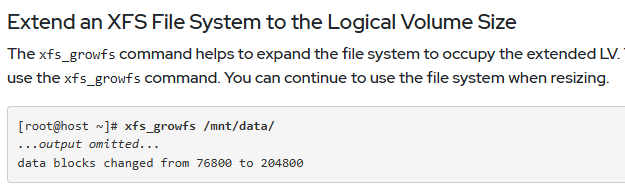
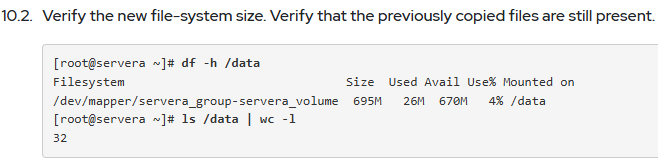
Extend an EXT4 File System to the Logical Volume Size
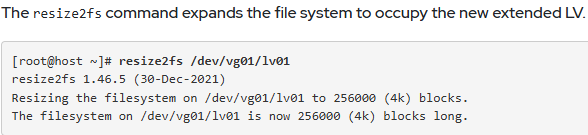
The xfs_growfs command expands an XFS file system. resize2fs command resizes ext2, ext3, or ext4 file systems and takes the device name as an argument. The xfs_growfs command supports only online resizing, whereas the`resize2fs` command supports both online and offline resizing.
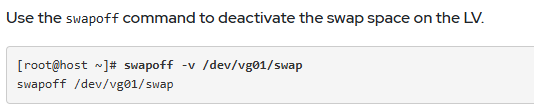
Extend Swap Space Logical Volumes
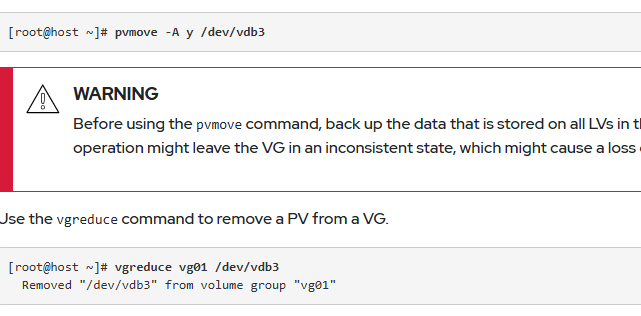
Reduce Volume Group Storage
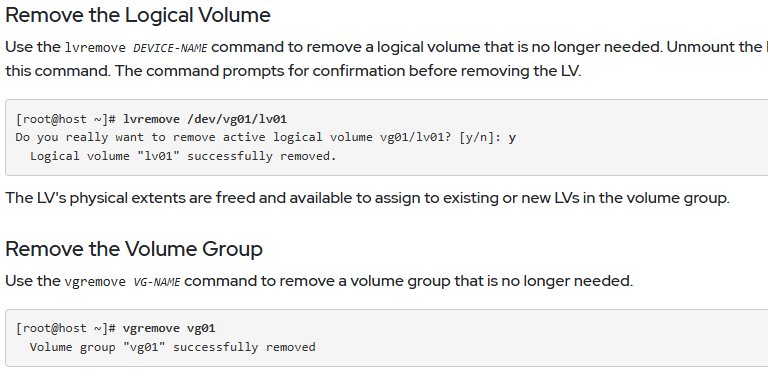
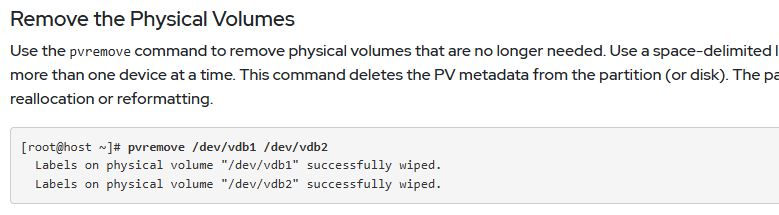
Remove LVM Storage
Use the lvremove, vgremove, and pvremove commands to remove an LVM component that is no longer required.

fdisk, gdisk, parted, partprobe, lvm, pvcreate, vgcreate, lvcreate, mkfs, pvdisplay, vgdisplay, lvdisplay, vgextend, lvextend, xfs_growfs, resize2fs, swapoff, mkswap, swapon, pvmove, vgcfgbackup, vgreduce, lvremove, vgremove, and pvremove
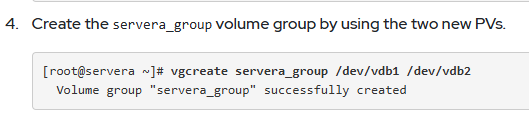
Guided Exercise: Create and Extend Logical Volumes
Create and extend a physical volume, volume group, logical volume, and an XFS file system. You also persistently mount the logical volume file system.
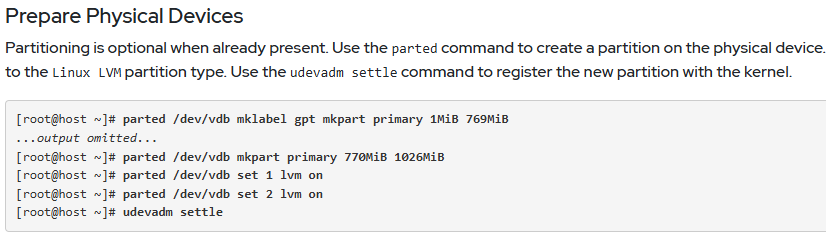
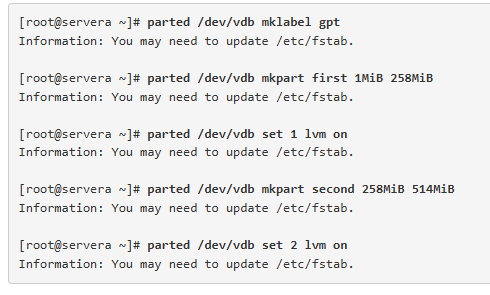
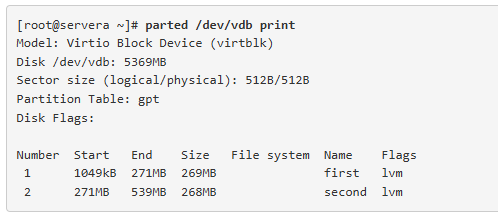
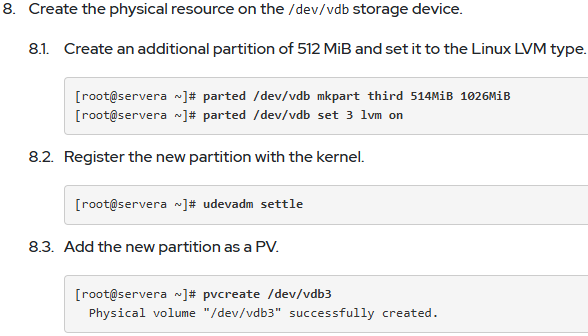
Create the physical device partition on the /dev/vdb storage device.
Create two partitions of 256 MiB each and set to the Linux LVM type. Use the first and second names for these partitions.

5. Create the servera_volume logical volume with a size of 400 MiB. This command creates the /dev/servera_group/servera_volume LV without a file system.


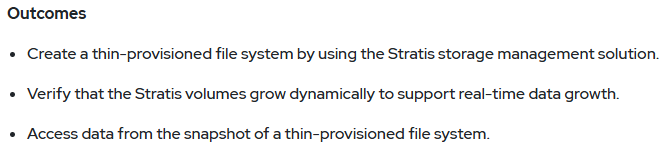
Manage Layered Storage
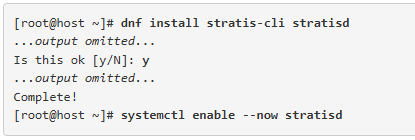
Stratis Administration Methods
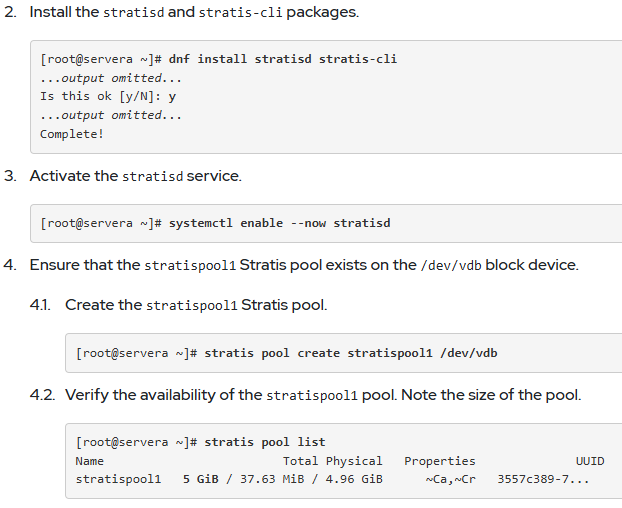
install the stratis-cli and stratisd packages. The stratis-cli package provides the stratis command,
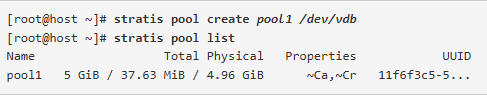
Create pools of one or more block devices by using the stratis pool create command.
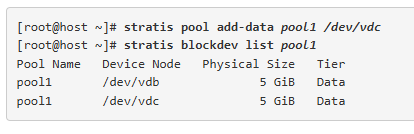
Use the stratis pool add-data command to add block devices to a pool.
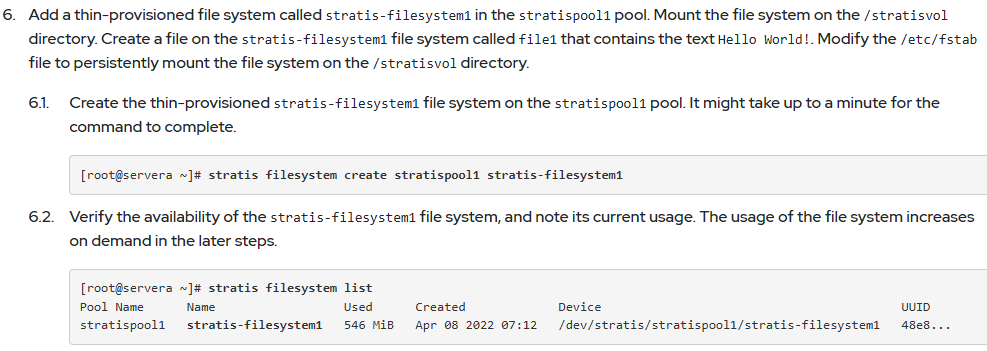
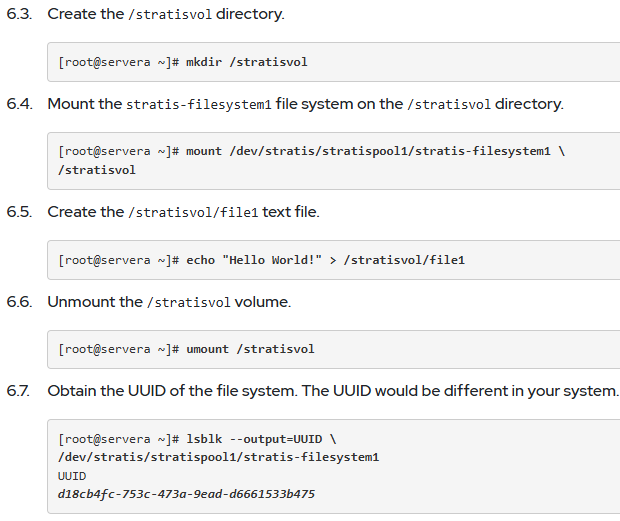
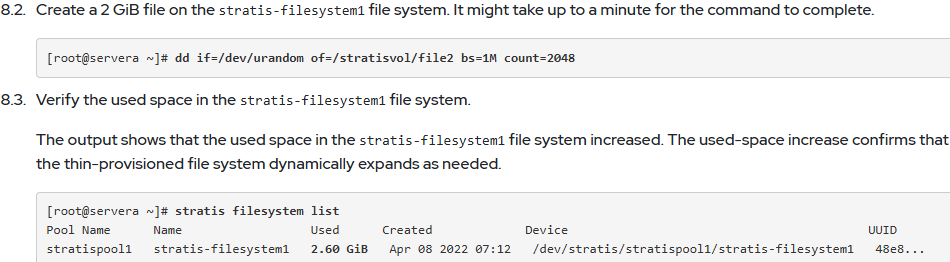
Use the stratis filesystem create command to create a file system from a pool. The links to the Stratis file systems are in the /dev/stratis/pool1 directory.

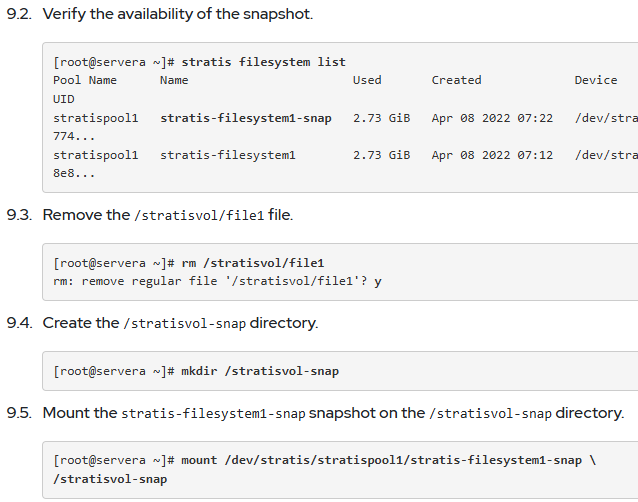
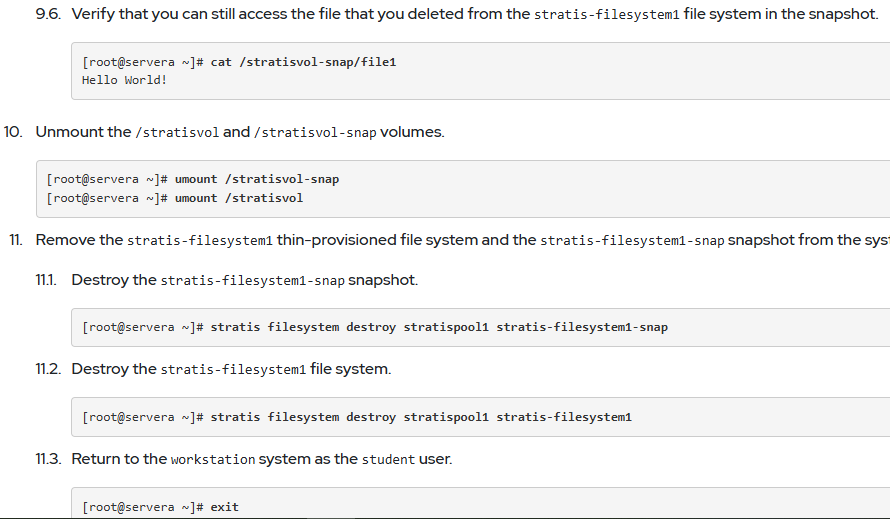
Create a Stratis file system snapshot by using the stratis filesystem snapshot command.

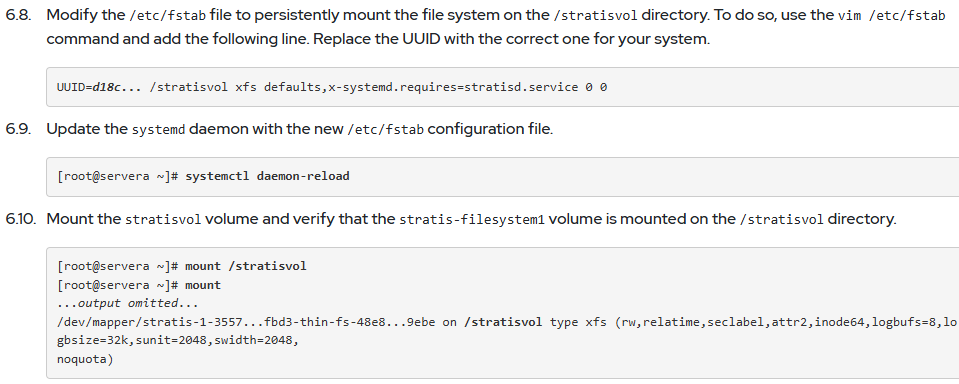
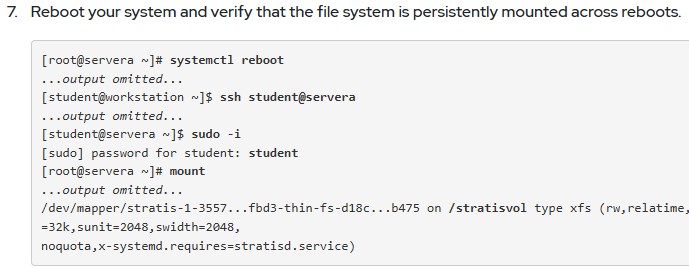
You can persistently mount Stratis file systems by editing the /etc/fstab file and specifying the details of the file system. You can also use the stratis filesystem list command to obtain the UUID of the file system.


Guided Exercise: Manage Layered Storage


Chapter 9. Access Network-Attached Storage
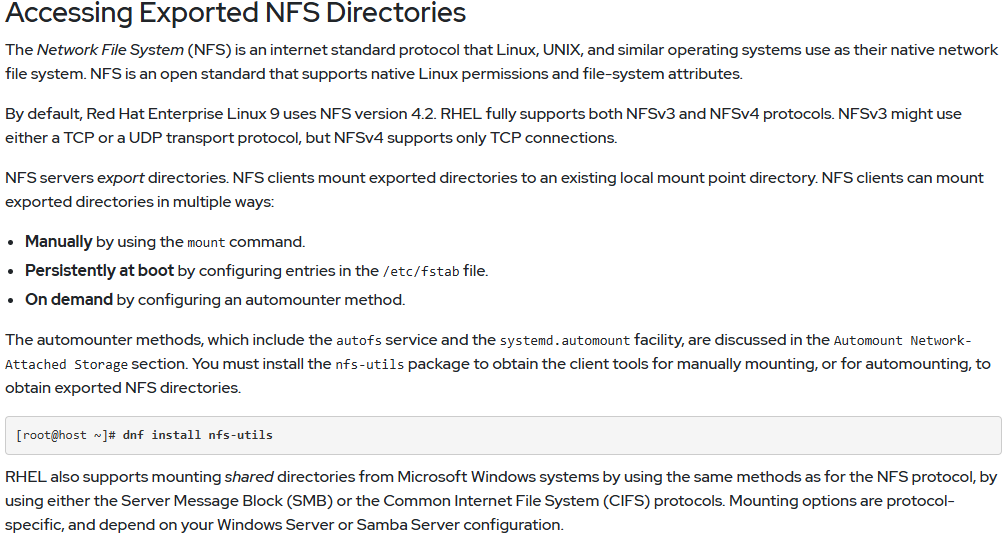
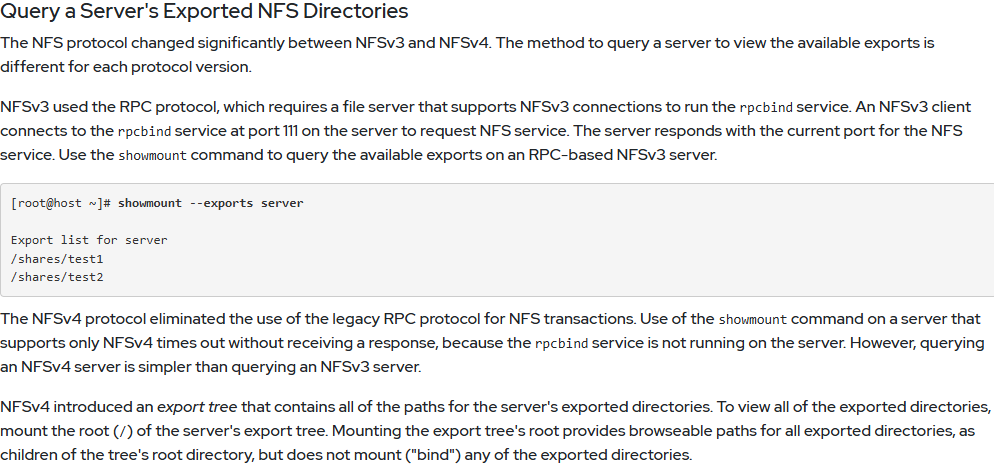


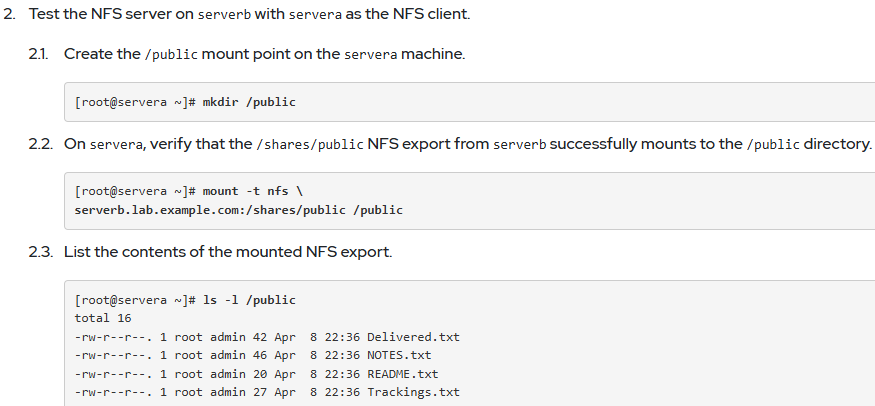
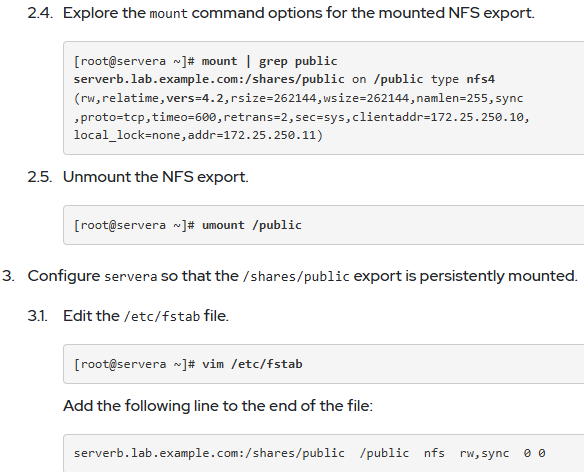
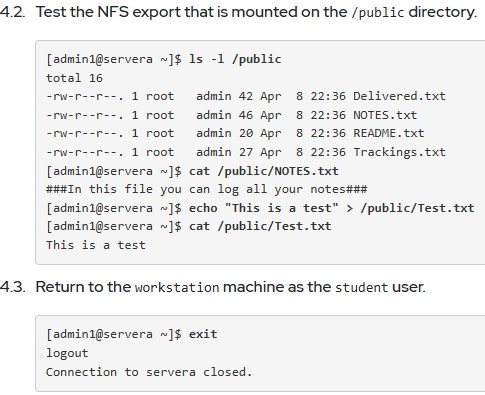
Guided Exercise: Manage Network-Attached Storage with NFS


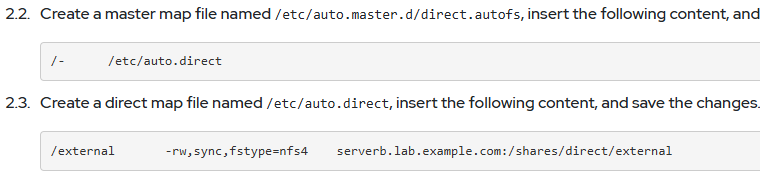
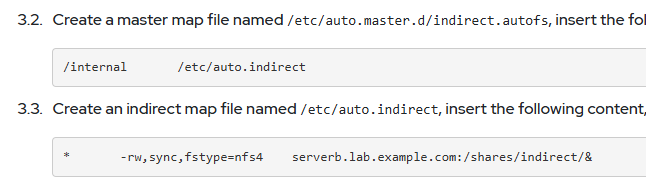
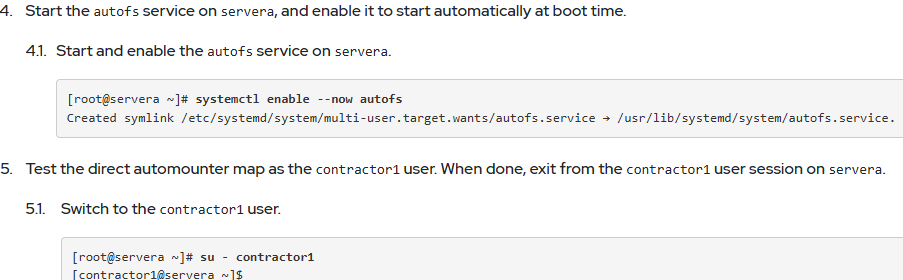
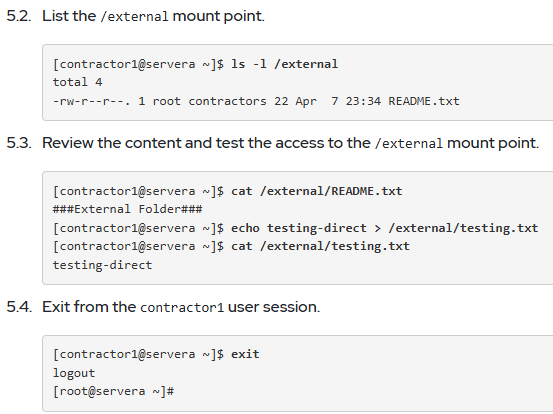
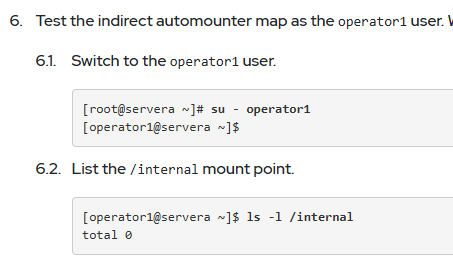
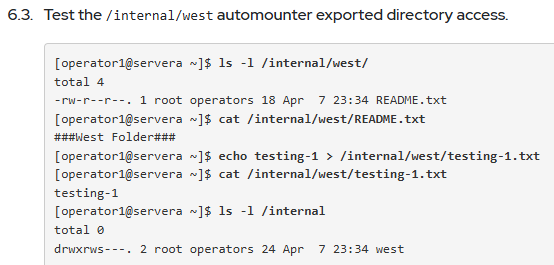
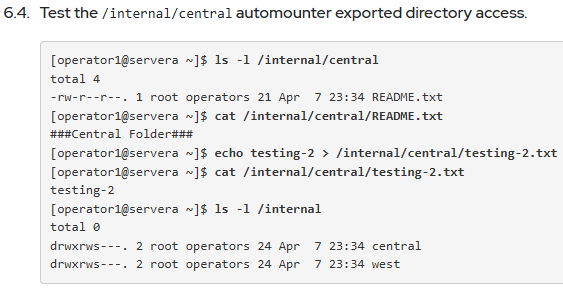
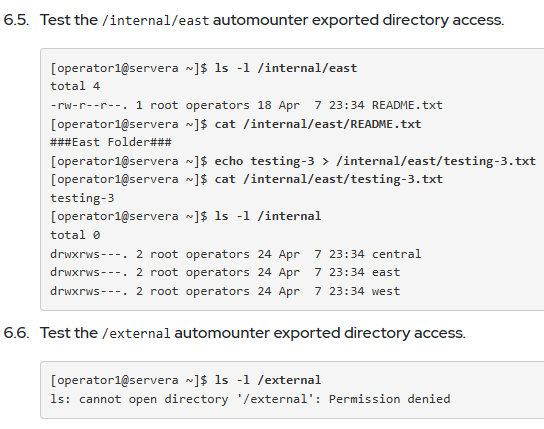
Automount Network-Attached Storage
dnf install autofs nfs-utils
[root@servera ~]# mount -t nfs \
serverb.lab.example.com:/shares/direct/external /mnt
[root@servera ~]# ls -l /mnt
[root@servera ~]# umount /mnt
[root@servera ~]# mount -t nfs \
serverb.lab.example.com:/shares/indirect /mnt
[root@servera ~]# ls -l /mnt
[root@servera ~]# umount /mnt
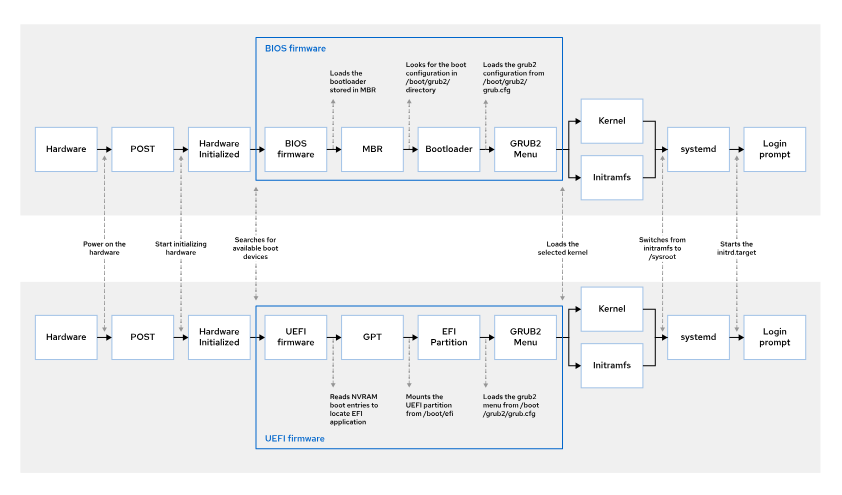
Chapter 10. Control the Boot Process
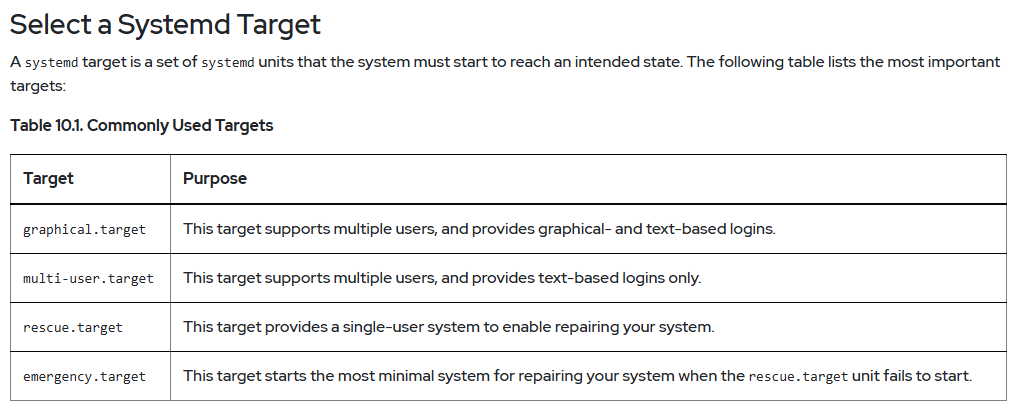
[user@host ~]$ systemctl list-dependencies graphical.target | grep target
[user@host ~]$ systemctl list-units --type=target --all
[root@host ~]# systemctl isolate multi-user.target
[user@host ~]$ systemctl cat graphical.target
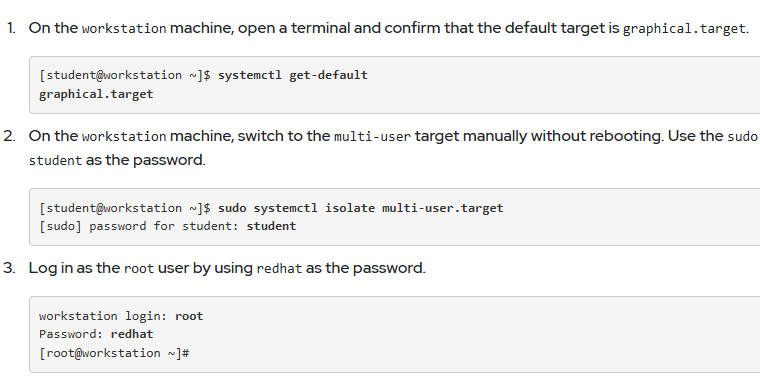
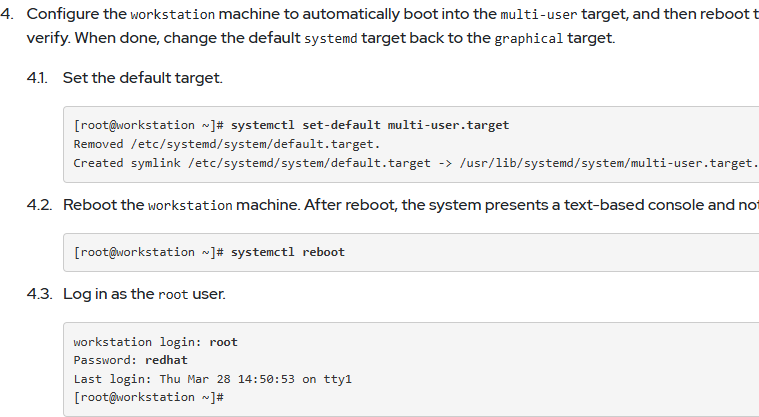
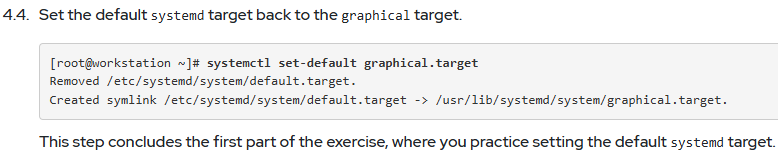
[root@host ~]# systemctl get-default
Guided Exercise: Select the Boot Target
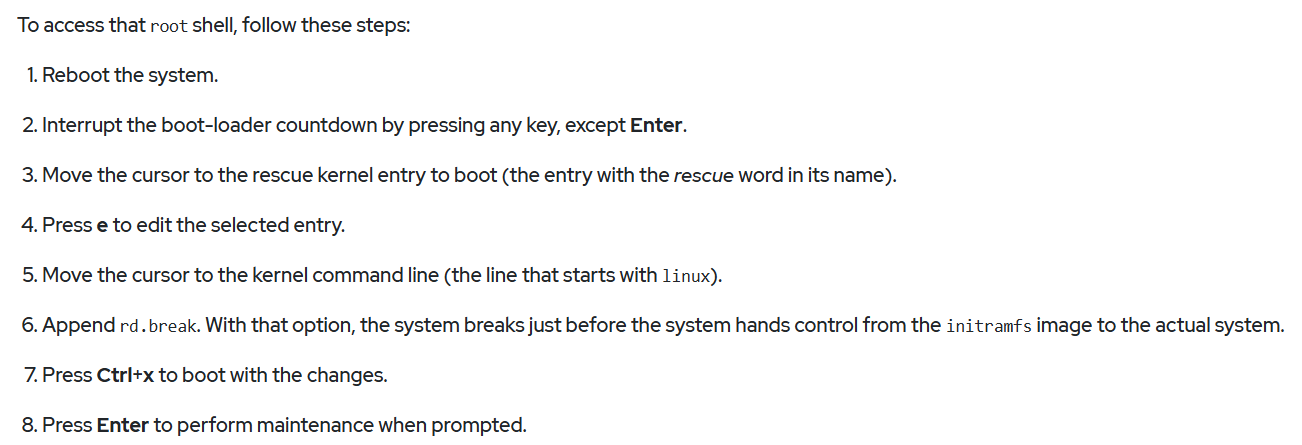
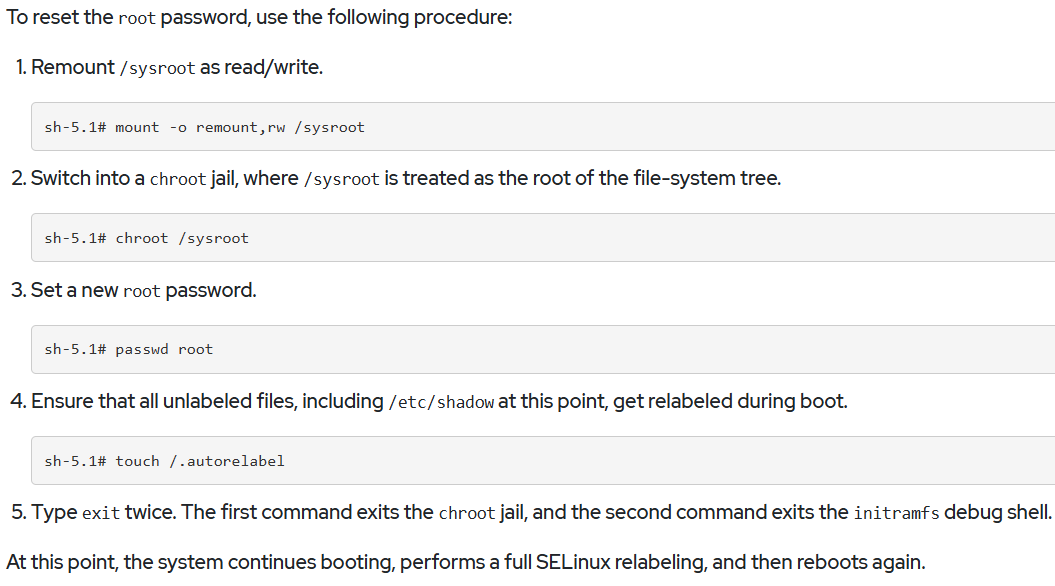
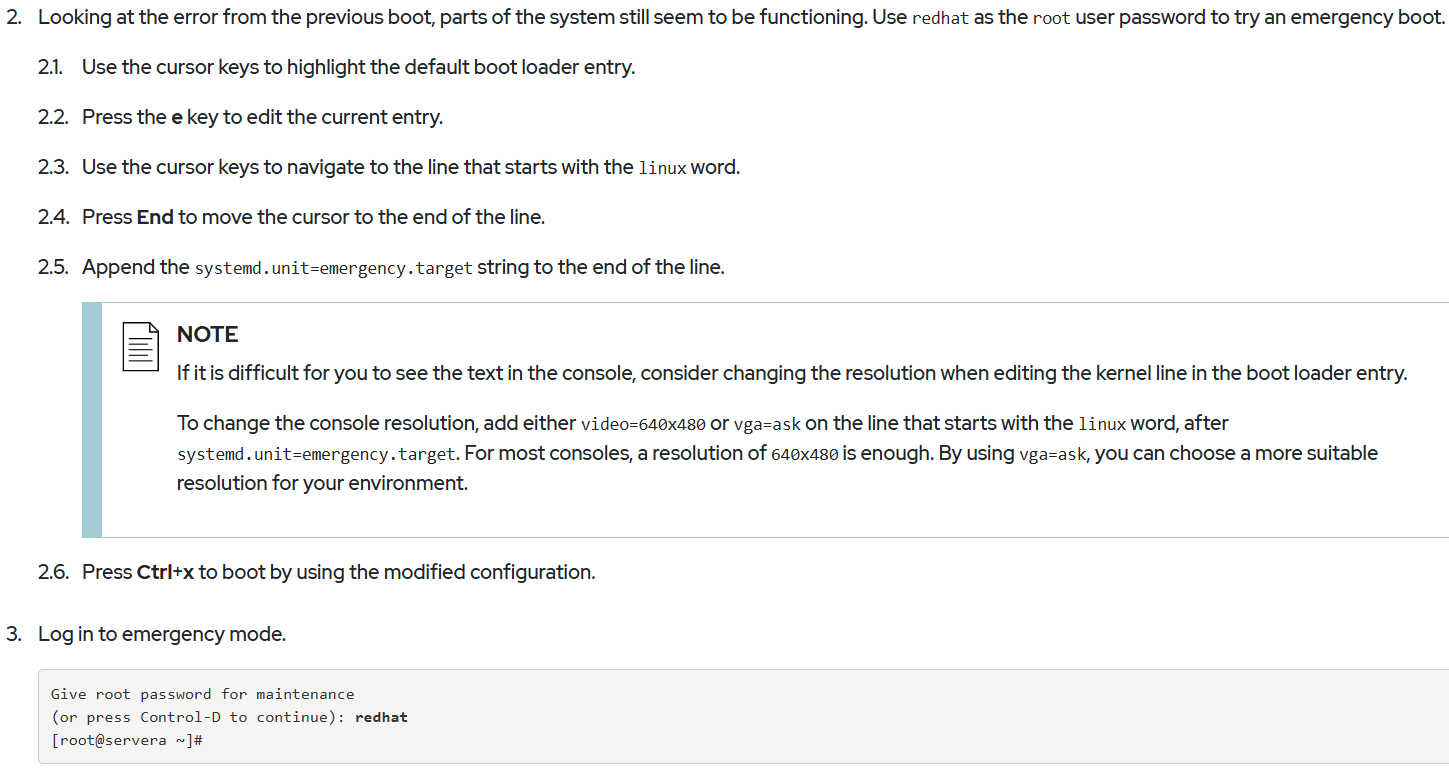
Reset the Root Password from the Boot Loader
Inspect Logs
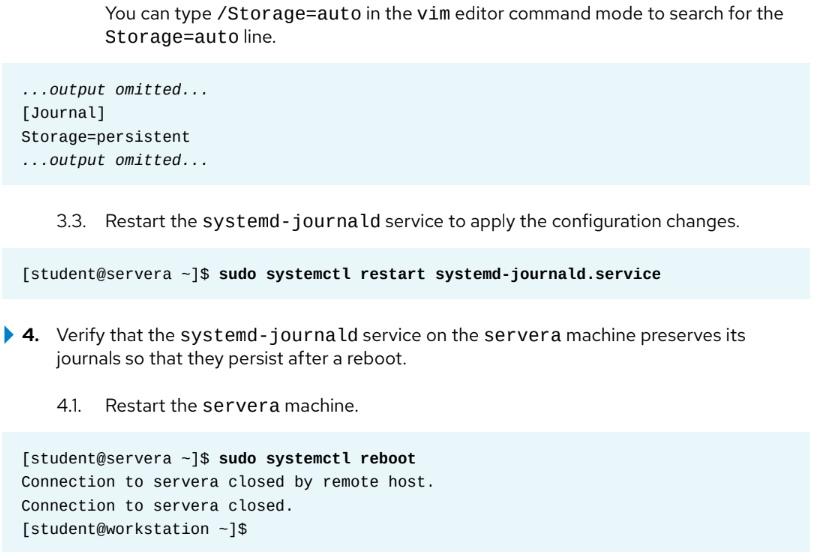
Remember that by default, the system journals are kept in the /run/log/journal directory, and the journals are cleared when the system reboots. To store journals in the /var/log/journal directory, which persists across reboots, set the Storage parameter to persistent in the /etc/systemd/journald.conf file.
[root@host ~]# vim /etc/systemd/journald.conf
[root@host ~]# systemctl restart systemd-journald.service
[root@host ~]# journalctl -b -1 -p err
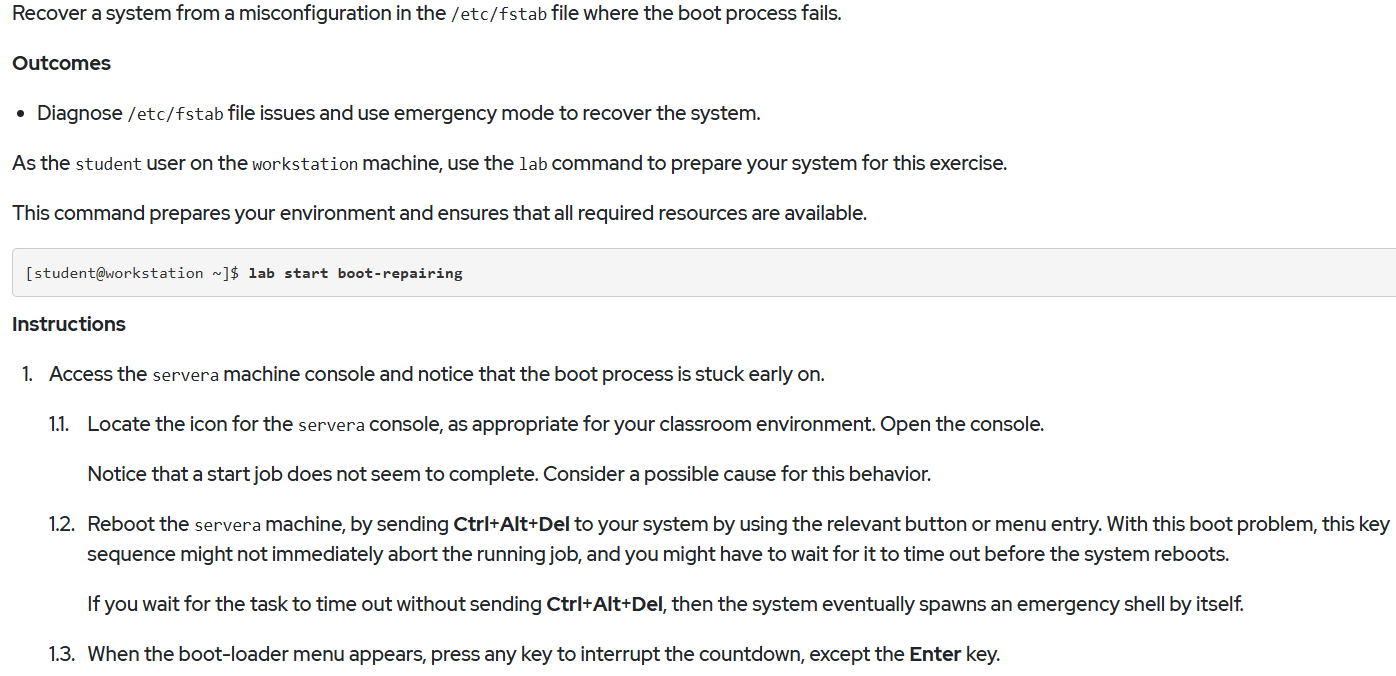
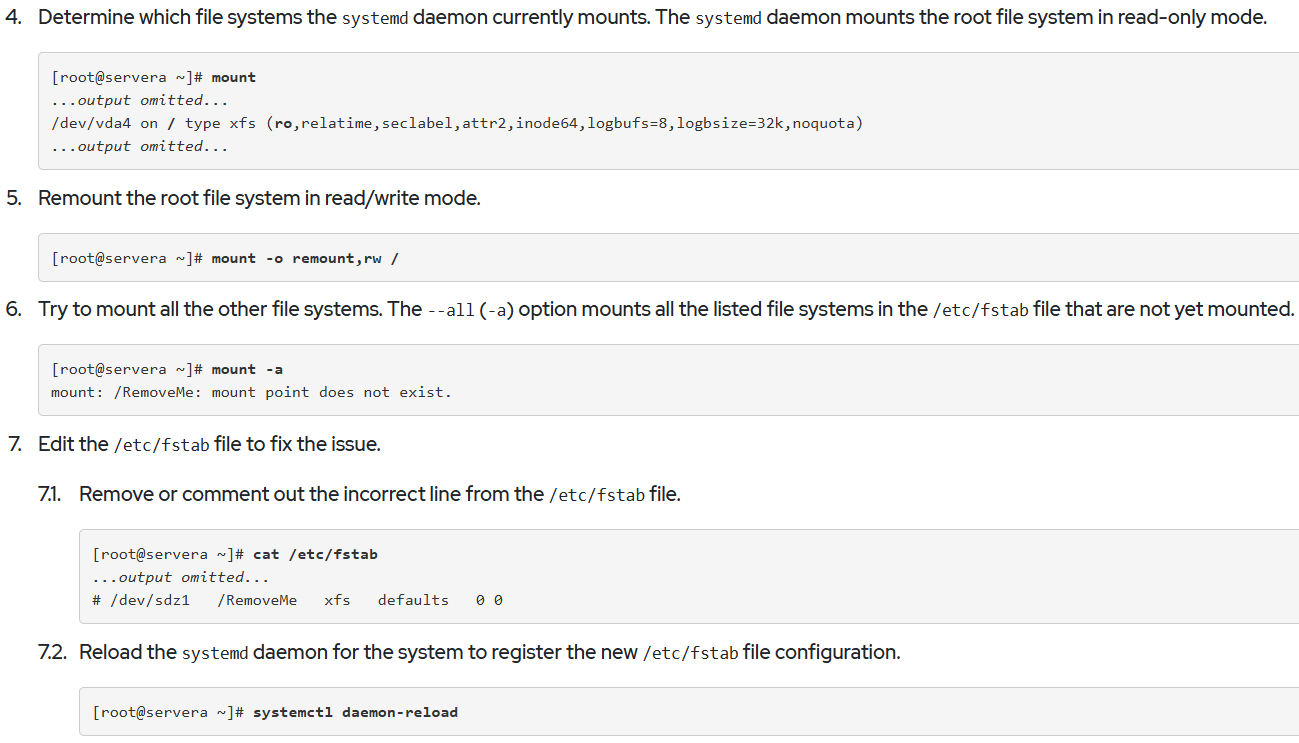
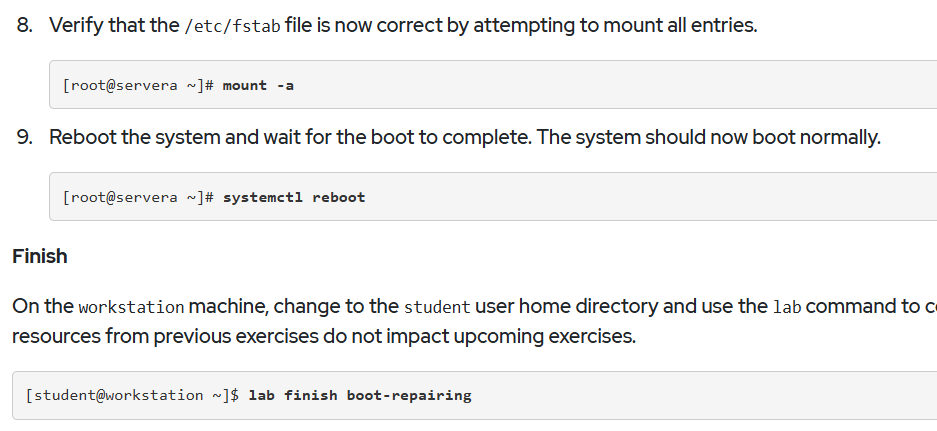
Repair File-system Issues at Boot

Chapter 11. Manage Network Security
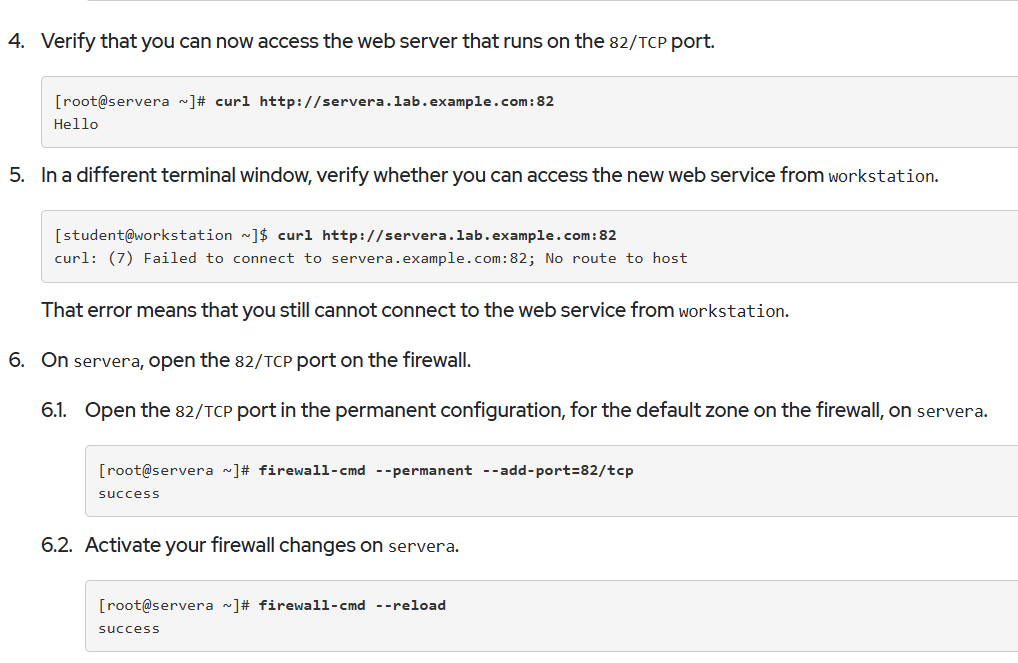
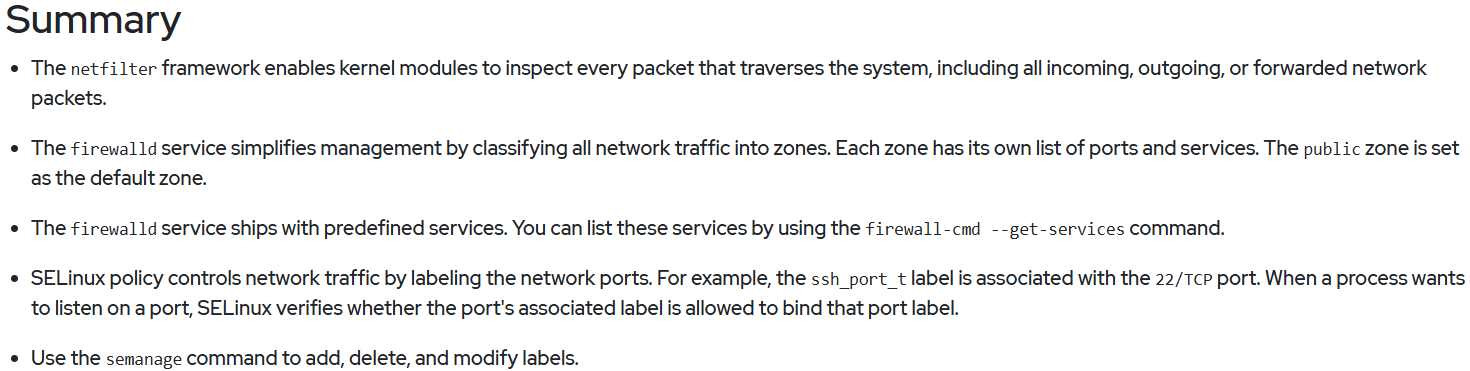
Manage Server Firewalls
Firewalld service, netfilter framework, nftables framework, iptables framework, iptables framework, arptables, and ebtables framework, firewall-cmd --get-services, firewalld.zone, firewalld.zones, and nft
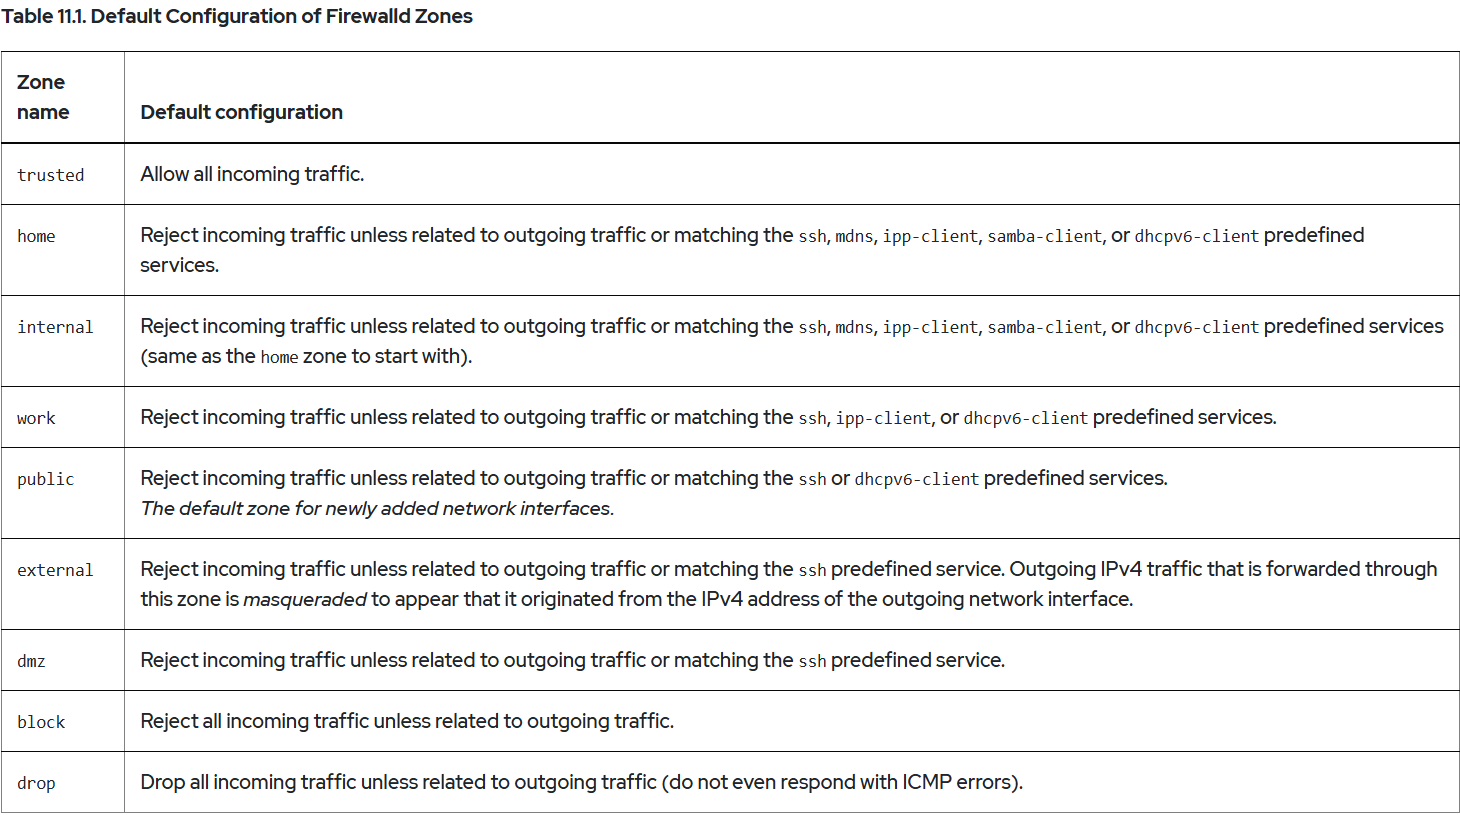
Predefined Zone
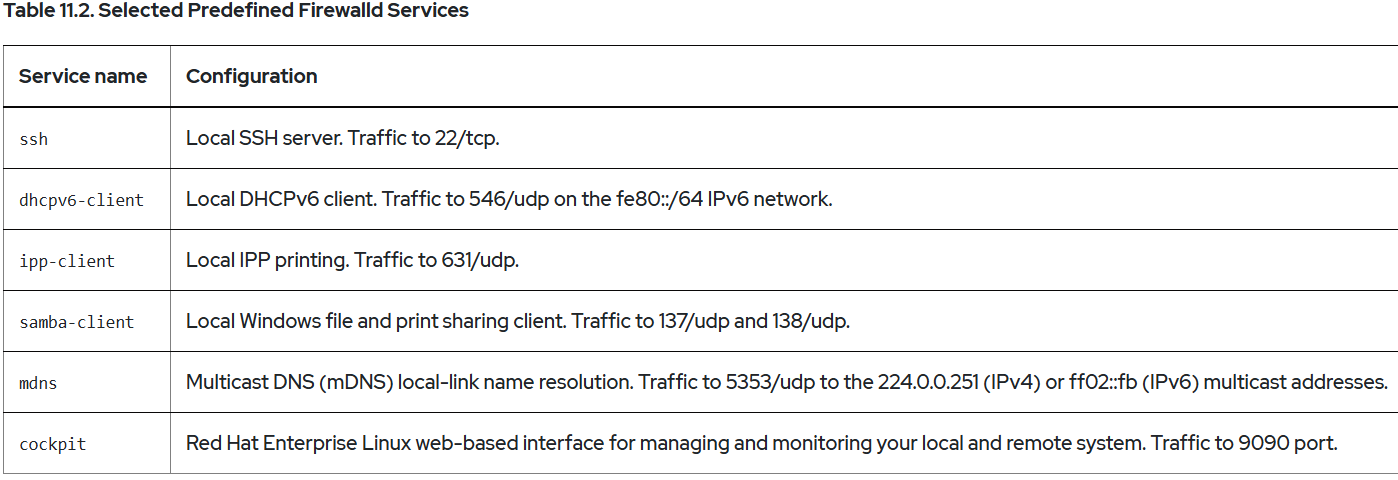
Predefined Services
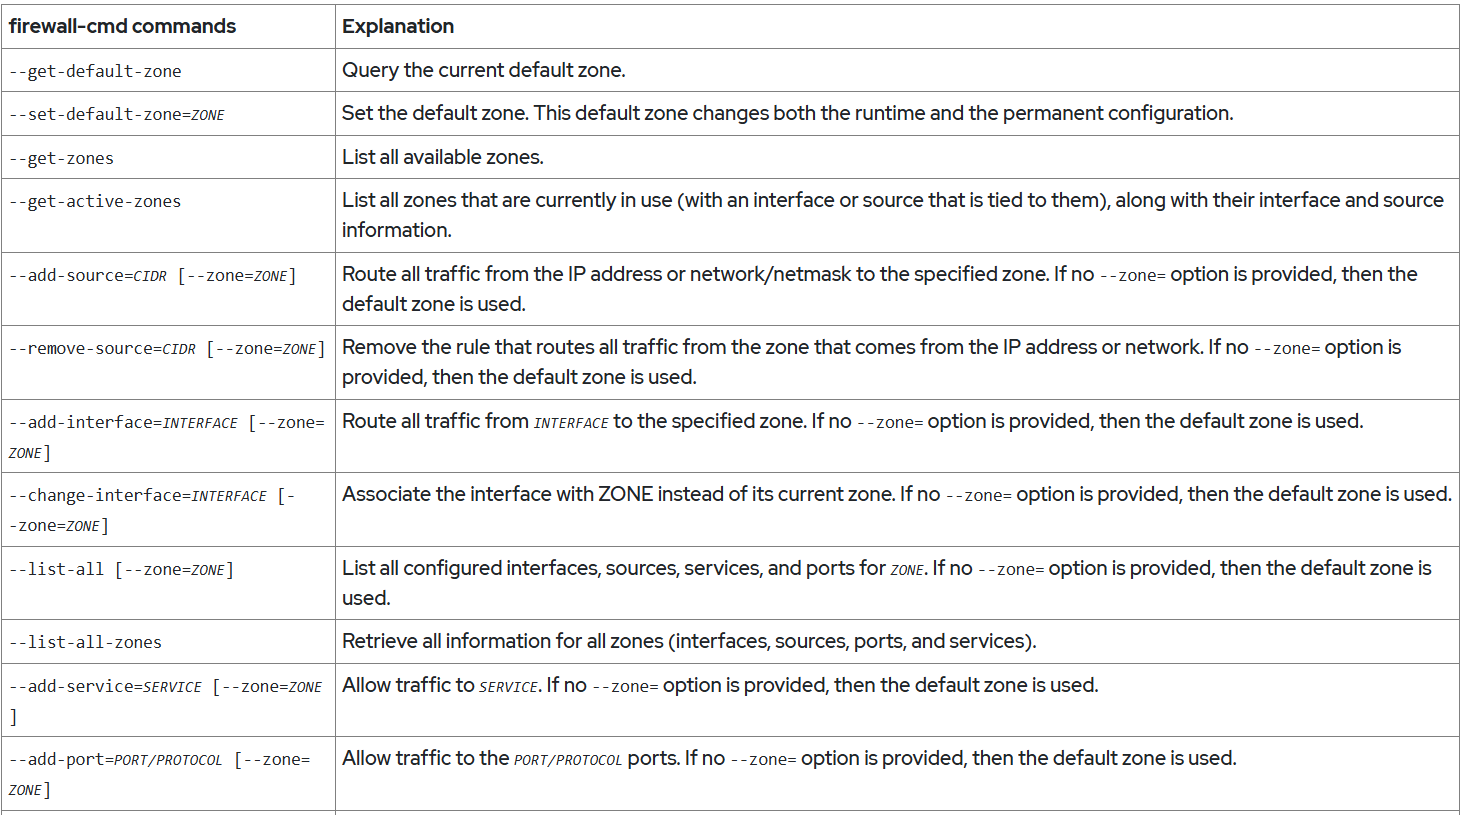
Configure the Firewall from the Command Line

##For example, the default zone to dmz, assigns all traffic coming from the 192.168.0.0/24 network to the internal zone, and opens the network ports for the mysql service on the internal zone :–--
[root@host ~]# firewall-cmd --set-default-zone=dmz
[root@host ~]# firewall-cmd --permanent --zone=internal \
--add-source=192.168.0.0/24
[root@host ~]# firewall-cmd --permanent --zone=internal --add-service=mysql
[root@host ~]# firewall-cmd --reload
##As another example, to add all the incoming traffic from the 172.25.25.11 single IPv4 address to the public zone, use the following commands:---
[root@host ~]# firewall-cmd --permanent --zone=public \
--add-source=172.25.25.11/32
[root@host ~]# firewall-cmd --reload
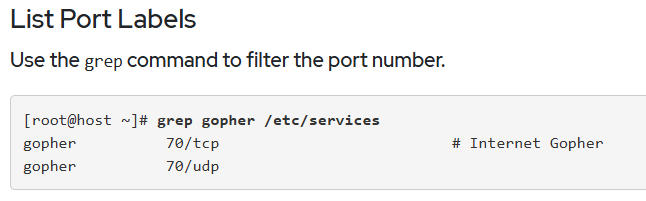
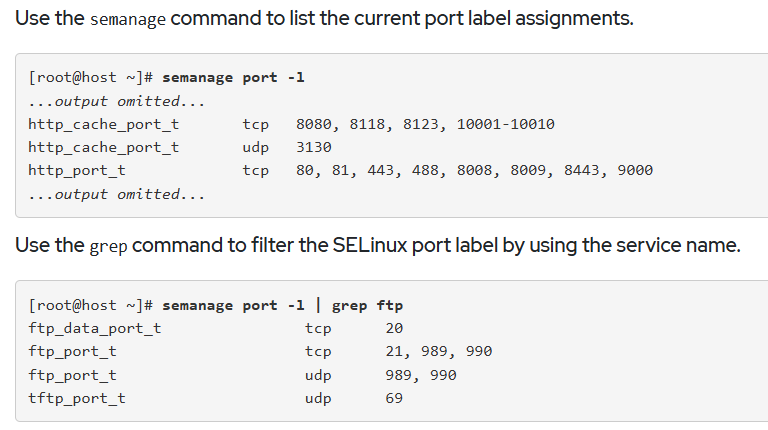
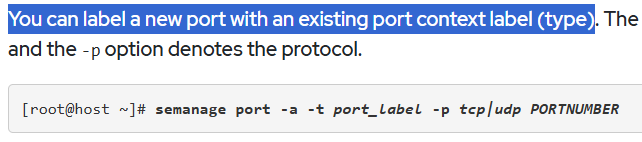
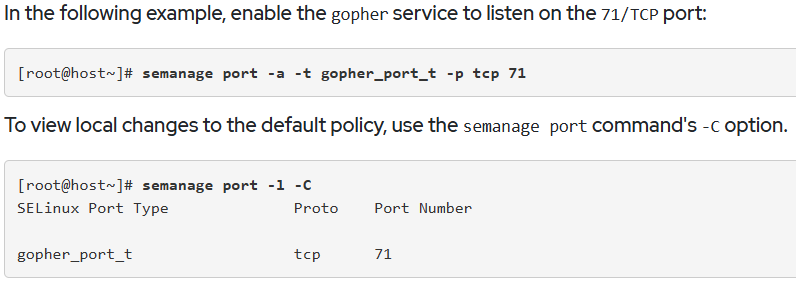
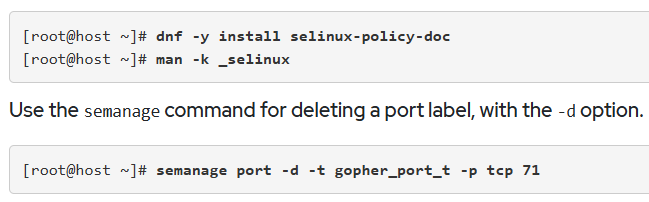
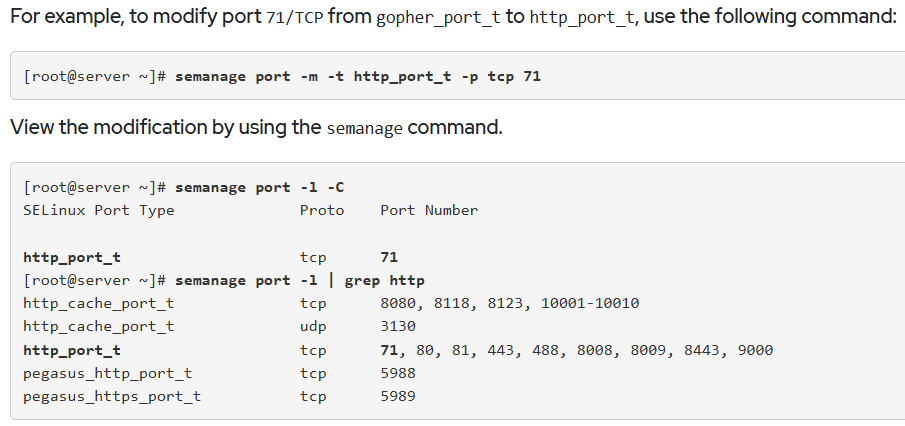
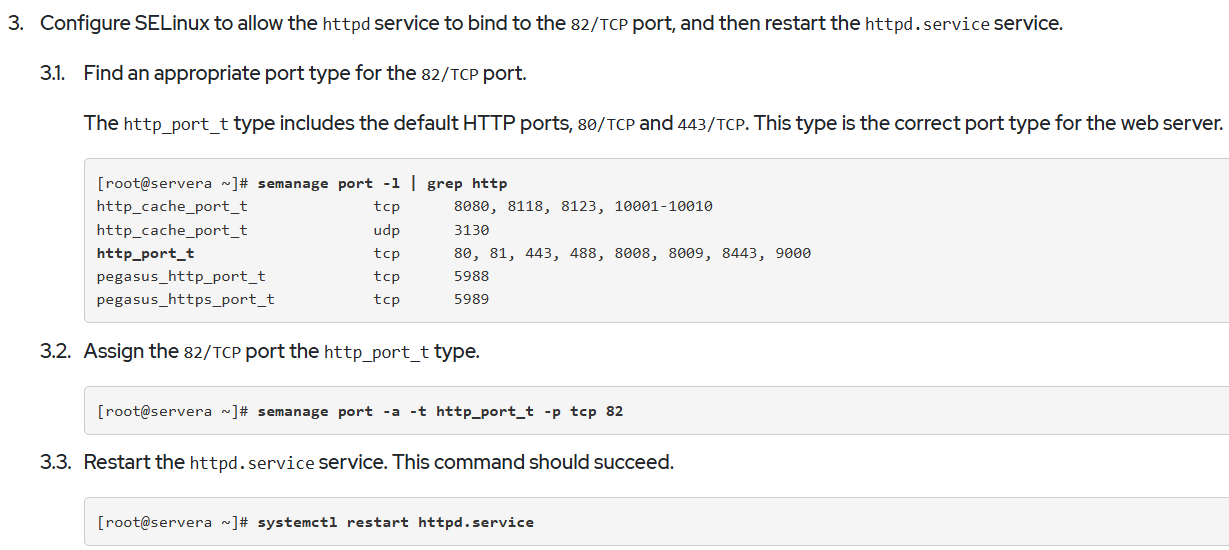
SELinux Port Labeling
semanage(8), semanage-port(8), and *_selinux(8)

Extra -------
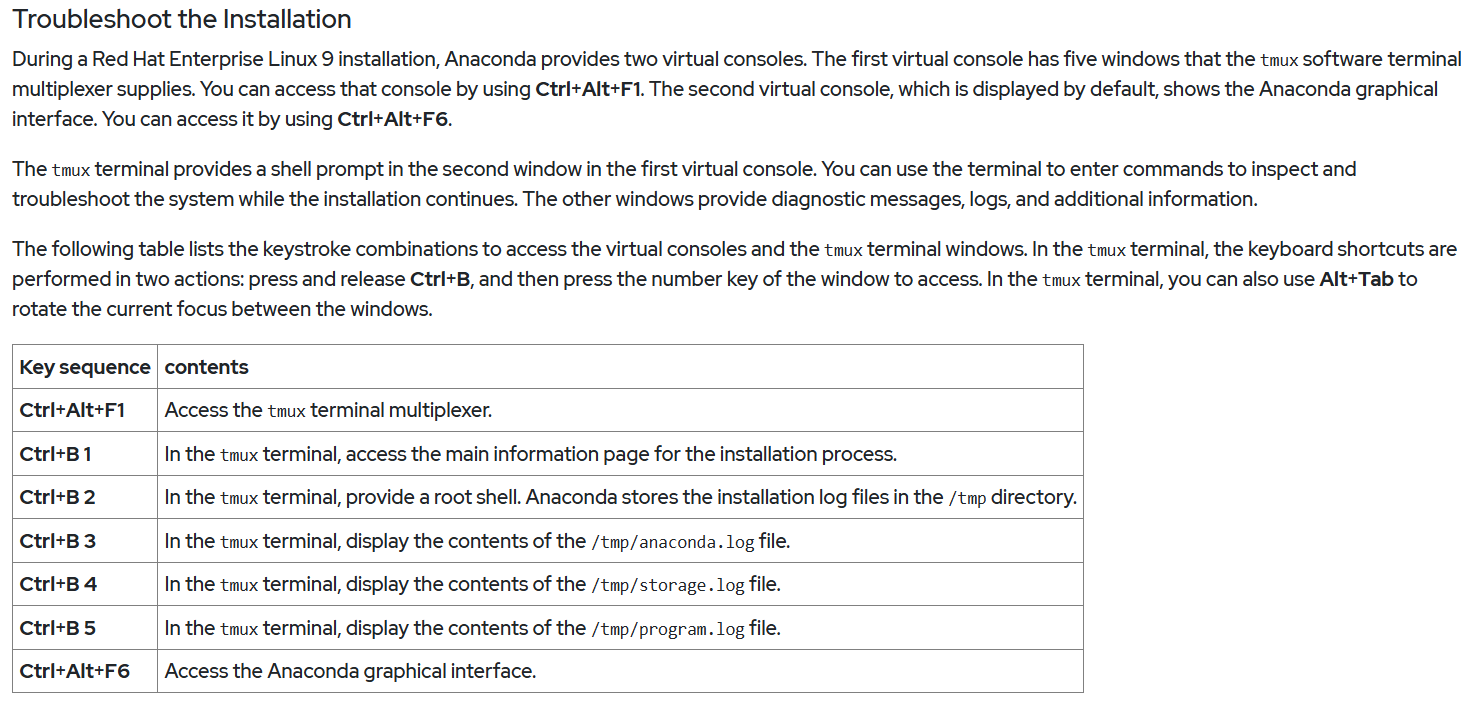
Chapter 12. Install Red Hat Enterprise Linux
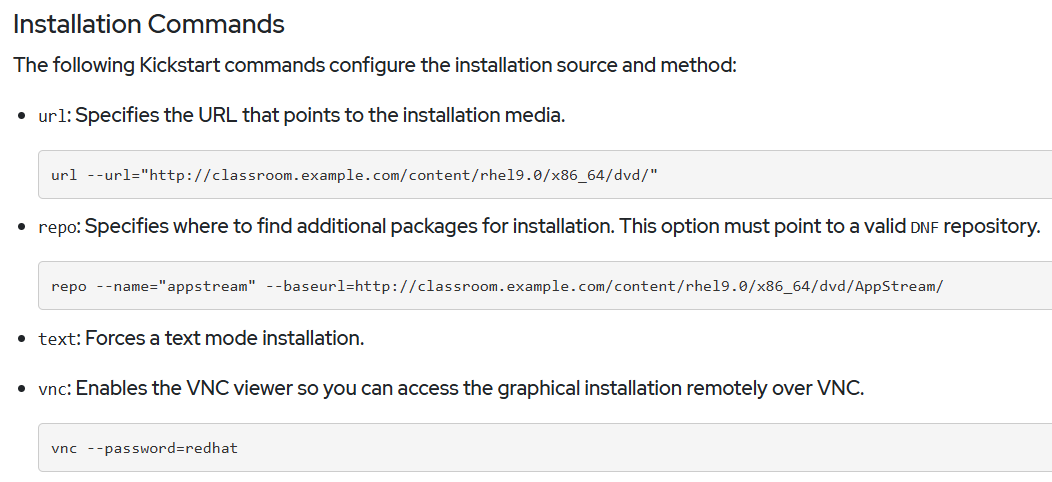
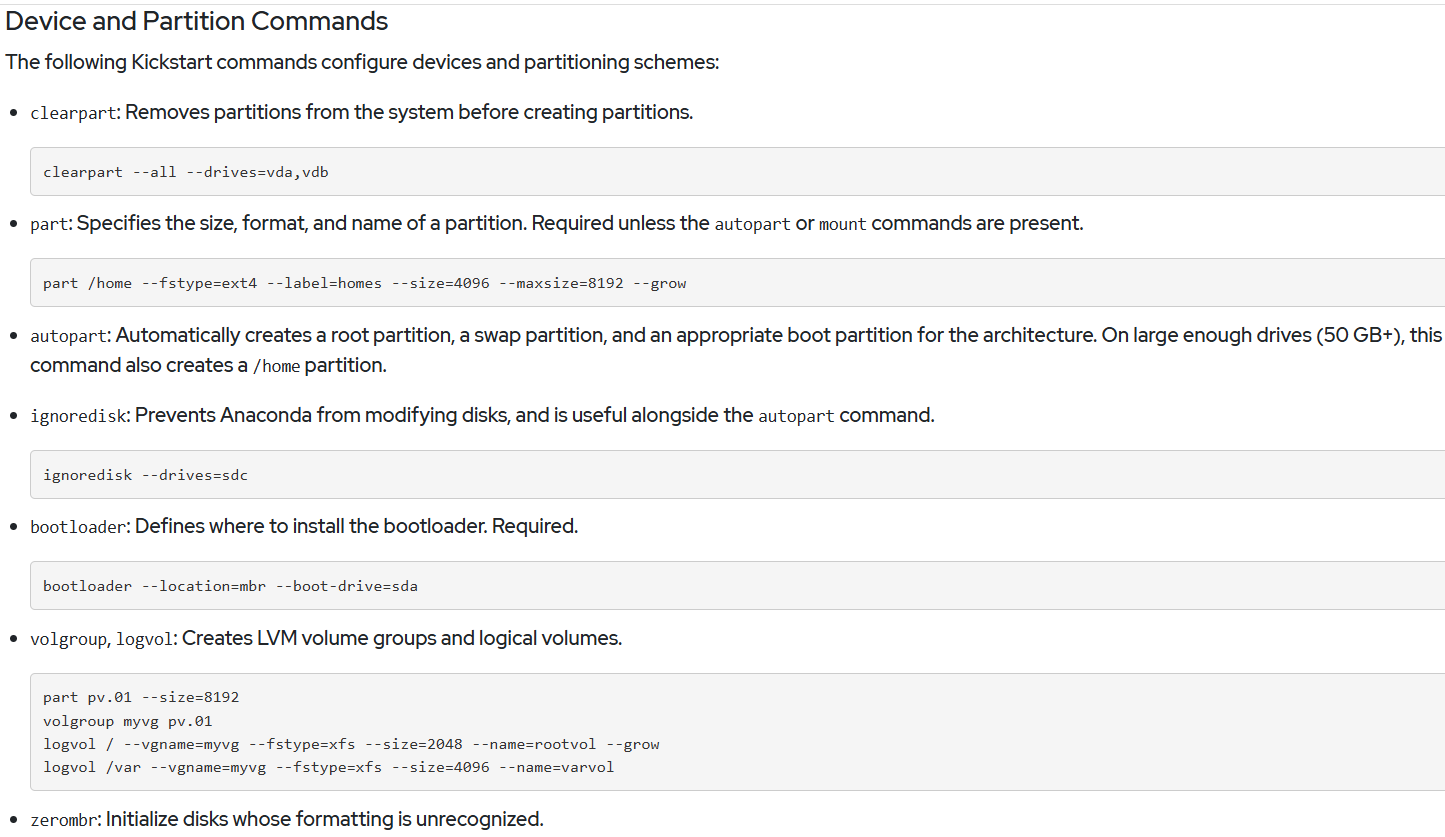
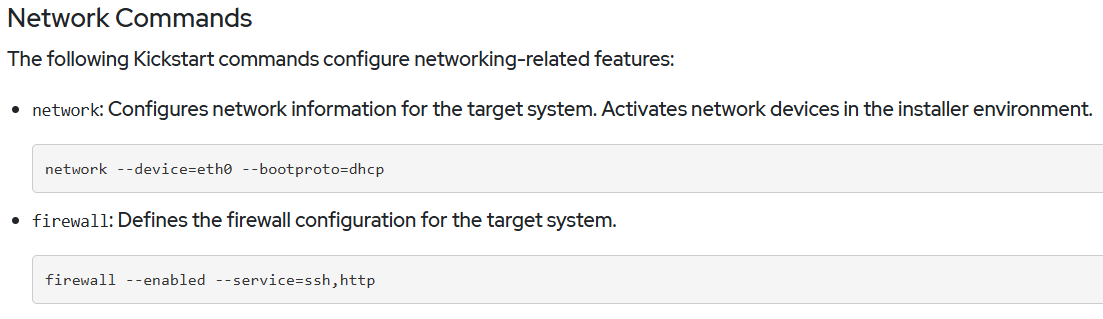
Automate Installation with Kickstart
Example Kickstart File
#version=RHEL9
# Define system bootloader options
bootloader --append="console=ttyS0 console=ttyS0,115200n8 no_timer_check net.ifnames=0 crashkernel=auto" --location=mbr --timeout=1 --boot-drive=vda
# Clear and partition disks
clearpart --all --initlabel
ignoredisk --only-use=vda
zerombr
part / --fstype="xfs" --ondisk=vda --size=10000
# Define installation options
text
repo --name="appstream" --baseurl="http://classroom.example.com/content/rhel9.0/x86_64/dvd/AppStream/"
url --url="http://classroom.example.com/content/rhel9.0/x86_64/dvd/"
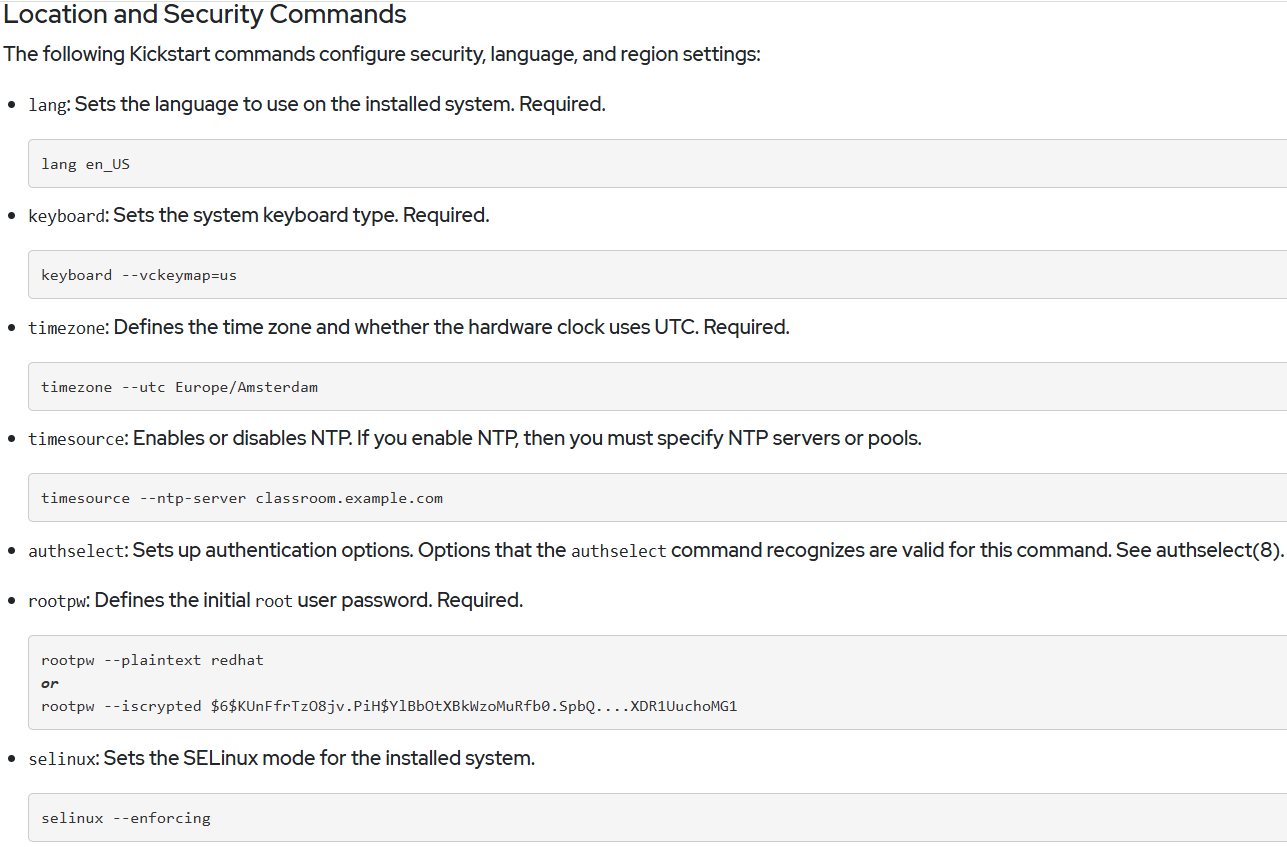
# Configure keyboard and language settings
keyboard --vckeymap=us
lang en_US
# Set a root password, authselect profile, and selinux policy
rootpw --plaintext redhat
authselect select sssd
selinux --enforcing
firstboot --disable
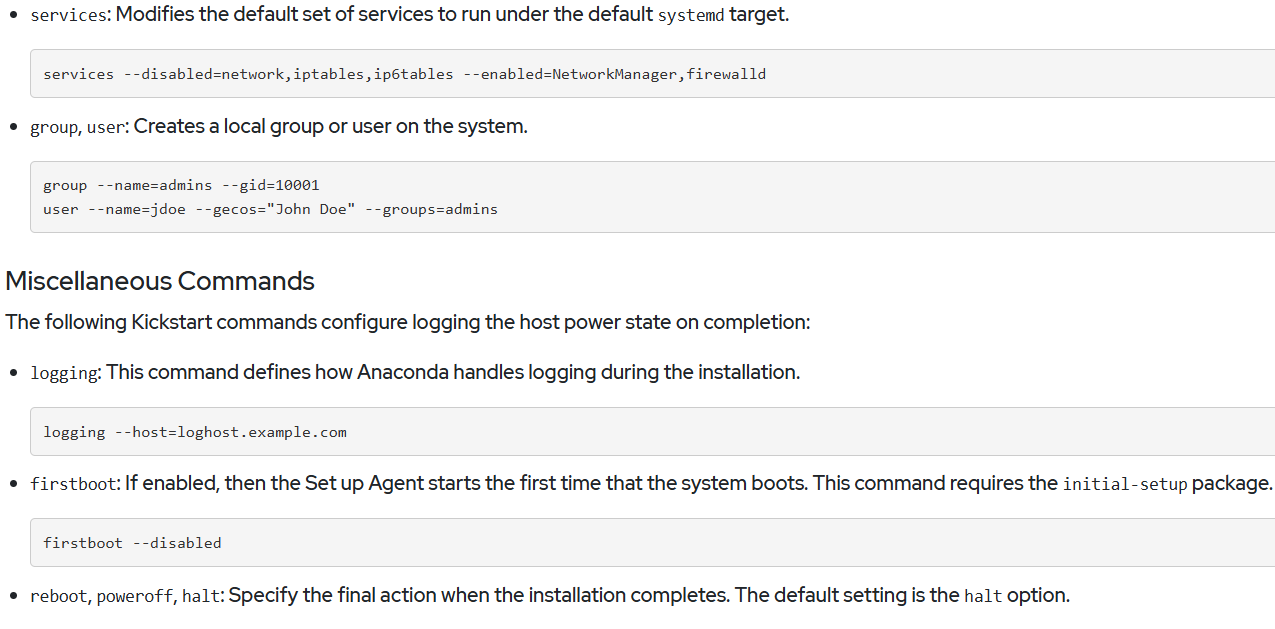
# Enable and disable system services
services --disabled="kdump,rhsmcertd" --enabled="sshd,rngd,chronyd"
# Configure the system timezone and NTP server
timezone America/New_York --utc
timesource --ntp-server classroom.example.com
The second part of a Kickstart file contains the %packages section, with details of which packages and package groups to install, and which packages not to install.
%packages
@core
chrony
cloud-init
dracut-config-generic
dracut-norescue
firewalld
grub2
kernel
rsync
tar
-plymouth
%end
The last part of the Kickstart file contains a %post installation script.
%post
echo "This system was deployed using Kickstart on $(date)" > /etc/motd
%end
You can also specify a Python script with the --interpreter option.
%post --interpreter="/usr/libexec/platform-python"
print("This line of text is printed with python")
%end
@The ksvalidator utility checks for syntax errors in a Kickstart file.
[user@host ~]$ ksvalidator /tmp/anaconda-ks.cfg
[user@host ~]$ ksvalidator /tmp/anaconda-ks.cfg
@The ksverdiff utility displays syntax differences between different operating system versions.
[user@host ~]$ ksverdiff -f RHEL8 -t RHEL9
The pykickstart package provides the ksvalidator and ksverdiff utilities.
Guided Exercise: Automate Installation with Kickstart
Create the /home/student/kickstart.cfg file by copying the contents of the /root/anaconda-ks.cfg file using privileged access.
[student@servera ~]$ sudo cat /root/anaconda-ks.cfg > ~/kickstart.cfg
Install and Configure Virtual Machines: KVM Virtualization
[root@host ~]# dnf group list | grep -i virt
[root@host ~]# dnf group info "Virtualization Host"
[root@host ~]# dnf group install "Virtualization Host"
[root@host ~]# virt-host-validate
Chapter 13. Run Containers
Introduction to Containers
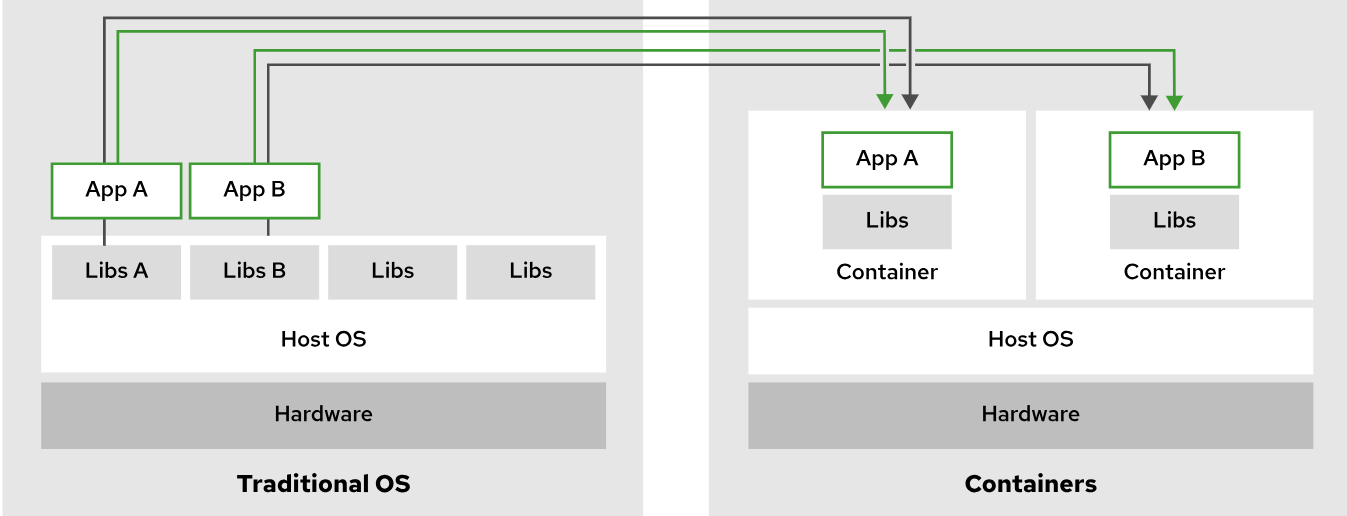
Comparing Containers to Virtual Machines
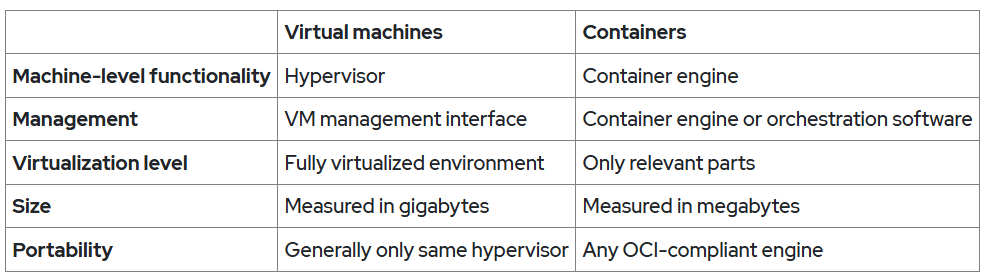
Rootless and Rootful Containers
On the container host, you can run containers as the root user or as a regular, unprivileged user. Containers that a privileged user runs are called rootful containers. Containers that non-privileged users run are called rootless containers.
For Example; Podman Enginee is rootless containers and docker is the Rootful containers.
Kernel and Namespaces
The kernel is the core of the operating system, managing hardware and providing services to applications, while namespaces are a kernel feature that allow for resource isolation between processes, enabling the creation of independent environments, like containers.
Container Management Tools
Red Hat Enterprise Linux provides a set of container tools that you can use to run containers in a single server:
• podman manages containers and container images.
• skopeo inspects, copies, deletes, and signs images.
• buildah creates container images.
Container Images and Registries
Red Hat distributes certified container images through two main container registries that you can access with your Red Hat login credentials:
• registry.redhat.io for containers that are based on official Red Hat products
• registry.connect.redhat.com for containers that are based on third-party products
Container and Registry Login by Local Enginee PODMAN -
#podman login registry.lab.example.com (login command)
#echo $PASSWORDVAR | podman login --username RH134 \
--password-stdin registry.access.redhat.com (Altr login command)
#podman login registry.access.redhat.com --get-login (verify login command)
#podman login quay.io --get-login
Configure Container Registries
Default Configuration file - /etc/containers/registries.conf
#cat /etc/containers/registries.conf
#podman pull ubi (Universal Base Image)
OR
#podman pull registry.access.redhat.com/ubi8/ubi:latest
Container Files to Build Container Images
#cat Containerfile
References Command -
cgroups, namespaces, seccomp
Open Container Initiative (OCI) Image Specification -
https://github.com/opencontainers/image-spec/blob/master/spec.md
Container files official Download Page:
Deploy Containers - The Podman Utility
#podman –help

Install Container Utilities
#dnf install container-tools
#dnf info container-tools
Download a Container Image from a Registry -
#podman info
#podman search python-38
#skopeo inspect docker://registry.access.redhat.com/ubi8/python-38
#podman pull registry.access.redhat.com/ubi8/python-38
#podman images
Create a Container Image from a Container File -
[user@host python36-app]$ cat Containerfile
[user@host ~]$ podman build -t NAME:TAG DIR
Name for the new image
Tag for the new image
DIR Path to the working directory and then you designate it by a dot (.)
[user@host python36-app]$ podman build -t python36:1.0 .
[user@host ~]$ podman images
[user@host ~]$ podman inspect localhost/python36:1.0
Or
[user@host ~]$ podman image inspect localhost/python36:1.0
Command for Running Containers
Now that you have the required container images, you can use them to run containers. A container can be in one of the following states:
Created - A container that is created but is not started.
Running - A container that is running with its processes.
Stopped - A container with its processes stopped.
Paused - A container with its processes paused. Not supported for rootless containers.
Deleted - A container with its processes in a dead state
Command -
[user@host ~]$ podman create --name python36 dd6ca291f097
[user@host ~]$ podman ps
[user@host ~]$podman ps -a (see all Existing containers)
[user@host ~]$ podman start python36
[user@host ~]$ podman run registry.access.redhat.com/ubi8/python-38 (remote container & foreground running container)
[user@host ~]$ podman run -d --name python38 -p 8000:8080 \
registry.access.redhat.com/ubi8/python-38 (Background running and fort forwarding container)
[root@host ~]# ps -ax
[student@host ~]$ podman exec python38 ps -ax
[student@host ~]$ podman exec python38 sh -c 'ps -ax > /tmp/process-data.log'
[user@host ~]$ python3 --version
Python 3.9.10
[user@host ~]$ podman exec python36 python3 --version
Python 3.6.8
[user@host ~]$ podman exec -it python38 bash (interact with bash)
File-system Isolation in Containers
[user@host ~]$ echo "echo 'hello world'" > /tmp/hello.sh
[user@host ~]$ stat /tmp/hello.sh
[user@host ~]$ podman exec python38 stat /tmp/hello.sh
[user@host ~]$ podman cp /tmp/hello.sh python38:/tmp/hello.sh
[user@host ~]$ podman exec python38 stat /tmp/hello.sh
[user@host ~]$ podman exec python38 bash /tmp/hello.sh
Remove Containers and Images
[user@host ~]$ podman rmi registry.access.redhat.com/ubi8/python-38
Error: Image used by
a60f71a1dc1b997f5ef244aaed232e5de71dd1e8a2565428ccfebde73a2f9462: image is in use
by a container
[user@host ~]$ podman stop python38
[user@host ~]$ podman rm python38
[user@host ~]$ podman rmi registry.access.redhat.com/ubi8/python-38
Untagged: registry.access.redhat.com/ubi8/python-38:latest
Deleted: a33d92f90990c9b1bad9aa98fe017e48f30c711b49527dcc797135352ea57d12
References
podman, podman-build, podman-cp, podman-exec, podmanimages, podman-inspect, podman-ps, podman-pull, podman-rm, podman-rmi, podman-run, podman-search, and podman-stop
For more information, refer to the Starting with Containers chapter in the Building,
Running, and Managing Linux Containers on Red Hat Enterprise Linux 9 guide at
Guided Exercise: Deploying Containers with Podman
Install the container-tools meta-package.
[student@servera ~]$ sudo dnf install container-tools
Create the ($HOME) home directory /home/student/.config/containers directory.
[student@servera ~]$ mkdir -p /home/student/.config/containers
Create the /home/student/.config/containers/registries.conf file with the following contents: -
unqualified-search-registries = ['registry.lab.example.com']
[[registry]]
location = "registry.lab.example.com"
insecure = true
blocked = false
Verify that the classroom registry is added.
[student@servera ~]$ podman info
Log in to the classroom registry.
[student@servera ~]$ podman login registry.lab.example.com --tls-verify=false
Search for a python-38 container in the registry.lab.example.com registry.
[student@servera ~]$ podman search registry.lab.example.com/
Inspect the image.
[student@servera ~]$ skopeo inspect docker://registry.lab.example.com/ubi8/python-38
Pull the python-38 container image.
[student@servera ~]$ podman pull registry.lab.example.com/ubi8/python-38
Verify that the container is downloaded to the local image repository.
[student@servera ~]$ podman images
Start the python38 container.
[student@servera ~]$ podman run -d --name python38 \
registry.lab.example.com/ubi8/python-38 sleep infinity
004756b52d3d3326545f5075594cffa858afd474b903288723a3aa299e72b1af
Verify that the container was created.
[student@servera ~]$ podman ps
Examine the container file in the /home/student/python39 directory.
[student@servera ~]$ cat /home/student/python39/Containerfile
Create the container image from the container file.
[student@servera ~]$ podman build -t python39:1.0 /home/student/python39/.
Verify that the container image exists in the local image repository.
[student@servera ~]$ podman images
Inspect the python39 container.
[student@servera ~]$ podman inspect localhost/python39:1.0
Create the python39 container.
[student@servera ~]$ podman create --name python39 localhost/python39:1.0
3db4eabe9043224a7bdf195ab5fd810bf95db98dc29193392cef7b94489e1aae
Start the python39 container.
[student@servera ~]$ podman start python39
python39
Verify that the container is running.
[student@servera ~]$ podman ps
Copy the /home/student/script.py script into the /tmp directory of the running containers, and run the script on each container.
[student@servera ~]$ podman cp /home/student/script.py python39:/tmp/script.py
[student@servera ~]$ podman cp /home/student/script.py python38:/tmp/script.py
Run the Python script in both containers, and then run the Python script on the host.
[student@servera ~]$ podman exec -it python39 python3 /tmp/script.py
[student@servera ~]$ podman exec -it python38 python3 /tmp/script.py
[student@servera ~]$ python3 /home/student/script.py
Delete containers and images. Return to workstation.
[student@servera ~]$ podman stop python39 python38
[student@servera ~]$ podman rm python39 python38
[student@servera ~]$ podman rmi localhost/python39:1.0 \
registry.lab.example.com/ubi8/python-38:latest \
registry.lab.example.com/ubi9-beta/ubi
Return to workstation.
[student@servera ~]$ exit
Guide Exercise: Manage Container Storage and Network Resources
Create the frontend container network. Create the db_client and db_01 containers and connect them to the frontend network.
[student@servera ~]$ podman network create --subnet 10.89.1.0/24 \
--gateway 10.89.1.1 frontend
[student@servera ~]$ podman login registry.lab.example.com
[student@servera ~]$ podman run -d --name db_client --network frontend \
-v /etc/yum.repos.d:/etc/yum.repos.d registry.lab.example.com/ubi9-beta/ubi \
sleep infinity
[student@servera ~]$ podman run -d --name db_01 --network frontend \
registry.lab.example.com/rhel8/mariadb-105
3e767ae6eea4578152a216beb5ae98c8ef03a2d66098debe2736b8b458bab405
[student@servera ~]$ podman ps -a
Troubleshoot the db_01 container and determine why it is not running. Re-create the db_01 container by using the required environment variables.
[student@servera ~]$ podman container logs db_01
[student@servera ~]$ podman rm db_01
3e767ae6eea4578152a216beb5ae98c8ef03a2d66098debe2736b8b458bab405
[student@servera ~]$ podman run -d --name db_01 \
--network frontend \
-e MYSQL_USER=dev1 \
-e MYSQL_PASSWORD=devpass \
-e MYSQL_DATABASE=devdb \
-e MYSQL_ROOT_PASSWORD=redhat \
registry.lab.example.com/rhel8/mariadb-105
948c4cd767b561432056e77adb261ab4024c1b66a22af17861aba0f16c66273b
[student@servera ~]$ podman ps
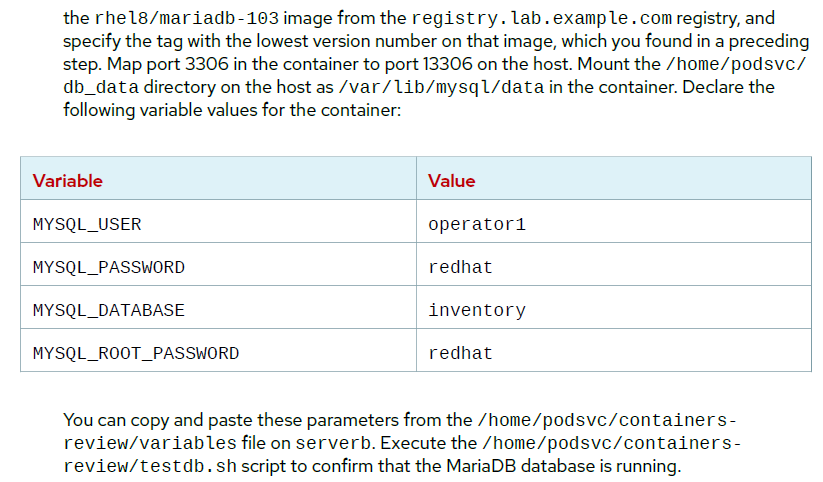
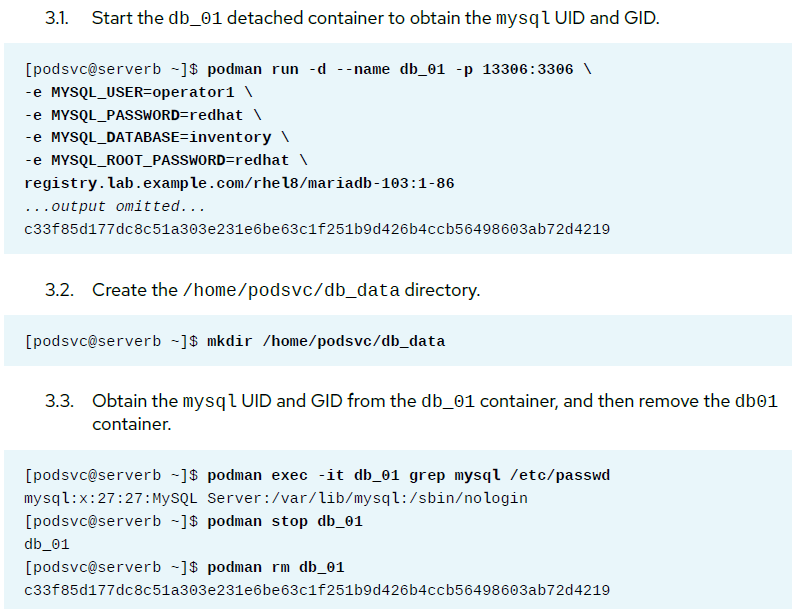
Create persistent storage for the containerized MariaDB service, and map the local machine 13306 port to the 3306 port in the container. Allow traffic to the 13306 port on the servera machine.
[student@servera ~]$ mkdir /home/student/databases
[student@servera ~]$ podman exec -it db_01 grep mysql /etc/passwd
mysql:x:27:27:MySQL Server:/var/lib/mysql:/sbin/nologin
[student@servera ~]$ podman stop db_01
db_01
[student@servera ~]$ podman rm db_01
948c4cd767b561432056e77adb261ab4024c1b66a22af17861aba0f16c66273b
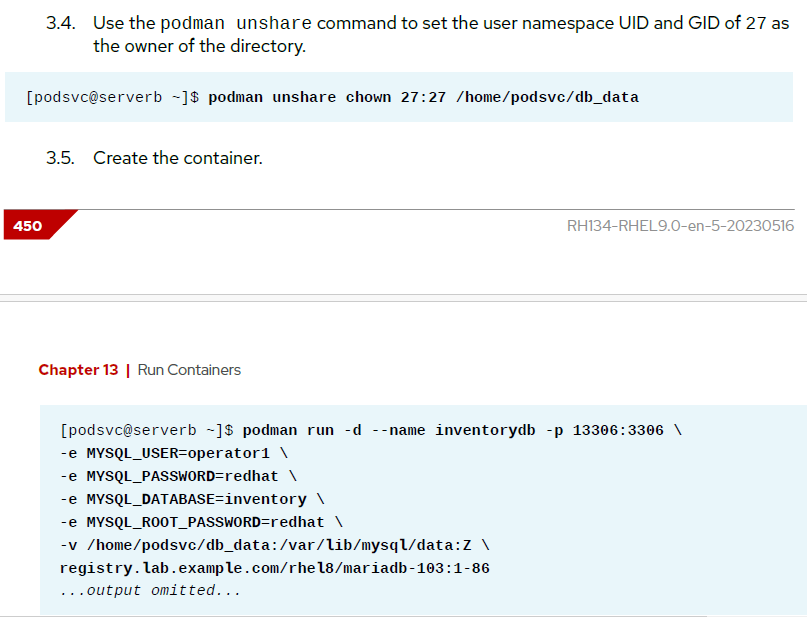
[student@servera ~]$ podman unshare chown 27:27 /home/student/databases/
[student@servera ~]$ ls -l /home/student/
[student@servera ~]$ podman run -d --name db_01 \
--network frontend \
-e MYSQL_USER=dev1 \
-e MYSQL_PASSWORD=devpass \
-e MYSQL_DATABASE=devdb \
-e MYSQL_ROOT_PASSWORD=redhat \
-v /home/student/databases:/var/lib/mysql:Z \
-p 13306:3306 registry.lab.example.com/rhel8/mariadb-105
[student@servera ~]$ podman exec -it db_client dnf install -y mariadb
[student@servera ~]$ podman exec -it db_client mysql -u dev1 -p -h db_01
Enter password: devpass
...output omitted...
MariaDB [(none)]> USE devdb;
Database changed
MariaDB [devdb]> CREATE TABLE crucial_data(column1 int);
Query OK, 0 rows affected (0.036 sec)
MariaDB [devdb]> SHOW TABLES;
+-----------------+
| Tables_in_devdb |
+-----------------+
| crucial_data |
+-----------------+
1 row in set (0.001 sec)
MariaDB [devdb]> quit
Bye
[student@servera ~]$ sudo firewall-cmd --add-port=13306/tcp --permanent
[sudo] password for student: student
success
[student@servera ~]$ sudo firewall-cmd --reload
success
[student@workstation ~]$ mysql -u dev1 -p -h servera --port 13306\
devdb -e 'SHOW TABLES';
Enter password: devpass
+-----------------+
| Tables_in_devdb |
+-----------------+
| crucial_data |
+-----------------+
Create a second container network called backend, and connect the backend network to the db_client and db_01 containers. Test network connectivity and DNS resolution between the containers.
[student@servera ~]$ podman network create --subnet 10.90.0.0/24 \
--gateway 10.90.0.1 backend
[student@servera ~]$ podman network connect backend db_client
[student@servera ~]$ podman network connect backend db_01
[student@servera ~]$ podman inspect db_01
[student@servera ~]$ podman exec -it db_client dnf install -y iputils
[student@servera ~]$ podman exec -it db_client ping -c4 db_01
Guided Exercise: Manage Containers as System Services
References
loginctl(1), systemd.unit(5), systemd.service(5), subuid(5), and podman-generate-systemd(1) man pages
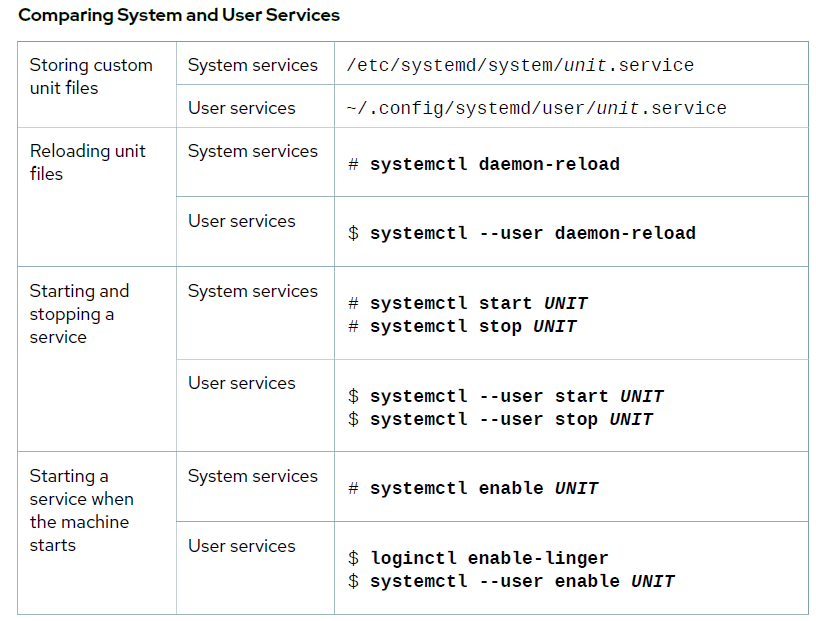
Managing Containers in Podman with Systemd Unit Files
https://www.youtube.com/watch?v=AGkM2jGT61Y
For more information, refer to the Running Containers as Systemd Services with
Podman chapter in the Red Hat Enterprise Linux 9 Building, Running, and Managing
Containers guide at
Create a user account called contsvc and use redhat as the password. Use this user account to run containers as systemd services.
[student@servera ~]$ sudo useradd contsvc
[sudo] password for student: student
[student@servera ~]$ sudo passwd contsvc
[student@servera ~]$ exit
logout
Connection to servera closed.
[student@workstation ~]$ ssh contsvc@servera
...output omitted...
[contsvc@servera ~]$
Configure access to the registry.lab.example.com classroom registry in your home
directory. Use the /tmp/containers-services/registries.conf file as a template.
[contsvc@servera ~]$ mkdir -p ~/.config/containers/
[contsvc@servera ~]$ cp /tmp/containers-services/registries.conf \
~/.config/containers/
[contsvc@servera ~]$ podman search ubi
Use the /home/contsvc/webcontent/html/ directory as persistent storage for the web server container. Create the index.html test page with the Hello World line inside the directory.
[contsvc@servera ~]$ mkdir -p ~/webcontent/html/
[contsvc@servera ~]$ echo "Hello World" > ~/webcontent/html/index.html
[contsvc@servera ~]$ ls -ld webcontent/html/
drwxr-xr-x. 2 contsvc contsvc 24 Aug 28 04:56 webcontent/html/
[contsvc@servera ~]$ ls -l webcontent/html/index.html
-rw-r--r--. 1 contsvc contsvc 12 Aug 28 04:56 webcontent/html/index.html
Use the registry.lab.example.com/rhel8/httpd-24:1-163 image to run a container called webapp in detached mode. Redirect the 8080 port on the local host to the container 8080 port. Mount the ~/webcontent directory from the host to the /var/www directory in the container.
[contsvc@servera ~]$ podman login registry.lab.example.com
[contsvc@servera ~]$ podman run -d --name webapp -p 8080:8080 -v \
~/webcontent:/var/www:Z registry.lab.example.com/rhel8/httpd-24:1-163
[contsvc@servera ~]$ curl http://localhost:8080
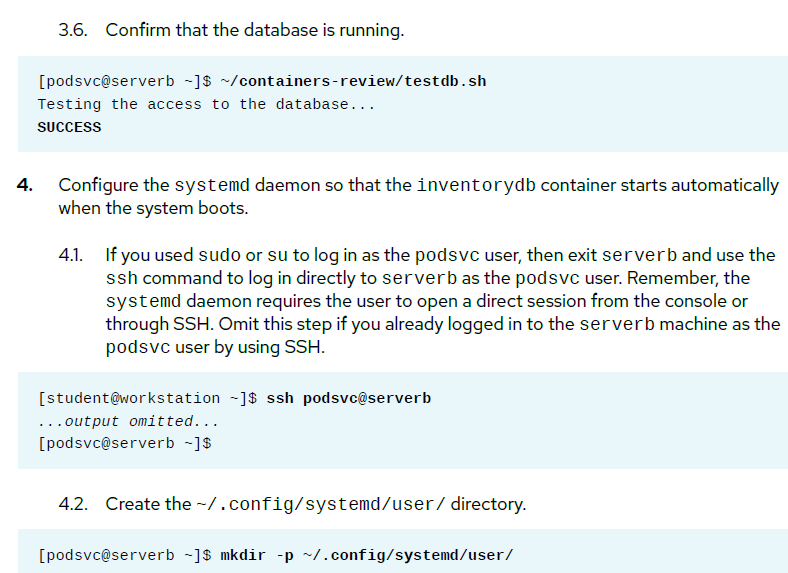
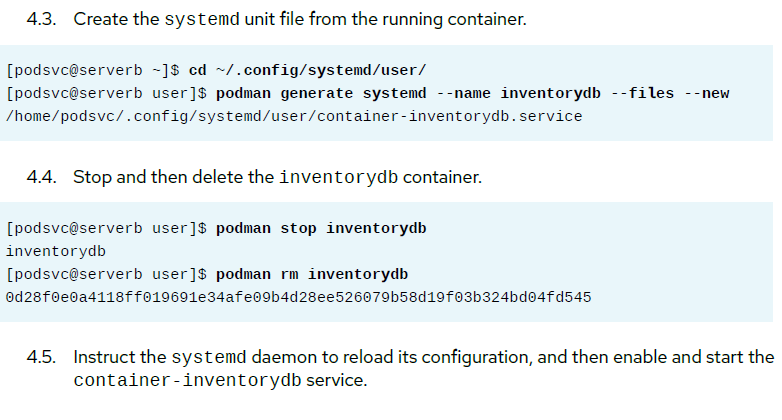
Create a systemd service file to manage the webapp container with systemctl commands. Configure the systemd service so that when you start the service, the systemd daemon creates a container. After you finish the configuration, stop and then delete the webapp container. Remember that the systemd daemon expects that the
container does not exist initially.
[contsvc@servera ~]$ mkdir -p ~/.config/systemd/user/
[contsvc@servera ~]$ cd ~/.config/systemd/user
[contsvc@servera user]$ podman generate systemd --name webapp --files --new
/home/contsvc/.config/systemd/user/container-webapp.service
[contsvc@servera user]$ podman stop webapp
[contsvc@servera user]$ podman rm webapp
750a681bd37cb6825907e9be4347eec2c4cd79550439110fc6d41092194d0e06
[contsvc@servera user]$ podman ps -a
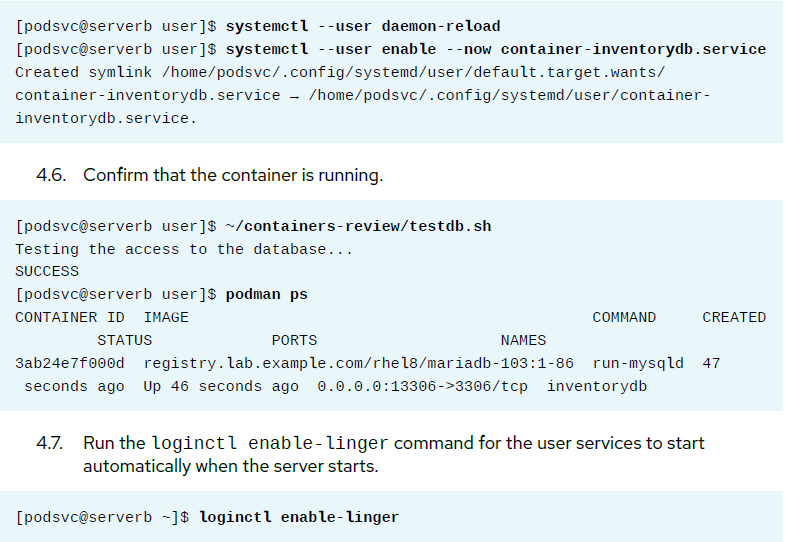
Reload the systemd daemon configuration, and then enable and start your new container-webapp user service. Verify the systemd service configuration, stop and
start the service, and display the web server response and the container status.
[contsvc@servera user]$ systemctl --user daemon-reload
[contsvc@servera user]$ systemctl --user enable --now container-webapp
[contsvc@servera user]$ curl http://localhost:8080
[contsvc@servera user]$ podman ps
[contsvc@servera user]$ systemctl --user stop container-webapp
[contsvc@servera user]$ podman ps --all
[contsvc@servera user]$ systemctl --user start container-webapp
[contsvc@servera user]$ podman ps
Ensure that the services for the contsvc user start at system boot. When done, restart the servera machine.
[contsvc@servera user]$ loginctl enable-linger
[contsvc@servera user]$ loginctl show-user contsvc
[contsvc@servera user]$ su -
Password: redhat
Last login: Fri Aug 28 07:43:40 EDT 2020 on pts/0
[root@servera ~]# systemctl reboot
When the servera machine is up again, log in to servera as the contsvc user. Verify
that the systemd daemon started the webapp container, and that the web content is available.
[student@workstation ~]$ ssh contsvc@servera
[contsvc@servera ~]$ podman ps
[contsvc@servera ~]$ curl http://localhost:8080
LAB: RUN CONTAINER
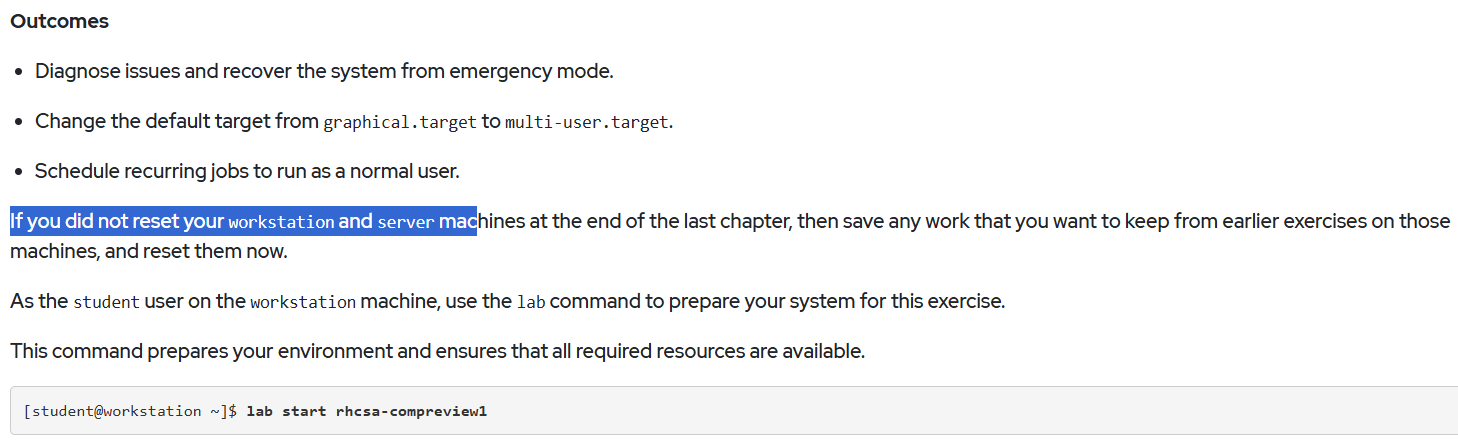
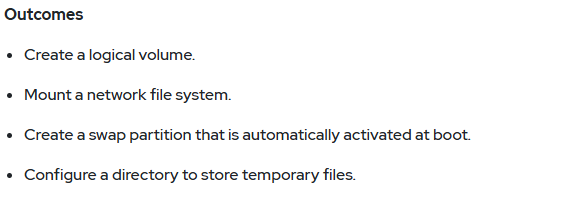
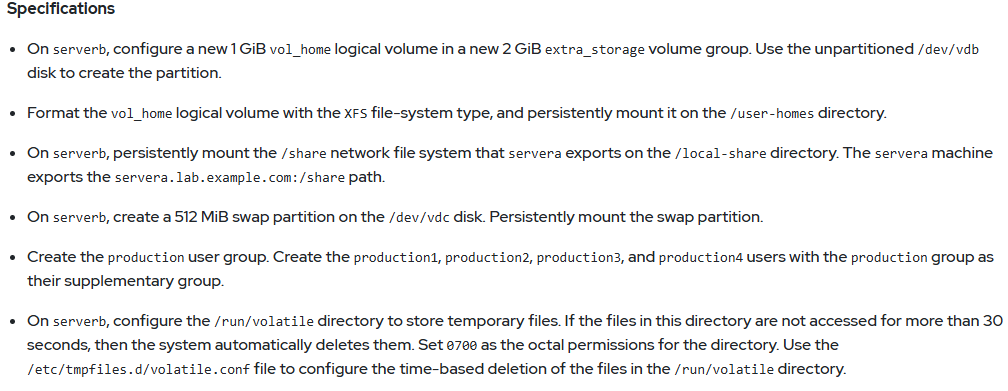
Chapter 14. Comprehensive Review