Probable Problem Solving for macOS Devices
Problem: System Info Check and Sign Out the Apple ID
Graphical View:
Method-01:
Choose Apple menu > System Settings, then click General in the sidebar. (You may need to scroll down.) Click About, then click System Report.
Method-02:
Apple icon Upper tab => About This Mac => View the system info in different tab + System report.
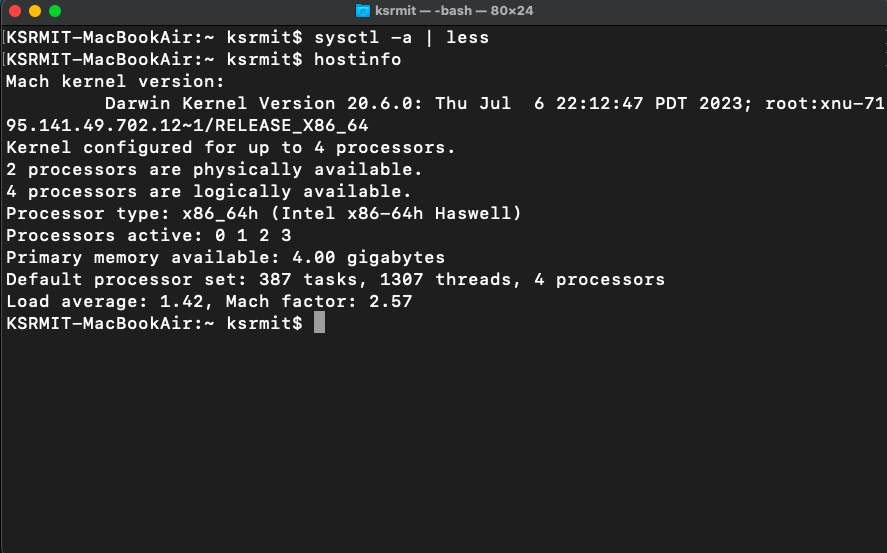
Terminal View:
$ system_profiler -listDataTypes
$ system_profiler SPSoftwareDataType SPHardwareDataType
Or
$ hostinfo
$uname
Problem: System ON/OFF
Sudo shutdown -r now (restart)
Sudo shutdown -h now
Sudo shutdown -h +10 (poweroff)
Sudo shutdown -h 15:00
Sudo shutdown -s now (sleep)
=> Manually By Keyboard Option-
For an immediate restart, press and hold the "Control + Command + Power buttons" at the same time.
or
press and hold the "Control + Power buttons" at the same time.
Problem: How to Reset Siri and Apple Intelligence iOS 18.0
1. Settings >Action Button > Check-Out "Apple Intelligence" > Talk to Siri > Toggle Off
2. again Press the side button on for Siri > Click on "Hey Siri"
3. "Apple Intelligence" Allow


Problem: Search Bar on Screen (Spotlight Search)
Command+spacebar in short command.
Problem: Permanently Delete Files
command()+option(alt)+delete for permanently removing the files.
command()+delete files move to trash.
Problem: MacOS Recovery Partition
Restart mac => press (command+R) until showing the apple logo while starting mac => showing macOS recovery window and click Utilities from upper tab => Click terminal => Open-up terminal
Problem: How to enable Root User (System administrator) on MacOS
=> Initially, root user disable by system, and It is defined as System Administrator by MacOS.
$su -l root
=> find more info, read /etc/passwd file total information for root user of MacOS PC/Laptop
$cat /etc/passwd
=>edit the root password by below this command -
$sudo passwd root
New password:
Retype new password:
=> Login Root user GUI mode
Problem: MacOS Sudoers Files
=> file name /etc/sudoers from root user (system administrator)
#vim /etc/sudoers
……………………………..
……………………………..
:wq!
=> write the user name below the root in the sudoers file.
user ALL=(ALL) ALL
Problem: Third Party Software Installation/Uninstallation
Method-01: Allow 3rd Party Software
$sudo spctl –master-disable (if permission denied showing)
Restart mac => press (command+R) until showing the apple logo while starting mac => showing macOS recovery window and click Utilities from upper tab => Click terminal => Open-up terminal
$csrutil disable ( system integrity protection - disable)
$sudo shutdown -r now
Open Terminal from Spotlight of mac
$csrutil status
$sudo spctl –master-disable
Method-02: for firewall issue
Check firewall and allow by pressing Open Anyway button.
$sudo spctl --master-disable
$sudo spctl --master-enable (again problem will be showing)
Problem: How to Install / Uninstall Software
Method-01: From AppStore for Free / Paid Apps
=> Click on Get option for an Application
=> following the next step
Method-02: From .dmg (Disk Image) / .pkg file
=> Double click on the .dmg/.pkg files of the application.
=> Drag the software.app files to the Applications into the Finder window.
Problem: How to add Extension Safari on MacOS
=> Go to AppStore
=> Search SaveForm.net extension named meddlemonkey
=> Click on Get Option
=> Next click on Open
=> Command+Q => (Quit the Safari)
Problem: How to add Extension Chrome on MacOS
Problem: How to add extension OrangeMonkey for Chrome in Windows PC
Problem: How to Change the Hostname GUI mode on MACOS
GUI Configure:
=> Click on Apple icon Upper Tab => System Preference => Sharing => Change Computer name => Click on Edit.
Check from Terminal:
$ hostname
$ echo $HOSTNAME
Terminal Configure:
Change Primary Hostname:
$ sudo scutil --set HostName “KSRM’s Macbook Air”

Change Computer Name:
sudo scutil --set ComputerName <new_name>.
Change Local Hostname:
$ sudo scutil --set LocalHostName KSRMIT-MACBOOKAIR
Problem: How to Remote Management ON/OFF
=> System Preferences => Sharing => Remote Management service => Check Mark for ON
=> Allow Access for Specific users
Problem: How to Enable Virtualization on MacBook Bootcamp Assistant
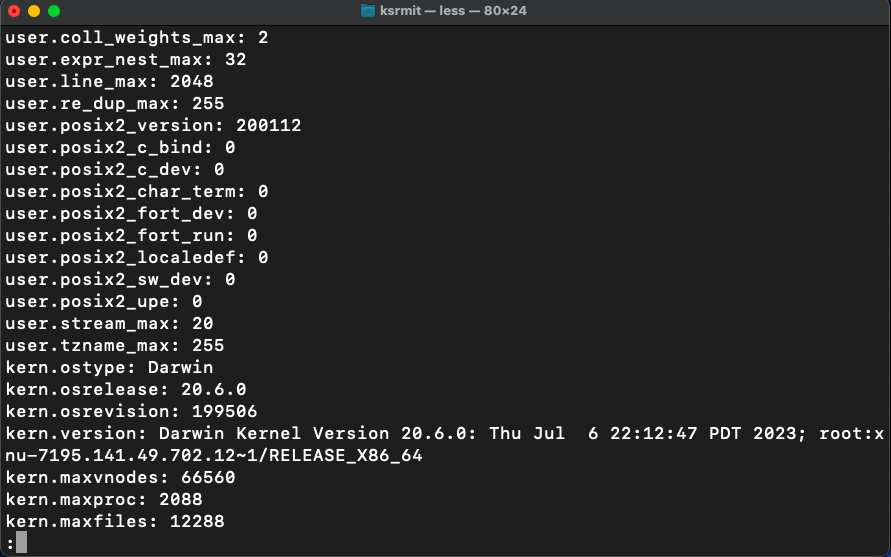
Problem: How to check VT-x (CPU Hardware Virtualization) status on MacBook macOS
$ sysctl -a | less
$ sysctl -a | grep machdep.cpu.features
machdep.cpu.features: FPU VME DE PSE TSC MSR PAE MCE CX8 APIC SEP MTRR PGE MCA CMOV PAT PSE36 CLFSH DS ACPI MMX FXSR SSE SSE2 SS HTT TM PBE SSE3 PCLMULQDQ DTES64 MON DSCPL VMX EST TM2 SSSE3 FMA CX16 TPR PDCM SSE4.1 SSE4.2 x2APIC MOVBE POPCNT AES PCID XSAVE OSXSAVE SEGLIM64 TSCTMR AVX1.0 RDRAND F16C
$ sysctl -a | grep -o VMX
VMX
Problem: Manage to Clear Cache in Safari on MAC
https://support.apple.com/en-gb/guide/safari/sfri11471/18.0/mac/15.0
Method-01
1. Go to the Safari app on your Mac.
2. Choose Safari > Settings, then click Privacy.
3. Click Manage Website Data.
4. Select one or more websites, then click Remove or Remove All.
Method-02:
Open Safari and go to Safari Settings (Command-Comma)
Go to the Advanced tab and select the checkbox next to the "Show Develop menu"/
Click on Develop from Upper task bar => Empty Caches
Restart Mac.
Problem: Remove system temp files
Quit or close any open and active apps. To make sure this is done, Force Quit anything that hasn't closed properly. Anything that needs to be closed that way might benefit from a cache clearout.
Go to the Finder.
Press down the Shift+Command+G keys to pull down the Go to Folder menu.
Type ~/Library/Caches/ and press Return.
Problem: Safe Mode on Mac
https://support.apple.com/en-us/116946
Method-01:
Restart the Mac and press down Shift Key until loading macOS and login the user
Go to System Info => Click on Software => Boot Mode: Safe
Method-02:
Shutdown the Mac => Boot Again & Hold down Power button until Loading the MacOS and release the power Button.
Problem: Command(⌘)+R for macOS Recovery Not Working: Fixing the issue with Multiple Probable Ways
- Internet Recovery Mode
- Reinstall Original macOS
- Install macOS Option and so on
Start up your Intel-based Mac in macOS Recovery (choose another option)
1. Use Option + Command + R (Internet Recovery Mode)
2. Shift + Command + Option + R (Reinstall Original macOS)
1. Reset NVRAM/PRAM (Non-Volatile Random Access Memory)
2. To Reset the SMC(White Screen of Death recover tool) -
3. Option Key (Boot to Startup Manager)
4. Shift Key (Safe Mode)
5. Create a Bootable USB Drive (If you have another Mac available)
- Bootable from Windows devices
- Bootable from MacOS devices
- Download the TransMac Software for booting macOS into the USB TransMac_For_Windows
- Download the macOS file as .dmg extension. Official_macOS or macOS-X-images
- Extract the masOS by TransMac software into the USB & It will not showing by windows PC due to not supporting issue. But remember it will be visible as removal drive in the windows PC.
- Boot with this Pendrive by connecting with the USB port of macOS device and Press Option(ALT) Key for Boot manager.
- Press the Options button for showing MacOS Recovery Mode.
- Click on Disk Utility for HDD information as, formatting/Partitioning(APFS or Macintose Extendend-Journaled or exFAT)/First Aid for disk treatment/Mount or Unmount etc.
- Restart and Click on Install macOS Sequoia.
- Following the next steps for completing installation.
- Need a Running macOS Device and making Bootable Pendrive as exFAT format.
- Download the macOS Sequoia from Apps Store.
- Following steps -Terminal code:


Problem: How to recover from the Black/White Screen of Death when booting a Mac
Hardware Problem solving -
//Disconnect all external devices
//Force shut down and restart
//Check display brightness
//Test with an external monitor
//WiFi Module failure
Software Problem Solving -
PROBLEM: IS THAT POSSIBLE TO DEPLOY TIME MACHINE (TM) DATA BACKUP OF MACOS TAHOE (UPGRADE) INTO THE MACOS SEQUOIA(DOWNGRADE) OR VICE VERSA?
Details-01: step-by-step guide to make a Time Machine backup on Existing macOS on Ex-HDD.


b) Two way upgrade macOS Tahoe, by bootable or Upgrade manually -

c) Check the Upgrade macOS info -


Details-03: Deploy the Backup Data from TM to macOS Machine.


Probable Solution: Prevent Rapid Battery Drain after Updating macOS Tahoe
1. Check Activity Monitor for Resources Hogs :
- Spotlight Search => Activity monitor.app
2. Disable Unused Startup apps :
- System settings => General => Login Items & Extensions => Open at Login => Minus Unwanted apps
3. Turn Off Background App refresh :
- System settings => General => Login Items & Extensions => App Background activity (Check or Uncheck)
4. Reduce Motion / Transparency :
- System Settings => Accessibility => Motion => Reduce Motion (Uncheck/Check)
- System Settings => Accessibility => Display => Reduce Transparency (Uncheck/Check)
5. Update All Apps :
- From Apps store.app => update all apps
6. Lock Screen Sleep timer :
7. Appearance Settings :
8. Battery Settings :
- Low Power Mode - Always
- Battery health -
- Optimized Battery -(Check/Uncheck)
Navigating the File System -


Network Utilities -


